

Introduction: Moon Shots Using Eyepiece Projection


Step 1: Eyepiece Projection

Eyepiece Projection is the technique of placing a camera in front of the telescope eyepiece where your eye usually goes.
When using even a small telescope and a bright object such as the moon, you can simply hold a digital camera up to the eyepiece and snap pictures.
Be sure to turn off your camera's flash.
Hold the camera up to the eyepiece and slightly press the camera's snapshot button. Partially pressing this button usually will allow the camera to auto focus. When the camera is set, take the picture. Using this technique you take many pictures and only keep the one out of ten that are good.
You may also make a simple camera holder that positions the camera near the eyepiece. Several options exist for doing this. Most cameras have a 1/4 inch 20 threads per inch mounting hole normally used to attach the camera to a tripod. You can construct a holder that attaches to the camera using this mounting hole and attached to either the eyepiece or to the body of the telescope. Which one you use may depend on the weight of your camera. Remember that when you use the camera's zoom option, that the camera lens may protrude away from the camera body. Make sure that you allow for enough clearance between the eyepiece and the camera lens when the camera is mounted.
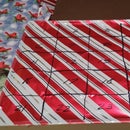
Step 2: Sample Moon Pictures


Here are a few Moon pictures I've taken using this technique.
Participated in the
Celestron Space Challenge


