

Introduction: Mr. & Mrs. Potato Head Costumes
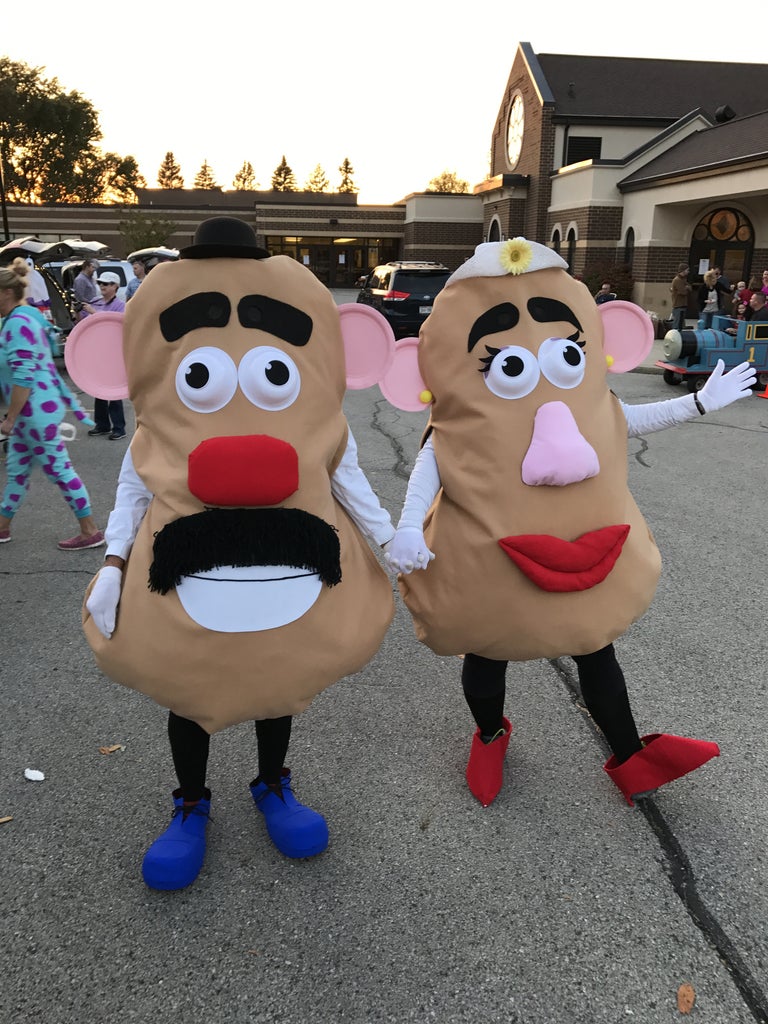
My husband and I enjoy making costumes of duos that will be well known to kids for our church/school Trunk or Treat event each year. This is our Mr. and Mrs. Potato Head and they were a big hit.
Step 1: Making the Potato


To make the body of the potato, I first drew out the potato shape in the size I needed on a large piece of paper. There is a lining on the inside so that the stuffing is between two layers of fabric. I cut the lining the same size as the outer potato except a little shorter on the top of the head to leave room for stuffing there. I made the outer potato out of beige felt and the lining out of brown felt. I sewed the two pieces of the outer potato together, leaving openings on the sides for ears and arm holes, as well as at the bottom. I did the same for the lining except I didn't need the opening for the ears. (Now I had what looked like 2 potatoes.) Slide the lining inside the outer potato with seams between the 2 layers, matching them up at the armholes. I attached both layers at the armholes giving them a finished look. (I googled "how to put a lining in a sleeveless top" to learn how to do that). The outer potato and the lining are open at the bottom to allow stuffing. I closed it up with hot glue after stuffing but I think Velcro would've been a better choice.
Step 2: Eyes, Eyebrows and Ears


The eyes were made from plastic bowls from the dollar store. The black center and white dot are made of felt. The eyes (bowls) were then hot glued to the potato. Mrs. Potato Head has three eyelashes added to each eye made from black felt and a bit of lavender felt on the top of the eye for "eye shadow". The eyebrows were made of black felt. There's a hole cut in each eyebrow to see through. I hot glued the inner and outer potato layers together around each eye hole to prevent shifting and blocking vision. Under the eyebrow, I glued a small piece of black screen (window screen) so it blended more with the eyebrows. The eyebrows are hot glued to the potato. The ears are pink paper plates from the dollar store. They are hot glued into the opening left on the sides for the ears. Mrs. Potato Head's earrings are ping pong balls colored with yellow permanent marker and glued into place.
Step 3: Noses, Mouths and Mustache


For both noses, I cut a piece of poster board to the desired size and shape. Then I piled poly fill on top of it and stretched fabric in place around it, hot gluing it to the poster board on the back side. I used a stretchy t-shirt type fabric for both noses to make that stretching possible. Both noses are hot glued to the potato. Mr. Potato Head has a piece of white felt for his mouth. The black line is also felt. (I tried a black marker but it soaked into the felt and didn't leave a nice, black line.) The mouth is hot glued to the potato. Mrs. Potato Head's lips are made from a red t-shirt. I drew the desired size and shape on paper and cut 2 layers of fabric. I sewed the two layers together, leaving an opening for turning. After turning it to the right side, I hand stitched the opening closed and sewed the line through the center to separate upper and lower lip. On the back side, I cut a slit in both the upper and lower lip to put stuffing in each part. I loosely closed up the openings and hot glued the lips to the potato. (Those openings are then hidden on the back side of the lips). For the mustache, I cut a piece of black felt to the right size and shape. Starting at the bottom, I glued layers and layers of short pieces of black yarn, moving up the mustache with each layer. When finished, I gave the mustache a much needed trim. The mustache is hot glued to the potato.
Step 4: Shoes, Hats and Clothing

Mr. Potato Head's shoes were a large pair of plastic clown shoes. They were originally red and I painted them blue. Mrs. Potato Head's shoes were more work. I cut pieces of poster board to resemble a high heel. I shaped the pieces around an old pair of athletic shoes. Then I covered the poster board by gluing on pieces of red felt. Then the "red shoes" were hot glued to the athletic shoes.
Both hats I found at Goodwill. Mrs. Potato Head's hat was just a floppy white hat. I flipped up the front of the brim and glued it in place and added the flower.
My husband and I both wore black leggings and long-sleeved white t-shirts and white gloves to finish the look.
Step 5: Stuffing
The last step is to stuff the potato between the two layers of fabric. Poly fill is kind of expensive so we were looking for a cheaper alternative that wouldn't be noisy (like newspaper). We ended up using bubble wrap. It worked fine but I really think poly fill is a better choice. Over the course of the couple hours we wore them, the bubble wrap started to settle to the bottom. I think poly fill would stick to the felt inside and would probably stay in place much better. I mentioned earlier that Velcro to close that opening in the bottom would be better. That's because in the case of settling, it will be much easier to open it up again to reposition the stuffing. Stuff especially the front and sides (all the way to the top of the head) until you've reached the desired puffiness.
Step 6:

Participated in the
Halloween Contest 2019


