

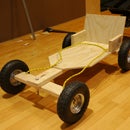
Introduction: Multi Sega Case Retopie Sega Case Mark 1


Retropie Emu built out of a old sega case using Retropie image all instruction are on their site software wise I have put what I used on here.
Step 1: List of Parts & How to Build
1) 1 old sega game case's from 'ebay'
2) 2x pcb board 16cm x 10cm from 'ebay'
3) 11 tac switches 2 red hat switches from 'altronics'
4) 1 hdmi kit 5" lcd from adafruit
5) 1 ps3 game controller pc compatible from arcade world UK & US or 'ebay'
6) 1 Soundblaster usb no wires are better from 'ebay'
7) 2x usb cables & 1 hdmi cable to fit case from 'ebay'
8) 1 amp small ebay 2 to 3 watts 1 speaker 2 to 3 watts from altronics
9) 1 B+ Rasberry pi computer from adafruit
10) 1 usb pny 256gb from 'PNY' or 'ebay
11) 1 heat sink kit for overclock from 'ebay'
12) 1 16gb sd card micro.
13) On a 3d plastic printer or some other means make a 15mm spacer for middle of sega case.
14) adafruit battery's 2x li-ion 6600mah 500c boost converter & charge unit.
Building:-
1) First you will need a raspberry pi B+ keyboard usb logitech game pad or generic, program buttons for menu when u get to boot stage.
Go to site download sd image retropie 1 ' http://blog.petrockblock.com/retropie/retropie-do... '
Second you will need to download go to site win32 disk imager ' http://sourceforge.net/projects/win32diskimager/f... ' 16gb sd card needed to 'write' image to hd or usb to sd.
Boot raspberry pi B+ program directional button selection white screen
will pop up asking you to do keyboard or game pad you can program, the game pad later use keyboard first get to know the program read & youtube retropie.
you will also need a usb sound blaster here are some of the sites & code I used :-
Audio:
http://blog.petrockblock.com/forums/topic/thoughts... http://elinux.org/RPi_VerifiedPeripherals#USB_Sou...
http://blog.scphillips.com/2013/01/sound-configura...
Audio Test any wav file:
alsamixer: aplay -d plughw:1,0 /home/pi/starwars.wav sudo nano /ect/modprobe.d/alsa-base.conf
Audio settings:
/etc sudo nano retroarch.cfg
More performance:
audio_enable = true audio_out_rate = 22050 audio_driver = sdl audio_sync = true
Update to the latest Retropie Retropie setup script & all other instructions should be on the site petrockblock blog site.
Manually install retroarch this program makes it easy to set settings in games.
USB Thumb drive Edit rom folders & other :-
**http://emulationstation.org/gettingstarted.html#config** **http://www.raspberrypi.org/forums/viewtopic.php?f=78&t=85328**
http://mardell.me/blog/how-to-load-roms-from-a-usb... nano /opt/retropie/supplementary/ESConfigEdit/testfiles
prob solved itlest for edit use: sudo find / -name es_systems.cfg Two fils came up
This one works: sudo nano /etc/emulationstation/es_systems.cfg
sudo nano /opt/retropie/supplementary/ESConfigEdit/testfiles/es_systems.cfg sudo reboot sudo shutdown -h now.
vid modes making sure it's vid mode '1' eg for usb & vid modes all EMU's look for runcommand.sh 1 make sure it is 1 ,usb look for PATH there are two you need to change for each of them.
PATH=/media/usb/atari800
DESCNAME=Atari 800
NAME=atari800 PATH=/media/usb/atari800 EXTENSION=.xex .XEX COMMAND=/home/pi/RetroPie/supplementary/runcommand/runcommand.sh 1 "/home/pi/RetroPie/emulators/atari800-3.0.0/installdir/bin/atari800 %ROM%" PLATFORMID=22.
2) Game controls you need to keep some of the screw points to fit a horse shoe circuit board using tac switches & the old rubber shoes, from the old sega I did have a lot of old sega's to make up for my buttons you may have to mod you model you could use other switches for you buttons look at my red buttons these just had two connections & could be easier to get hold of. Once done take you mame controller board from arcade world & wire up your buttons try to put all grounded wires together from one side of the horse shoe to the other side I had two to make it easier for me look at solider points diagonally across -+ for tac switches.
3) Heat sink kit for overclock peal of protection & stick big heat sink on the big cpu middle chip on the raspberry pi the little one is for the volt controller but is not needed for the b+. Important not responsible for overclocking do at your risk their are site included in my Software site's & web addresses I went to googleing.
4) Sega case you need a dremel tool to take as much plastic away battery compartments away as possible any edging must be removed &, later make fit with dremel all boards wiring using them as a guide to were you mite put them as some boards mite be different sizes eg hdmi board if you have a silver painted inside case you must insulate inside as I had that problem other wise try buy a old part sega orange inside or other.
5) Adafruit battery's 2x li-ion 6600mah 500c boost converter & charge unit Instruction are on this site :- https://learn.adafruit.com/adafruit-powerboost-50...
I attached this by Velcro sticky strips.
6)Have a good look at the pictures & links in Software site's & web addresses I googled also adafruit products have very good instructions to follow.
Your model mite be differ to mine eg buttons game case & most important have fun.
Step 2: Software Site's & Web Adresses I Went to Googleing

Retropie site:-
http://blog.petrockblock.com/retropie/
Retropie Image:-
http://blog.petrockblock.com/retropie/retropie-downloads/
Retropie setup initialization script:-
Retropie Problem work around Web pages :-
Audio-Stereo-Amplifier-Board-Module-2-3W-USB-Power:
http://www.ebay.com.au/itm/Digital-DC-5V-PAM8403-A...
Arcade Parts:
http://www.diyarcade.com/diy-arcade-starter-kits
Maping controllers:
http://weekendengineer.wordpress.com/2014/08/28/ma...
Overclock setting at your own risk:
https://github.com/petrockblog/RetroPie-Setup/wiki...
How to edit retroarch.cfg:
http://blog.petrockblock.com/forums/topic/how-to-...
Gethub RetroPie 3.0 BETA SD Image Released! (see changelog):
https://github.com/petrockblog/RetroPie-Setup/wiki...
Raspberry pi Pinout b+ & 2:
http://pi.gadgetoid.com/pinout
http://pi.gadgetoid.com/pinout http://planetcalc.com/2283/ http://pi.gadgetoid.com/pinout
Calculating battrey life:
http://www.rapidtables.com/convert/electric/mah-to...
http://www.rapidtables.com/convert/electric/wh-to...
Configuring EmulationStation:
http://emulationstation.org/gettingstarted.html#co...
Retropie-Roms from Usb help:
http://www.raspberrypi.org/forums/viewtopic.php?f=...
How to load ROMs from a USB drive on RetroPie:
http://mardell.me/blog/how-to-load-roms-from-a-usb...
Emulation Station Scraping - command line your choce weater to use the one provide or these or others on web :
https://www.youtube.com/watch?v=bg20m5pPjns
https://github.com/sselph/scraper/
Thoughts on USB audio devices:
http://blog.petrockblock.com/forums/topic/thought...
http://elinux.org/RPi_VerifiedPeripherals#USB_Sou...
http://blog.scphillips.com/2013/01/sound-configura...
Emulators in full screen:
http://blog.petrockblock.com/forums/topic/emulator...
RPiconfig:
documentation > configuration > config-txt
Step 3: Photo's of Project :-


I do also plane to use the rasberry pi 2 which is shown in one of the pictures later on & use retopie's new image please do read the new note's I have made in the pictures above .
Step 4: Instuctions & Software to Use
- Download Win32DiskImager-0.9.5-install from:
Download Retropie 1v 2.6 From:
- Format if neserery your 16gb sd micro & use Win32DiskImager-0.9.5 by placeing your image into program then select drive letter your sd is in, then press write for image to make a backup if needed press read to make an image of the sd card this can be done later.
- Setup & install RetroPie Setup script folow instrution on this wed site:
http://blog.petrockblock.com/2012/07/22/retropie-s...
I perfer to use when you get to it install it will take over night to download wearth doing 2)Source-code based installation but you can use 1)Binaries-based installation just to see what it's like or to test.
Other programs you can use are Putty & FileZilla Client Warning with FileZilla do not edit file once you have copy file or files to windows, as they use different file propertys to save file's use linux sudo nano 'dir file' eg.
Refer to work arounds & have a google at other people if u have any problems there are lots of youtube vids to help as well.
- Have fun & enjoy


