

Introduction: My Little Paracord Splicing Guide


Don't panic yet!
I won't go into making all sorts of things with paracord.
If you want to explore this then please check some of the links on the right side of this window.
What I want to do is show you some nice ways of working with paracord for the purpose of joining cords, making proper eye loops and so on.
So far there are two lessons, joining and making an eye splice as it covers most of what we do with the cord.
Based on the feedback I will add more lessons for the splicing needs you might have.
Step 1: Why I Think We Needed Yet Another Thing About Paracord
I used paracord long before I even knew the real name for it.
And with some family background in sailing big ships I got a lot to learn when we had those weird family gatherings.
Let's just say one really old bloke did not like them either and we both liked ropes and knots.
When I look at certain Youtube videos or people claiming to show ways of splicing or joining paracord then one things stands out:
Almost always the resulting thing is only be able to look good but not to support the strenght of the cord.
If you only do decorative things with no need of keeping most if not all the strenght of the cord then read no more.
If you want to find out some things you might not know yet or always wondered why your joined cords failed to support real use then read on!
I just think that if you join or slice paracord you might as well do it right the first time you try it.
Step 2: Before We Start...
When you work with paracord you should use knifes or scissors suited for cutting it without frailing the fine fibres.
Nothing is worse than working with cord that constantly keeps unwrapping.
You will need some of course, so here is a little list:
# Paracord or 4mm fid(s) of your choosing
# Locking hook needles in various sizes - those from the fish and takle store do just fine
# A safe source of fire - I suggest a lighter
# Some waxed dental floss for some of the advanced parts of the lessons, braided fishing line works too
# Patience and steady hands ;)
# And of course some 550 paracord
I might suggest some additional things in the advanced parts.

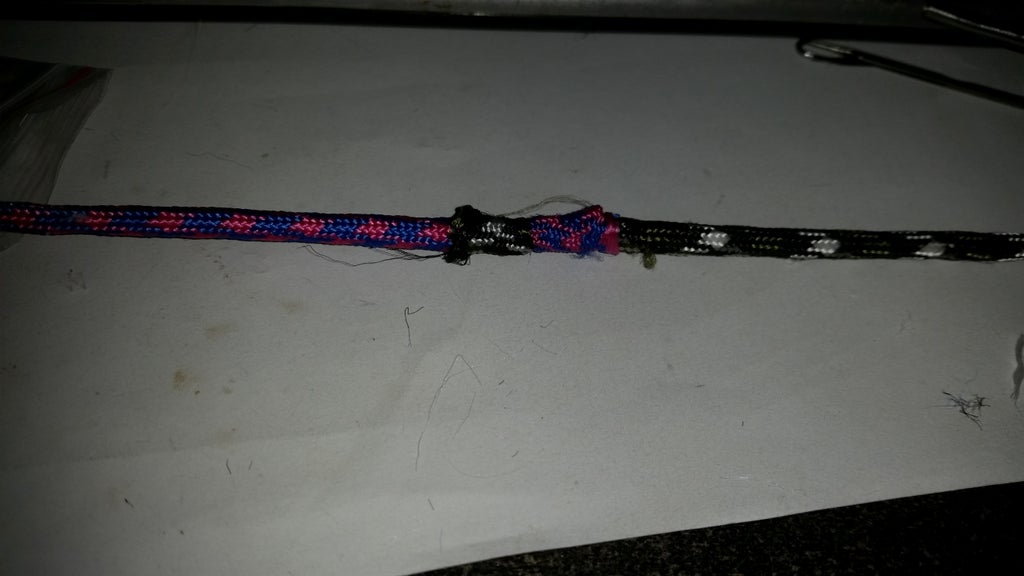
Step 3: Lesson One: Splicing Two Cords Together
When it comes to the end of the line you always have to decide if a quick knot or a slightly more complicate slpice is required.
Your trailer might not care about a knot when securing the load but if it needs to go through a pulley or similar splicing is often the only way.
As said most videos will show you how to splice gutted paracord or just a very quick and simple way.
Mil spec 550 cord will support 550LBS of load.
That makes around 250kg for those in the other parts of the world.
Most of us go cheap instead of buying a certified cord, so lets be safe and assume a sound 200kg that we want to keep.
Assuming this also eliminates the losses we always face when splicing lines and those tolerances from cheap china imports.
With that in mind we must create a connection that is both flexible enough and able to keep the load rating of the cord as high as possible.
Of course this is only possible if the thin core lines are spliced correctly and with the most support possible.
In the last step you could see some of the tools I use through out this Instructable.
For this relatively simple task I will use a standard fid and a hooksize that fits the purpose depending how much the core lines dare to resist me.
Please check the pics first to get a quick overview of what I am doing.
I will explain some of the steps with more detail with the images but it really helps to see it develop first before actually reading the explanations.
We start by marking the two cords so we end up with equal lengths on both of them.
For a standard connection where maybe not all the strenght is required you can go quite short.
I suggest to simply use the length of a standard fid as a guide as seen at the start of the video.
When working with long lines you should stretch the sleeve and then secure the line with some nice knot.
I concentrate on the splice only.
After marking the sleeve use the fid to open the cord and then mark the inner lines as well - this will make sure sleeve and cores are at equal lengths when we are done.

If you know the "Brummel Lock" or the "Manny" for gutted cord you already know that we need to literally lock the two sleeves of the cord to support proper loads.
However, the core lines are what gives the cord the actual full strenght.
The Brummel Lock in it's standard form works for ungutted cord as good as gutted but it does not support the maximum load this way.
To overcome this flaw we need to get the core lines out of one sleeve and inside the other sleeve - at the point where the cords are locked.
This is the reason why I removed the core lines.
I also don't use simple holes for this lock but instead feed the needle through the sleeve a bit - about twice as long as the cord is wide.
This is to provide a better compression for the core lines once everything is pulled tight.
Pay close attention where and how you lock the sleeves!!
You need straight access for the core lines to go through!
In the next pic I twisted one sleeve to show you how bad it would to leave it like this - I fixed that right after taking the pic.
I used a hook to get the core out but you can do it the way you prefer.
Now the other ends of the lines are fed through the gutted cord to create our lock.
On longer lines it pays off to have metal tube for this feeding to prevent the core from bruning the fibres when pulling it through.
We would have a secure lock on the sleeves if we would pull it all tight together right now.
But like this we also have lose core lines, so let's fix this, shall we?
It can be a bit tricky to pull on the core lines and sleeves together until the markings on the core lines are right in our hole.
I prefer to do this in two stages, meaning I pull the sleeves first and then pull the core lines or stretch the sleeves.
Again I used fid and hook to feed the cores lines to the outside, making sure I have enough sleeve compressed so the cores will go fully inside once stretched.
To make sure we have a smooth transition the core lines are thinned out towards the end - I do this step right before pulling it all in.
If you have the markings on the core lines quite far out as a bit above image shows then stretch the sleeves first to get the markings as close to the joint as possible.
It will take you some pulling and stretching to get the core lines back into the other cords sleeve.
Again it pays off to work with knots once the cords are stretched so you don't have to do this task for the entire lenght of your line!

In the above images you see that the core is fed to the outside, on the right the core is already thinned out.
The sleeves are still compressed, when stretched out I inserted the hook about 2cm above the length I need for the core to disappear.

The core lines are now gone after pulling and stretching the sleeves but we still have this rather ugly looking sleeve problem....
If you don't mind or even prefer a bit of stiffness you can now use waxed dental floss to make half hitches around the sleeve, starting from the joint area in both directions.
You should fix the cord between two mounts to keep it under tension and then pull the free sleeves and secure them with a rubber band or so.
Like that you keep the cord as thin as possible.
This is the prefered option for maximum strength but for this you need to pull the knots with the dental floss or braided line really tight after making sure the sleeves and cores are aligned properly.
For a better optical look and better finnish we can also make the sleeve ends disappear into the other sleeve.
To do this we first open the sleeve to get the more individual strands.
Next step is to pull them through the core like before with the core lines.
A nice finnish is done with careful opening of the webbing, I did not care too much...
I also fed it all through one hole, using two on oppsite sites of the sleeve looks even better but is really hard to do properly as everything inside is pushed around as well.
For the use in pulley systems or similar I still suggest to add some dental floss, otherwise the connections done now.
In the next lesson you can see the difference in appearance when just wrapped with braided line.
I have done this not only on paracord but also on real ropes 2cm and thicker - the later often with two or three people pulling on heavy tools....
But I have also joined monofilament leader line to thick braided line in a quite similar way.
A question always asked when doing this for other people was "Will it hold?".
Paracord is not really easy to work with as compared to a rope it is quite thin material.
So the tools you use should be able to withstand some level of abuse.
The worst you can do is damage the fibres or feeding them through loops.
If done properly and for max strength with at least twice the fid lenght in core line to go into the other sleeve, the load capacity should be still over 80% of our 200kg target area, 160kg.
With dental floss half hitches pulled really tight over the exposed sleeves you should get 90% or more.
The only other way to get similar joint strengh that I know would be to stitch the cord together after feeding the core lines through.
That however would require very thin and strong yarn and a lot of time.
Step 4: Lesson Two: Brummel Type Eye Splice With Proper Strength
Reading this means you really dare to try an even harder splice...
Quite often we need a loop or an eye at the end of our cord.
The classic Brummel Lock Splice has a lot of strengh but this is basically at the expense of the core lines.
One reason why this splice is mostly used on gutted cord or when high loadratings don't matter too much.
We already know from the previous lesson that the core lines need to be handled correctly to share the total load capacity.
For a loop this is even more critical as you really want the sleeve and core line parts of equal lengths.
There are a lot of videos and slideshows showing how to do a Brummel lock splice.
Animated Knots has some of the best and the website offer them for free viewing.
Check it out here.
The link shows how to do it without feeding the other end of the rope through - which is quite handy for very long lines.
You can use the normal Brummel if you prefer and will do the same here.
But if you have 100m of cord you really want to consider the version from the video.
What we do differently is again to take the core lines out after marking them and the lenght we need for our eye.
Again check the pics first they basically speak for themself.
After taking the core lines out where the eye ends - at the short end of the cord, we make a Brummel style splice with the sleeve as usual.
At least for the first bit by opening the sleeve. ;)
But as said we don't use a hole, we use a short tunnel to feed the short end through.

The core lines should now be fed into the long end of the sleeve where it is the straight line.
To be precise: The core lines are fed into the long sleeve after the short sleeve is pulled through the hole and aligned with the markings.
I used a hook and entered about 2cm above the max length of the core lines - that is again starting from the lock point where the core comes out.
I use a thin probe to keep the core from going in all the way.
This helps to align the markings ;)
As you can see I already thinned out the core lines but the sleeve is still compressed.

You can't really see it in the pic but I actually kept the loop for the core a bit shorter than what the loop sleeve is.
The purpose of this is that we need a bit of tension on the core when we do the final steps.
When the long end of the cord is pulled through the second hole for the Brummel we feed the core lines back into the short sleeve - again make sure to align the markings.

The distance between the two locking points will disappear when we pull it all close!
I did not pull with a lot of force here, just enough to align everything properly.

Tricky bit is now to pull the core lines through while getting the sleeves to move together to form the lock.
It helps to use an anchor point for the loop so you can really pull on both sleeves and the core lines.
But first do it by hand only and only on the long end of the line and inside the loop!
Sometimes shortening the sleeve and marking the core lines at this point also helps, at least to get a better grip on the core lines. while they are still outside, but this is again very tricky as it leaves the joint area without tension.
If the sleeve feels hard and round in the eye it means the tension is correct.
A loose and wobbly sleeve means the core is still too short inside the loop and you need to to work the loop again to stretch it all properly.
Only once the eye feel hard and tight you should get full load and pull on everything to get the sleeve to tighten around the core.
If you do it too early you will have a damn hard time getting the sleeve tight around the core of the loop/eye.
To finnish off we could feed the short sleeve back into the long end but this is a painful process.
To give added support I prefer to wrap it all with dental floss or braided fishing line.
This will compress all and provide a tight grip on the core lines.
It is also a neat way to make the eye fit perfectly onto a metal eye - you know the thing...
Loose ends cut off for a clean finnish - do not use a flame to melt the free ends as you can damage the sleeve.
If in doubt just continue the wrap until you cover all ;)
If you need really a lot of security then you can feed the long end through the entire fee short end.
If wrapped or better knotted with dental floss or braided line it gives added grip on the core lines.
Having a clean and stiff finnish often helps to work the looped end of the line, especially when wet.
Just because it was a prefect match I used the leftover from the sleeve to slide back onto the line.
Not secured or anthing, just a lose protective sleeve.
If done correctly the core lines will match up with the sleeve end, although you might not be able to see that once finnished.
If your core lines won't disappear into the sleeve it means you need to stretch the sleeve properly.
Can be tricky, which makes some practise a requirement before attempting this out in the field.
Done properly won't even decrease the load capacity here as we have two sleeves compressing the core and a Brummel lock on the sleeve.
That does not mean your first one will match this...
Working with sleeve and core on seperate levels just takes more time and more practise to get done properly.
Don't be disappointed if your first attempts here only hold 100kg, you will get better with every new eye you make!
Step 5: Want More?
I could show you how to splice the single strands of the sleeve but I won't as this is only something for very lonely winter nights alone from everyone and at least 500km from the next house...
Joining lines and creating an eye loop are the most used types of splices.
For those demanding even more consider what you just learned first.
Of course you can always improve on the joining part to avoid feeding long lines through the joint...
Doing this with ungutted line however is a whole new level and you might never have a cord too long to feed through.
If want to try something different use waxed dental floss more often.
You can even secure and stiffen the ends of your cord with it which makes feeding it through holes much easier.
And as said it is even possible to attach monofilament line to paracord or braided line without making a knot into these.
If have very specific needs that might be of interest for others too than ask in the comments and I might add m
Step 6: Things You Should Never Do to Paracord If You Need the Full Strength.
People like to think the 250kg rating for 550 paracord means it will always endure at least that much.
After all it is the rated capacity or not?
Consider how the cord works:
The core lines give the most strength.
The sleeve adds to this and protects the core.
But only when the sleeve is fully stretched over the core to form a tight grip the cord will have maximum strength.
For this reason proper Mil spec paracord is sealed on both ends AFTER the sleeve was stretched to specs.
All cuts are done with hot knifes or similar tools and this bond between sleeve and core is only cut off once the side of the cord you work with is secured with a proper knot to prevent this balance from tipping.
So you should really never, ever just cut the cord or core lines without consideration.
A common practise is to just cut off the core if it hangs out of the sleeve for ease of working with the cord.
Every time you do this the sleeve is getting LONGER.
So long before the sleeve stops stretching and forming a tight fit the core lines will simply stretch or break under load.
For the usually low quality and unsealed paracord I prefer to seal one end and than use thick welding gloves and a lot of force to run along the sleeve to stretch it as full as possible.
Quite often the core lines disappear here as the stuff was taken from big rolls without any attention to detail.
To prevent this you can loop the core lines out of the sleeve a bit further and cut the sleeve off.
This way you can mark the core after each stretch until it is tight.
Once done lock with some pliers or similar, clean cut and hot seal.
Another thing I could see quite often is that people don't pay attention to the strands of the sleeve.
When you make holes for splices you want to try your best to get between the strands but not inside them.
The webbig is flexible and if you loop through a strand then this strand might fail early due to the added tension.
If you go through the space between then the strands can move free around the area.


