

Introduction: NODEMCU LUA ESP8266 WIFI Serial Dev Kit


If you have bought one of these kits, you might be wondering what to do with it as there is little or no information about how it works or what is connected to each pin.
Step 1: Modifications
At this time, these kits are available on Ebay and other suppliers for less than £3 if you purchase from China.
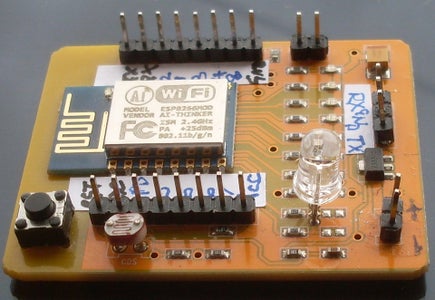
They are a very good value kit as there is an ESP-12 with 4 Mb of flash memory already mounted on a PCB with connection pins and a battery box.
I have modified my board by adding a reset button, removing the battery connection and adding 2 pins and relabelled the illegible pin numbers. By the way the RX and TX pins are labelled incorrectly on the 3 pin cluster.
You can supply the board with 5 volts if you connect to the battery terminal as there is a voltage regulator dropping it down to 3.3 volts. You can also feed the board at Vcc with 3.3 volts.
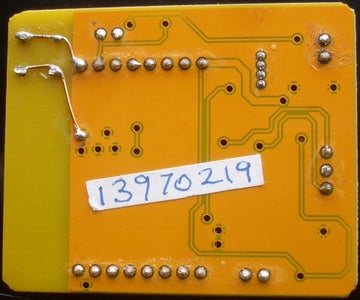
The number on the back is the chip's ID. As I now have 16 and counting of various ESP8266's it helps me identify them.
Step 2: Identifying the Pins
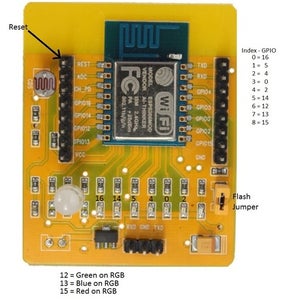
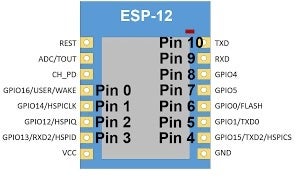
There are 9 I/O pins (11 if you use TX and RX) and 1 analogue pin available on the ESP-12.
Pins 0, 1, 2, 3, 4 and 5 are connected to the red SMD LEDs on the board. Pins 6, 7 and 8 are connected the the RGB LED as green, blue and red.
GPIO2 / Pin 4 is connected to the blue LED on the ESP-12 (as on other ESP8266 boards).
The CDS or LDR is connected to the ADC or AO pin.
A cadmium-sulfide (CdS) photo resistor (or photo cell) is a device that changes resistance depending on light intensity. They can be described by a variety of names from light dependent resistor, LDR, photoresistor, or even photo cell, photocell or photoconductor. As the squiggly face is exposed to more light, the resistance goes down.
The flash jumper needs to be shorted when flashing the ESP-12.
The RST needs to be momentarily shorted to GND (or the metal case) to reset the ESP-12. This can be done with a hook up lead or with a button as I have done with mine.
Step 3: Programming
There is nothing unusual about the ESP-12 on this board, it can be flashed like any other ESP8266.
I have included 2 lua programs here, DevKit.lua is specifically for this board and FlashSize.lua can be used on any ESP8266.
DevKit.lua flashes various LEDs and reads the analogue pin, it is well documented and should be easy to follow.
FlashSize.lua shows the size of the flash memory and other parameters. It also lists all the files in flash memory.
Attachments

Step 4: Conclusion
You can of course run other programs on this board, but here I have tried to demonstrate what its connections are and how to make it work.
I have written it in such a way that anyone new to NodeMCU Lua and ESP8266 can get started.
My other instructables cover more in depth and complicated uses for these boards.


