

Introduction: Naval Mine Mail Box - "Minesweeper" Style


Unusual and interesting mailboxes have been a feature of the Australian landscape for many generations. They help communicate the personalities of those living behind the otherwise anonymous gates and cattle grids that punctuate our long and dusty roads. They also provide a convenient landmark for visitors.
I had an old pressure tank from a water pump that was just asking to be made into something.
I like the iconic shape of naval mines, and I dig the way sea life has a way of making a habitat of even the most unlikely of man-made objects, so I decided to make a shipping mine with marine life growing around its mooring.
I have list this piece for sale in my Etsy shop.
If you are interested in seeing more of my work please feel free to check out my website de Burgh Steel. You might find some more ideas worth trying in there.
I hope you enjoy my work; if so please consider cling that VOTE icon at the top of your screen..
Step 1: Ingredients and Equipment


The most important item is the spherical tank. I'm sure there are other things that could be used, but old pressure tanks can usually be found at your local pump repairer. They are often thrown out and replaced when the rubber bladder fails. Most friendly pump shops will happily look out for an old tank for you if you ask nicely.
Other materials consist of whatever you can find:
- Some steel plate about 1mm thick for kelp.
- Pipe suitable for a post. About 1m long.
- Smaller diameter pipe to make the prongs.
- Some heavy plate to make a base.
- A hinge for the door.
- Rubber for the door seal. I used part of the old bladder from inside the tank.
- Glue.
- Paint.
Tools; I used the following...
- welder
- plasma cutter
- hammer
- grinder with various discs.
- all the usual workshop hand tools and safety gear.
Step 2: Make the Mine


- Remove the flange from the bottom of the pressure tank. Keep the bolts handy.
- Undo the nut that holds the Schroeder valve at the top of the tank.
- Drag the old bladder out and set it aside.
- Clean the old paint and rust off.
- Mark the position of the prongs. I did an image search to get ideas for the spacings. Bear in mind that the flange with be at the bottom to attach the post to.
- Cut the smaller pipe into appropriate lengths for the prongs. Mine were about 90mm long.
- Cut a disc of steel plate to cover the recess at the top where the valve was. Weld it into place.
- Weld all the prongs on. Make sure they are perpendicular to the surface of the sphere.
- Decide where the door will be. Mark it out and start cutting it out. Be sure to cut where the hinge is to go.
- Before the door is cut completely weld the hinge into position.
- Complete the cut and try opening the door.
- Weld something onto the door to prevent it closing too far. I used a washer. I also welded a chain link to the outside of the door so it went through the washer to allow it to be locked with a padlock.
- Cut out a ring of rubber from the old bladder. Make the outside diameter about 50mm larger than the door hole. Make the inside diameter about 50mm smaller than the door hole.
- Glue the rubber to the inside of the door hole to form a seal. I used Gorilla glue and lots of clamps.
- Cut a slot for letters and weld on a bit of steel plate to stop the rain from getting in.
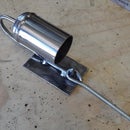
Step 3: Make Your Base and Post


Cut your base from some heavy plate. Clean it up with a grinder and wire brush.
Blast some holes into it so it can be bolted down.
Weld the post to the centre of the flange you removed from the pressure tank.
Weld the other end of the post to the centre of the base plate.
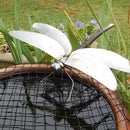
Step 4: Make Some Sea Life


Get your lighter plate and roughly mark out the shape of kelp leaves.
Cut out the leaves.
Attack the leaves with a ball pein hammer to give them a natural looking form. Try to imagine how they would be gracefully waving as the water surges around them.
Make as many kelp fronds as you like, and then position them around the post in a natural looking fashion. I gave a couple of mine solid steel stalks that act as bracing for the post. Weld them into position.
I decided to add a fish as well. I simply cut it out of some stainless steel that I happened to have in my shed.
Step 5: Assembly and Finishing


Simply use the original flange bolts to bolt the mine to the post.
Paint according to your tastes. I first carefully cleaned the whole thing before applying primer. I then used matt black enamel paint from a spray can. I didn't paint the fish. I thought the stainless steel made a nice contrast against the black kelp.
I hope you liked this instructable of mine. Please feel free to post comments and questions.
For more of my work see my Etsy shop and my website.

Runner Up in the
Big or Small Challenge

Participated in the
Make a Box Contest

Participated in the
Gaming Contest


