

Introduction: Opel Diagnostics - OPCOM V1.45 Setup & Installation

Introduction
This Instructable will help you set up and use the Opel hardware and software. It is specific to OPCOM V1.45 which was made in China. It was developed a number of years ago and software support has diminished since then. It is for this reason I will show you how to setup this system with a modern laptop, given a minimal amount of downloads and an easy setup. The setup should take no longer than an hour for a novice (not including download time).
The final product of this guide will allow you to check various settings on the computer of your car. You may check fault codes, set steering angles, and vehicle identity. The ability to communicate with your car computer opens a range of possibilities when maintaining or improving your car. Various key aspects of your engines operation and conditions are stored within this system. The ability to communicate with it must be done correctly to avoid causing harm to certain aspects of the car. Always consult the OPCOM Software Guide when in doubt.
Step 1: Required Items for Operation


We first need to gather all required items for the project. These are listed below.
Required Items:
- A Windows Laptop (Operating system: XP or newer) - Figure 1
Please note: If you have a windows XP laptop you may skip 'Step 2: Installing VM' of this guide. - An OPCOM v1.45 hardware diagnostics device - Figure 1
- USB male to USB B male adapter - Figure 1
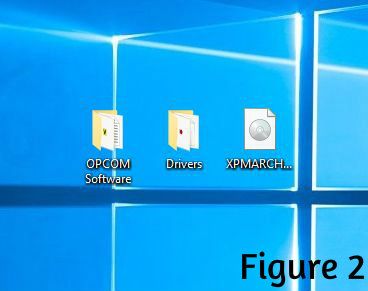
-This is usually shipped with the device - OPCOM software files - Figure 2
-Find these files in the links below
-Place Folders on Desktop for future reference
The items below may be skipped if you have a Native Windows XP laptop
- Windows XP ISO files - Figure 2
-Find these files in the link below
-Place Folders on Desktop for future reference - Oracle Virtual machine software - Figure 3
-Find the installation link below
DOWNLOAD LINKS
Note: Google Drive might present you with a constant spinning 'loading' icon. That's okay, simply click the download button on the top right of the screen. Google drive cannot render an 'image' for RAR files or ISO files, hence the constant loading icon.
OPCOM Software and Drivers - Link 1 - You need to have WinRAR software to unpack, its free. There should not be any password on the file.
OPCOM Software and Drivers - Link 2 (if first link doesn't work) - You need to have WinRAR software to unpack, its free. There should not be any password on the file.
OPCOM Software and Drivers - Link 3 (if first and second link doesn't work)
Windows XP ISO - Link 2 (use if first link doesn't work)
Windows XP ISO - Link 3 (use if first and second link doesn't work)
IF YOU ARE NOT ABLE TO DOWNLOAD THE OPCOM SOFTWARE OR WINDOWS XP PLEASE EMAIL jiles.richard@gmail.com
Unfortunately Google Drive cut off access for people without informing me about it and people weren't able to download the files. I will now try my best to retain access for people. Please email me so I can be notified of any issues as I do not always check the comments.
Step 2: Installing a VirtualMachine


SKIP THIS STEP IF YOU HAVE A NATIVE WINDOWS XP LAPTOP
This portion of the Instructables will lead you to a fully functional Windows XP install for those of you who have a more modern laptop. This step is essential for a functioning software installation as it was originally coded and designed for Windows XP.
- Install Oracle VirtualBox
-Use the files downloaded from Step 1 - Open VirtualBox Program
- Press the 'New' button
-This button is blue and shaped like a star
-A new window will open - Give the machine a name, e.g. 'Windows XP OPCOM'
a) Select Type: Windows
b) Select Version: Windows XP 32 bit - Figure X
c) Click Next - Allocate the Memory Size
a) 512 Mb will be sufficient for our operations
b) Click Next - Allocate a Hard Disk
a) Select 'Create a Virtual Disk Now'
b) Click Create
c) Select 'VDI' or 'VirtualBox Disk Image' - Figure X
d) Click Next
e) Select Dynamically Allocated
f) Click Next
g) Allocate 15 Gb or more
-Down worry, it will only take up a maximum of 15 Gb on your computer if the machine is filled. - Start the Virtual Machine
a) Select the 'Windows XP' Machine
b) Click the green Start arrow
c) A New window will appear
d) Select the ISO file on your desktop - Figure X - Install Windows XP
a) Enter username & password
- It is recommended to have no password - Install Guest Additions
a) In VMware menu bar select 'Devices'
b) Select 'Insert Guest Additions Cd' from drop down menu
c) Install content from Cd into Windows XP
At the end of this step you should now how a fully functional Virtual Windows XP machine running on your computer. This is a powerful tool which allows you to forever harness previous generations of software and operating systems that do not have driver support for the modern day laptops, desktops and even tablets.
Step 3: Installing OPCOM Software and Drivers.


Once you have reached this step you should find your OPCOM Software and Drivers folders on your Windows XP Desktop. If this is not the case, please refer to Step 1 and 2.
Virtual Machine users must pass desktop files.
- Link a folder between your computer & VirtualMachine
a) Devices > Shared Folders
b) Click add button
c) Select Desktop Folder
d) Check Auto mount & Make Permanent - Figure X
e) Restart the machine - Drag folders to Windows XP Desktop
a) Go to Windows XP 'My Computer'
b) Open your Network Drive
c) Drag and Drop folders onto Desktop
Folders are now located on Windows XP Desktop
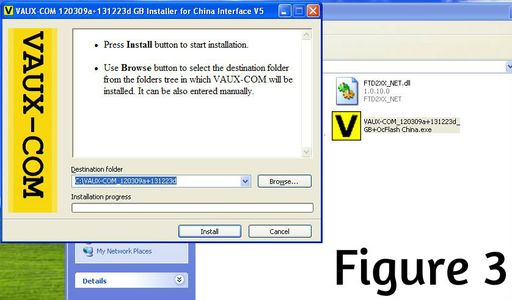
- Installing the OPCOM Software
a) Open your OPCOM Software folder from the Desktop
b) Run Vauxcom.exe
c) Complete installation - Figure X
d) Ensure icon has appeared on Desktop - Installing USB Drivers
a) Open your Drivers folder from the Desktop
b) Run BOTH CDMxxxx.exe Installs
c) Restart the machine
Step 4: Verification of Software Installation


In this step we will insure that the drivers, software and operating system are all working together. Once you have complete this step you can ensure that the software will communicate with your car correctly. This is an important step that you will be repeating every time you use the software with a vehicle. It will determine whether you have correctly or incorrectly complete the previous steps. This step may also eliminate wasted time from debugging problems.
- Plug in the USB Device to any USB Port
-Take note of which port you initially plug the device into
-Continued use of this port is recommended
If you are using a Virtual Machine:
a) Open the USB Drop down menu - Figure 1
b) Click on 'M3 Auto' to pass it to the Virtual Machine - -Ensure the device is connected properly in Device Manager - Figure 2
-Device Manager may be found in the control panel
-Under USB Devices you should see 'OPCOM' - Open OPCOM Software
- Open settings sub-menu within OPCOM software - Figure 3
- Click 'Check Interface - Figure 4
-A window reading 'Interface tested successfully' should open
Troubleshooting:
- If you cannot find the USB Device in Device Manager:
Using a virtual Machine:
-You have not installed the drivers correctly
-You have not passed the device to the Virtual Machine correctly
Using native Windows XP
-You have not installed the drivers correctly - The final window says 'USB Device not recognized
-Go back to Step 3
-Restart all computers and machines
-Attempt Step 3 again
- Virtual machine keeps restarting and never loads
-Try enabling virtualization in your computer's bios
-Lookup instructions to do this for your specific make and model computer on Google
Step 5: Connecting to a Vehicle & Reading Fault Codes.


This step finally pairs your computer to the vehicle itself. Before continuing with this step be sure to obtain your 4 digit security code from your car documents in the glove box. The paper containing this information will also detail your VIN, year, make, and model.
- Connect the OPCOM device to the car - Figure 1 & 2
-Port is located near driver side pedals - Figure 1
-Device must be fitted with lights on the top - Figure 2 - Connect USB cable to USB Port
If you are using a Virtual Machine:
a) Boot up the Windows XP Machine
b) Pass the OPCOM Device to the machine as outlined in Step 3.
c)Ensure the device is recognized in Device Manager as 'OPCOM'
If you are using native Windows XP:
a) Ensure the device is recognized in Device Manager as 'OPCOM' - Open OPCOM Software from the desktop Icon
- Ensure the Software recognizes the device
a) Open the settings sub menu
b) Click 'Check Interface'
c) If the device is not recognized, reboot the Vitrual Machine and/or your computer. - Turn on the car
- Open Diagnostics from the main window of OPCOM
- Select vehicle year and model
- Enter 4 digit secutity code
-Located with car documents in glove box - Check your engine fault codes - Figures 4 & 5
a) Select 'Engine'
b) Select engine size/model
c) Click 'Refresh List' - Figure 4
d) Record list on a notepad
e) Click 'Clear Fault Codes' - Figure 5 - Research Fault codes
a) Open Google
b) Search fault codes one by one
c) Follow advice from reputable forums or repair guides
Conclusion
If you reach the final step of this guide, congratulations! You have unlocked the ability to forever maintain and check in with your cars electronics and sensors. There is no other feeling like avoiding dealership technology sessions costs. You now have the ability to check every check-engine light and ensure that no damage is occurring on your vehicle. This advanced option of preventative maintenance will save you thousands in the future and put your mind to rest, knowing the exact condition of your car engine and other various components.


