

Introduction: Oak and Walnut Tortilla Press


For a gift this holiday season I decided I wanted to make this oak and walnut tortilla press for my wife. She loves cooking and really wanted to pick one up, so I decided to hand make her one! It was a pretty easy build, spanning around a couple of days and I'm really happy how it turned out!
Step 1:

I started off making the bottom section and the lid of the tortilla press. The press is 10" x 10" so I first cut the two oak slabs that make up the bottom
Step 2:

and then I cut the oak and walnut strips that make up the lid.
Step 3:

I glued up the bottom section
Step 4:

and glued up a pattern like this for the lid.
Step 5:

After those dried I cut down a 6" walnut piece for the beam across the top of the lid
Step 6:

rounded out the top of it
Step 7:

I then equally spaced where I was going to drive in three 3/8" dowel supports to help strengthen the joint
Step 8:

I drilled out the holes on my drill press
Step 9:

and glued in the three dowels.
Step 10:

Next I cut out two 6" walnut strips and a 3" oak strip to start putting together the piece that holds up the handle.
Step 11:

I rounded off the top of the pieces
Step 12:

and cut out two 2" oak strips, round off their tops and glued them to the rest of the piece.
Step 13:

I attached this to the bottom slab of oak the same way I attached the 6" walnut beam to the lid from earlier. I drilled out three equally spaced holes
Step 14:

centered it in the middle of the tortilla press
Step 15:

and glued it to the bottom section.
Step 16:

After that dried, I cut, glued and hammered in three 1/2" dowels to help strengthen the joint.
Step 17:

Closer look.
Step 18:

Next I started on the handle, I cut out an 11" oak strip and another strip about half that size
Step 19:

and clamp them together.
Step 20:

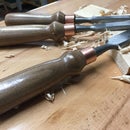
After it dried up I placed it in my Jawhorse and molded it into shape.
Step 21:

To attach the handle I cut off a piece of a 1/4" steel pipe I had around
Step 22:

I drilled out 1/4" holes in the handle holder and the handle
Step 23:

and assembled the handle section.
Step 24:

I then drilled in halfway into the walnut slabs and put in 3/8" wooden dowel caps.
Step 25:

Closer look.
Step 26:

Next I began the attachment of the lid and bottom section of the tortilla press. I cut out and placed down two pieces of construction paper (roughly the thickness of a corn tortilla)
Step 27:

Closer look.
Step 28:

I put the 3" brass hinges in place and marked out the spots for the screws
Step 29:

drilled out the holes
Step 30:

and screwed the hinges into place
Step 31:

With all the assembly done I took some wax paper and some play-doh and took it for a test drive!
Step 32:

Then it was time to sand, sand, sand!
Step 33:

For some finishing touches I cut out a leather strip for the area where the oak handle rubs against the walnut beam on the lid.
Step 34:

Closer Look.
Step 35:

Closer look.
Step 36:

Then I added on some clear rubber feet to the bottom.
Step 37:

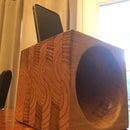
Finally I used some Food safe butcher block oil and finish and viola the tortilla press is complete!
Step 38:

Step 39:

Hope you like and thanks for checking it out!

Participated in the
Homemade Gifts Contest 2016


