

Introduction: Old School Crane (Jeppe Andersen 3p 2015)


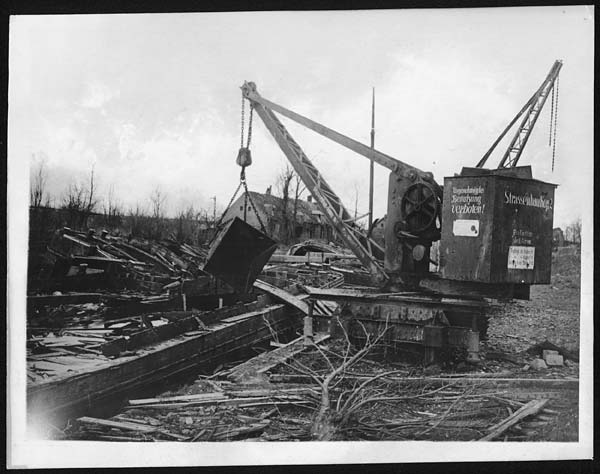
The inspiration to this crane came from this image.
All measurements are in mm (millimeter)
To build this crane, you will need this equipment: 600x600 mm MDF 6mm.
Crane:
- Drill
- Dremel
- Measurement tools (ect. a caliper).
- Aligning tools, like a steel angel.
- Ø14 drill
- Ø5-10 drill
- Ø32 Hallow drill
- Glue (wood glue & expoxy)
- Pencil
- Handsaw
- Jigsaw (remember the blades) / Bandsaw
- Sandpaper (80-180)
- Rubber band
- Ø10 round stik (30 cm +/-)
- Clamps
Electonics:
- Soldering Iron
- 1xRelay (two switch)
- 1xResistance (130R)
- 1xPush button
- 1xRocker switch
- 1xDC motor
- Cable for putting it together
- Testboard for attaching the electronics.
Optional:
- a Lathe (for the main wheel)
- 3D printer (for bushing)
- Sander (for making alle the parts the same size)
Step 1: Sketching
Start by sketching all the parts on the MDF plate.
This will give you an idea of where to cut.
I have listet all the parts below. As it is for the moment, there aren't any PDF with the details for the different parts. Just keep an eye on the following pictures.
- Static wheels: (2x) - 55x300mm
- Housing 1: (3x) - 190x135mm
- Housing 2: (1x) - 130x135mm
- Housing 3: (1x) - 60x135mm
- Driver wheel (1x) - 12mm thick - Ø160mm
- Assist wheel (1x) - 6mm thick - Ø32mm (drill this with hallow drill)
- Crane: (2x) - 35x200mm
Missing:
- Housing for the DC motor - as it is for the moment, the DC motor isn't attach to the house of the crane.
Step 2: Rough Cutting
I primary used the jigsaw.
Tip: Use a spare peace of wood (with one straight side) as a slide for the jigsaw. Measure the distances from the edge of the jigsaw to the center of the blade. Add this to your final line, where you are suppose to cut.
Step 3: Cutting the Details

Pieces like the Static wheels and the crane (arms) are rounded at the end. Use a dremel with sandpaper to get that finish.
Use the dremel aswell on the housing part no. 3 - At center. For the driver wheel to spin freely.
Use the bandsaw or jigsaw to turn the driver wheel as round as possible. Additionally, turn it on a lathe.
Strap all the same pieces together. Use the sander to equal them out.
Step 4: Add the DC Motor


See the PDF for instruction on how to connect the different wires.
OBS: Note that I my case, I couldn't get the DC motor to spin reverse. I connected the cables wrong, but where the issue are, I cannot explain.
Note: PDF can't be uploaded to Instructables.
Step 5: Bushings


Download the bushing here - alternatively find somefind else that could work as bushing.


