

Introduction: Oliver's Rattle

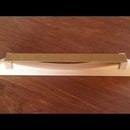


A couple of years ago I made a rattle like this one for my grandson's first birthday. It's made from three pieces laminated into a blank. The center piece has three holes to create internal chambers into which I have put letter beads, one for each of the initials in his name.
It's kind of a quiet rattle. I'm sure there are other things you could put in there that will make more noise. I wanted this one to be a little less obnoxious than the average.
I want to say up front that there are several ways to handle this project. Obviously, adding power tools to the equation would make some of what you see me doing easier. I enjoy the process though, and my intention is to show you how I did it, not how you should do it.
Also, know that you may encounter a problem with the beads getting stuck in glue squeeze-out when the blank is drying. The obvious solution is to allow the blank to dry horizontally. This still does not guarantee success. If only one bead gets stuck, the difference is nearly unnoticeable. But if two of the beads get stuck, it's a bummer. If they ALL get stuck, well... If any of you have suggestions, I would love to hear them.
Supplies
3 pcs @ 2 1/2" x 2 1/2" x 3/8"
1/4" graph paper
Wood glue
Noisemakers
Drill or gimlet
Coping saw
Sanding bow (optional)
Step 1: Cut 3 Pieces

3 pieces @ 2 1/2" x 2 1/2" x 3/8".
The stock I used was a craft board from the big box store labeled: 3/8" x 3" x 2'. At least two rattles can be made from this board. Really you could make three, if you scrape the nasty sticker off.
Step 2: Make the Template


Using 1/4" graph paper I made a square 2 1/2" x 2 1/2", divided it into quarters, and found the center in one of the upper squares. Using this center point I drew a half circle with a compass set to the edge. I don't want such a deep valley at the center so I move that point a little higher (about 1/4" down from the top).
I'll connect the point at which the half circle comes to the outer edge with the point of the heart for a line of reference. I don't want the heart to have a straight side though, so I'll mark another point a little further out. Using these three points I'll sketch a fair curve.
Next I'll cut the square out, fold it in half, and cut out the shape.
Step 3: Drill or Cut the Chambers

I'll use the template to show me where I can put the holes. I've marked centerlines on all the surfaces to help keep everything lined up. I use coins to layout the holes and a coping saw to cut out the chambers. My only concern is leaving enough in the center piece to get a solid glue up. A dime or penny seems just about right. If you are drilling, I wouldn't recommend going bigger than 3/4".
Step 4: Laminate the Blank


Trying not use too much glue, I'll put the noisemakers in and then glue all three pieces together.
I wrap it all up with masking tape to keep the parts from slipping and put it in the vise.
Step 5: Cut It Out

The next day I'll unwrap it and trace the heart on both sides. Then I'll cut it out with my coping saw.
Now would be the time for a bandsaw or scrollsaw, if you have one.
Step 6: Waste Removal


In this step, I'll lay out and cut a chamfer all the way around both sides in an effort to reduce sanding time.
I'll scribe a line around edges and faces somewhere between 3/16" and 1/4", and then follow these lines with my coping saw. Even a smallish chamfer like this is removing a lot of waste.
I've made a few of these now and I also feel that I'm getting more consistent results by taking the time to do this.
Step 7: Sanding


I used my sanding bow to do the majority of the work, starting with 80 grit. I worked my way up through 120, 220, and then 320 to get the final finish. I would alternately sand with the bow and then by hand, making sure to erase all the scratches from the previous grit.
Step 8: Safe Finishing

Mineral oil is usually my first choice for finishing toys and kitchen items. The bad news is it doesn't offer much in the protection department, and it must be replenished from time to time. The good news is mineral oil is edible and completely safe. Plus, it darkens the wood just enough to give it a nice warm glow.
Step 9: Troubleshooting the Sanding Bow

I'm including this because I had questions about the bow. I'll be adding it to the sanding bow Instructable as well, but I'm leaving it here because the heart rattle project depended so heavily on it.
If the bow is just a little loose, the easiest solution is to just apply a little pressure with your fingers.
If that's not enough, the next best thing is to cut a bit off the end of the strip of sandpaper.
If the bow is too tight, sanding the keys down a little can help.
If nothing else is working, try offsetting the saw kerfs. You can see what I've done in the picture above. I added another kerf on the side so the sandpaper could wrap around more. Turning this key around would allow a much shorter strip to work.
I spent an alarming amount of time dialing in the bows I made for 80 and 220 grit, and I am done experimenting with this for now. But there's something still nagging me about it. I have not tested the theory, but I suspect placing multiple kerfs on the keys and turning them in various ways could make a single bow with the right key distance universal.


