

Introduction: Origami Paper Bow


Why spend money on a bow for gifts ever again when you can make one out of any square of paper?
It can be an accent piece on your gift, a accent for the packaging, or you can combine them all for one big modular piece! The possibilities are endless!
I chose to make mine out of newspaper for a vintage look, but for this tutorial, I'll use a paper with a single color on each side, with a different front and back to make it easy to follow.
Step 1: You Will Need

- A square of paper in your choice of color
- A pair of scissors
Step 2: Fold Your Leading Lines

Whichever side you want to show, keep it face down. Ie if you wanted the bow to be blue, you would have the blue on the bottom. I chose to have the secondary color show and thus blue is on top.
- Fold the square in half horizontally and unfold
- Fold the square vertically and unfold
- Fold the square both ways diagonally and unfold
This creates the leading lines to make the next step easier.
Step 3: Making the Little Square

- Fold your square diagonally and then diagonally again
- Lift the fold and flatten on both sides
Step 4: The Hard Part

- Fold the top down (The top is the part that is the vertex of the folded parts ie the part that doesnt open up)
- Open the whole thing up and push/fold the inner square in. This is one of the times the first leading lines make things easier.
Now you should have a little diamond
Step 5: The Other Hard Part

1) Fold down the "flaps" of your diamond
2) Open it up
3) Flip it over and push down that middle bump carefully to form a little flat square
4) Flip it over
Step 6: Where You Need Scissors

Cut each of the sides of the diamond shapes closest to you. A small strip of the second color should be showing.
Step 7: More Folding

- Fold the edges of the newly cut squares in
- Flip it over
- Take the newly folded narrow diamonds and fold them in tucking the points into the small square. This will be the bow part of the bow.
Optionally you can push in the sides of the bow in the middle to make it pop if you are using thick paper.
Step 8: The Ribbon Tails

- Flip it over
- Bring the two remaining pieces together.
- Fold the sides down so that the edges folded in are parallel to the middle crease
- Cut the middle piece to the middle, do not cut the little box (square that your bow is tucked into) on the other side
- Fold the inner edges up slightly
Step 9: Final Cut

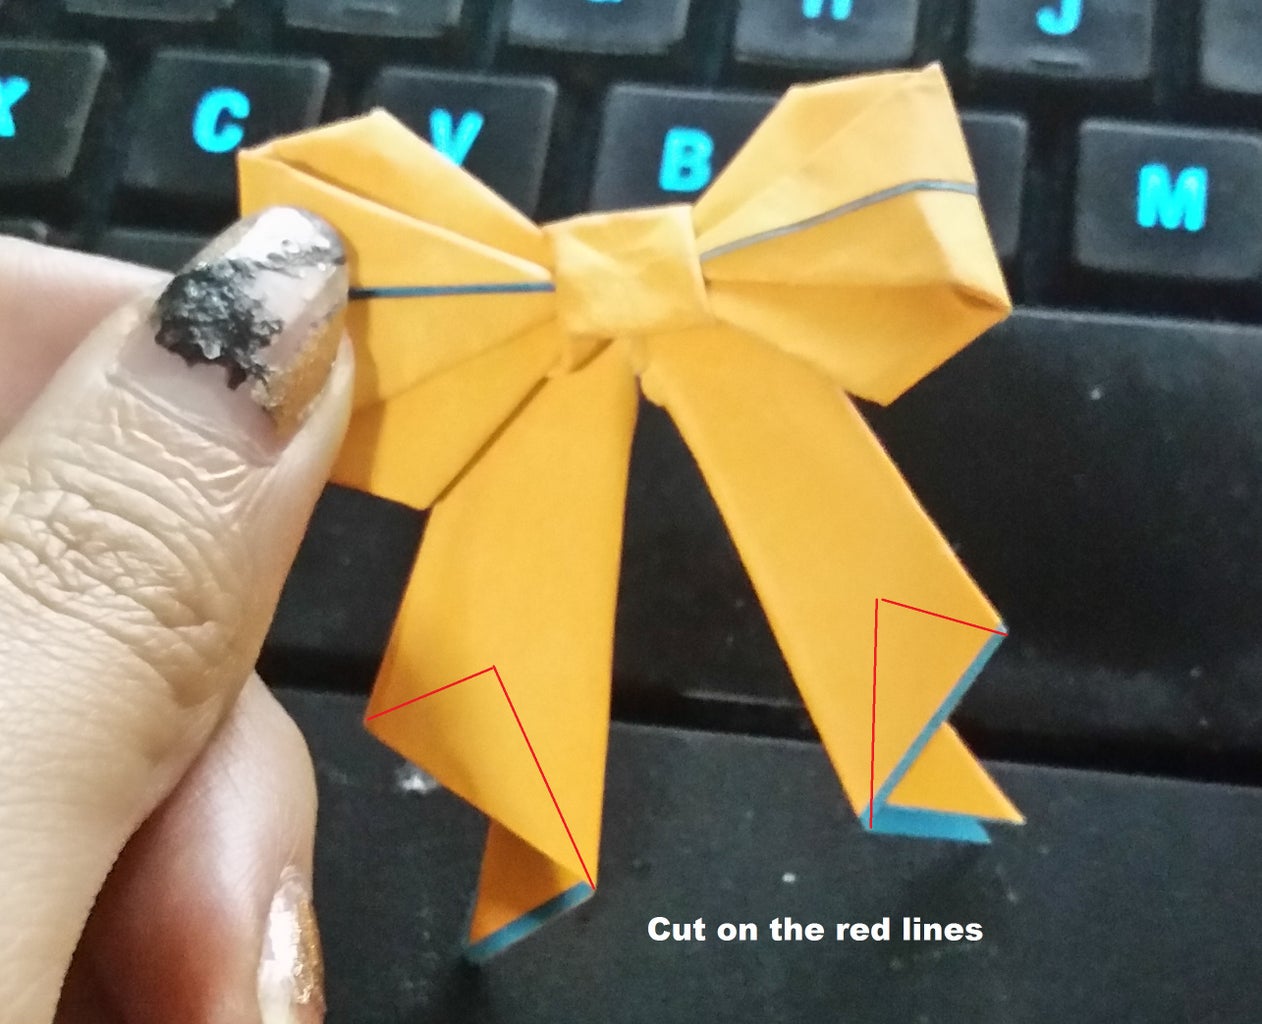
Use the red lines in the pictures to show where you should be cutting.
That's it! Congratulations you are done!
Step 10:

Participated in the
Papercraft Contest

Participated in the
Homemade Gifts Contest


