

Introduction: Owncloud 9 Raspberry Pi Server


These instructions are for installing owncloud 9 on a raspberry pi 3b using a 2.5 inch hard drive for the cloud storage.
Follow the instructions here for downloading Rasbian Jessie with pixel.
https://www.raspberrypi.org/downloads/raspbian/
I used a 16 MB high speed micro-SD card. Extract the .zip to its .img file. Now burn the image to the SD card using win32diskimage, if you are working from a Windows machine.
Use a USB keyboard, hdmi monitor or TV and mouse for the initial configuration.
Go to Raspberry Pi Configuration.
I changed the host name to raspcloud and changed the password from raspberry to something else.
Enable SSH under interface
Set the locale, your keyboard, time zone, wifi to where you live.
Since the pi will be used only for owncloud and will operate headless, I changed the amount of memory dedicated to the GPU to 16 MB
Reboot.
You need to know your network's private address space, netmask and gateway.
I added the raspberry's MAC address to dnsmasq on my firewall. This gives the same IP to the the pi using dhcp.
* * * *
To set a static address on the pi itself, follow these instructions
https://www.modmypi.com/blog/how-to-give-your-rasp...
* * * *
I removed unnecessary programs from the pi, as it will only run as a cloud server.
From the terminal:
sudo apt-get purge wolfram-engine libreoffice minecraft-pi sonic-pi
sudo apt-get clean
sudo apt-get autoremove
sudo apt-get update
sudo apt-get dist-upgrade
* * * *
Partition and format the hard drive
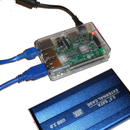
Plug in your usb connected 2.5 inch hard drive. The power supply for your pi needs to output 5 volts 2.5 amps.
sudo apt-get install gparted
Run gparted from the desktop preferences menu.
Enter your pi password.
Here is the instruction manual for gparted.
http://gparted.org/display-doc.php?name=gparted-li...
I used a 500 MB WD 2.5 inch drive. In the upper right corner, click the down arrow and select /dev/sda.
Make sure you are not working on the /dev/mmcblk0 or you will have to rebuild your pi operating system.
I partitioned the drive as GiB, Linux for ext4 file system. Do not use ntfs or fat32. You may run into permissions problems that you will not encounter with a linux file system
To write the partition, click on the green arrow
Restart the terminal
sudo mkfs.ext4 /dev/sda1
sudo mkdir /media/cloud
sudo blkid
copy down the UUID of the /dev/sda1 drive. It is a long series of letters and numbers.
You can do this by highlighting the text with a mouse, right click and select copy
We will use the blkid of /dev/sda1 for auto mounting the drive in /etc/fstab
By mounting the drive with its UUID, you will not have problems if you plug it into a different USB port.
sudo nano /etc/fstab
insert a new line above the # a swap file …
UUID=(blkid copied above) /media/cloud ext4 defaults,noatime 0 1
CTRL o to write file
CTRL x to exit
defaults is all you need for an ext4 file system (unlike with ntfs)
sudo reboot
* * * *
After the reboot go back to the terminal and verify your hard drive is mounted
sudo df
You should see the hard drive /dev/sda1 mounted at /media/cloud
You can also type
sudo mount -l
This should reveal the file type etc for /dev/sda1 which should be ext4
The user and group for the owncloud database is www-data
The pi comes with a www-data user and a www-data group. You can verify this like this:
sudo id -u www-data
It will respond with the id number for the user www-data, which is 33
sudo id -g www-data
It will respond with the id number for the group www-data, which is also 33
Now give permissions to the hard drive for the user and groups www-data
sudo chown -R www-data:www-data /media/cloud
sudo chmod -R 775 /media/cloud
* * * *
Now lets install owncloud
sudo su
Follow the instructions here: You will need to copy four lines exactly as written here. Misspellings wont work.
https://download.owncloud.org/download/repositorie...
This downloads the Release key from owncloud.org
The next command gets the Release.key
apt-key add - < Release.key
The next line tells apt where to find the owncloud files.
I suggest, instead of using echo, use nano to create the file owncloud.list with the exact url listed in the above link.
Verify that you typed it in exactly as listed for Debian_8.0
cat /etc/apt/sources.list.d/owncloud.list
Makes sure again that the location of the Debian 8.0 owncloud files is spelled exactly.
If not you can use the following command to correct your spelling etc.
nano /etc/apt/sources.list.d/owncloud.list
apt-get update
The next command will automatically install and configure apache2, mysql, php and other programs need for owncloud
apt-get install owncloud
The installation will continue with a screen asking for a administrative password for mysql-server 5.5. Give it a password and write it down.
Downloading and installing all the programs may take a while, if you are on a slow connect.
* * * *
I chose not to use ssl encryption. I will access the cloud only from within my network.
1. The data will remain on my private network. I have no need to pass my data over a public network. My pi uses Ethernet so my information is not even broadcast over WiFi.
2. Encrypting the connection with SSL, requires domain names and payments to CA authorities. Self signed SSL certificate is complex. You may have to make your own CA authentication system.
3. I build and manage my own firewall. So far it has protected me. For example, I setup my WiFi as a AP only. It passes WiFi clients to my router for dhcp. I even block the AP from access to the Internet along with other IoT devices like a DVR. The router has lists of clients that cannot access the internet.
4. I do not trust my data on Google's, Amazon's or Microsoft's cloud. I write. Loosing your own work means rework! I have nothing to hide. (The government already has my tax files. It has not done a good job of protecting my data. I served in the US military and my information, including my SS number, was stolen years ago. The media tells me the thief was a nation state. The government has never admitted this to me). Putting personal information in the public cloud, even though encrypted, is an unnecessary risk, IMO.
* * * *
Next I copied the owncloud installation files to the hard drive.
cd /var/www
cp -r owncloud/owncloud /media/cloud/
ls -l /media/cloud/owncloud
You should see the files copied in the above step
* * * *
Re issue the ownership of these files to www-data
chown -R www-data:www-data /media/cloud
chmod -R 775 /media/cloud
exit
to get out of su mode.
This is a good point to install PuTTY on your desktop computer for controlling the pi with ssh (secure shell) headless, without a keyboard, mouse or monitor.
The first login with putty, it will store the encryption key.
You can use PuTTY (ssh) for periodic updating and shutting down or rebooting the pi.
Now go to your desktop and access owncloud with your browser.
Use the static IP address assigned to your PI
Owncloud admin: enter an admin name
password: I used the pi login password. Do not use raspberry, the default password.
Data folder: /media/cloud/owncloud/data
This is the data folder on the USB hard drive.
Select: MySQL/MariaDB
database admin: root
Enter database root password entered during installation:
give the database a name: bcdefg
location is: localhost
Click Finish Setup
* * * *
Owncloud should complete its installation. If it gives an error message, go back to the pi and fix the problem. Errors could include bad permissions.
Download clients for Windows and macOs from owncloud.org. so you can to sync your data to your private cloud.
Use the admin name you gave above. Own-cloud will issue you a client password.
When selecting directories to backup, you should add must chose all the directories you want in the client setup. I have six directories it monitors and keeps a copy on the pi.
Now watch Owncloud work seamlessly. Your raspberry could server sits, drawing about 1.5 watts. When you save a file into one of your Owncloud backed up directories, the raspberry pi fires up the hard drive and automatically saves a copy. A few minutes later the 2.5 hard drive goes to sleep again. You can access your files with a browser or with the client.


