

Introduction: PORTABLE MINI LAB IN a BACKPACK


I am a village boy,working as an Engineer outside of my own state.Every year I slip to my home twice or thrice,away from hassle and bustle of the city life so that i can relax and enjoy in the natural beauty of my village and father's farm.During my stay I get lot of free time and use it by playing with my hobby of electronics projects..whenever i went to home, i packed the required instrument and components .But always I forgot something or the other which always irritated me a lot.At last I decided to prepare a mini portable lab inside of my backpack.
In this instructables I will give the details, how you can also make a portable lab which can be carried easily during outing.
I tried to prepare my mini lab by using the Japanese technology known as " 5S"
What is 5S :
The 5S’s stand for 5 Japanese words that are :
Sort (Seiri)
Set in order(Seiton)
Shine (Seiso)
Standardize (Seiketsu)
Sustain (Shitsuke)
The list describes how to organize a work space for efficiency and effectiveness by identifying and storing the items used, maintaining the area and items, and sustaining the new order.
For more details on 5S click here
Before preparing your mini lab you have to care about few things :-
1. Paying careful attention in deciding exactly what has to be made during outing.
2. A list of items required should always be ready before hand,so that you can avoid making your luggage unnecessarily heavy.
3. safety
My mini electronics lab (back pack) is quite lighter which can easily carry during outing.You can also use a briefcase or attache but I prefer to backpack which is quite handy .
Step 1: BASIC TOOLS


Before making a new electronics project, you require some basic tools and knowledge of how to use them to complete your project.Though there are huge number of tools available for easy working but you should take the most important tools otherwise you have to carry the extra weight.
These are the few assential tools which I carry with my backpack
Tools to work with wires :
Wire cutters are specialized tools made to make a clean cut through the wire’s strand or stands. Wire strippers are another kind of specialized tool used to remove the insulation from a wire.Pliers are used for bending wires on components to fit into circuit board. is a very useful tool for holding the small components and for removing the IC from the breadboard or from the IC base. They are an extension of your own hands and fingers.
See the pics for tools
1.Wire cutter
2. Wire stripper
3. Nipper
4.Pliers
Cutting pliers – They are used when you have soldered the component and want to cut the remain lead of the component. It has blade at one side so that you can easily chop the remaining part after soldering from PCB
Long nose pliers – It is used for bending the leads of components or can be used to hold the component while soldering as component become hot due to the heat from soldering iron. It can also be used to hold the nuts while tightening the bolts
5. Tweezers
Screwdrivers ,Nuts and Bolts:
Screwdrivers are used to screw and unscrew the bolt,screw etc and also used for electrical connection.Take different size of screwdrivers.I suggest a screwdriver set just like me(see the pics) for portable lab.This screwdriver set have a single handle which can be fixed with all sizes and shapes.Take precision screwdriver for small size screw.Take few screw,nuts and bolts in small plastic bag or container.
Cutting tools :
For cutting purpose these are the few tools which is essential during the project work.Choose a small hacksaw.see the pics for mini hacksaw..
1. mini hacksaw
2. scissor
3. paper cutter
4. PCB cutter
Soldering Tools :-
Most important and commonly used tool which you require is soldering iron and soldering wire.
1. Soldering Iron (15-35 watts is good one)
2. Solder
3. Flux : used as a cleaning, flowing, purifying agent.
4. soldering wick : to desolder the unwanted soldering
5. Desoldering pump : to desolder the unwanted soldering
6. sponge to wipe out the soldering iron tip
Holding Device :
Normally vice is used for holding the PCB board .I will suggest to choose a small vice as I shown in picture
which will take little space and lighter also.
Magnifying Glass:
It can be used to see the small markings on components and also for examining circuit board traces and solder connections.I will suggest to take a glass with led light which is very helpful during working.
Tap and Glue :
Add few taps of different sizes and glue in your bag which is very helpful during your work
Step 2: LAPTOP /TABLET/SMART PHONE


Laptop/Tablet is very essential for any kind of electronics lab.It serves for various activities .
1. Programming the micro controller
2. Testing softwares
3. As a power supply
4. Serial monitor and Visual output
5. pcb design
6. Access important information
I use my laptop for charging tablet,smart phone, speaker and mini digital storage oscilloscope.
I add my KINDLE PAPERWHITE for reading books and reference .
If you are music lover add a small blue tooth speaker.I carry my Logitech UE Boombox which is very good one.
Step 3: POWER SUPPLY AND CHARGER


POWER SUPPLY :
One of the most important pieces of test equipment in your lab is a reliable power supply.But carrying a bulky power supply is quite difficult. So I packed the following power sources in my mini lab.
1. Battery :
It is good practice to carry various type and rated battery along with you.like -
i ) 9v battery
ii) AA battery with holder
iii) LIPO battery
2. 5 volt regulated dc power supply(dc adapter) :
This can solves basic requirement for your experiment.Its size is very small and is very light also so that you can carry it easily.
optional : take a small rated solar panel for emergency and free power .
CHARGER :
Never forget to take the laptop charger.If it dies your lab will shut down also.
A mini USB charger is sufficient for charging the gadgets like tablet,smart phone and bluetooth speaker.
Also add the DSO nano charger.
Step 4: BREAD BOARD,PROTOTYPE UNIVERSAL BOARD AND WIRES


A very versatile prototyping platform is the solder less breadboard.Before soldering the components into the circuit test it with bread board first.In a braed board you can even build fairly complex circuits using integrated circuits and other components.
I add two different sized bread board for easy prototyping
You have to also take few universal prototype board and many jumper wires for bread board connection
Wires :
Wires carries the electrical signal from one part to the other part of the circuit.The wire size is very important .Depending on the wire size it caries more or less current .Typically it measures in term of Gauge(AWG).
Alligator Clips:
Used generally for temporary electrical connections, like when you’re testing something .They come in various length ,size and colors.Choose according to your requirement.You can also made it at your home.I made for myself.
You should carry various size( awg) and colors wires/alligator clips.
Step 5: MEASURING INSTRUMENT


1. Physical Measurement :
Traditional tap and scale is quite enough for physical measurement
2. Electronics Measurement :
Multimeter :–
This is the most basic equipment you should have with you. If your circuit does not work properly you can troubleshoot it with the help of multimeter.
1.Digital
2.Analog - Analog multimeters are old Fashioned — but still useful
You can use a multi-meter to take a variety of electrical measurements. With the help of multi-meter you can perform following operation -
a) Measure AC voltages
b) Measure DC voltages
c) Measure resistance
d) Measure current going through a circuit
e) Measure continuity (whether a circuit is broken or not)
f) Test the operation of diodes and transistors
I recommend to take a digital one first if you have enough space in your bag then go for analog also.
2. Digital Storage Oscilloscope : -
To analyse more complex signals and waveforms, you need a oscilloscopes.But oscilloscope are quite bulky and heavier which is not a good option to carry with your bag.Thanks to the seeedstudio team for providing such an excellent pocket sized digital storage oscilloscope (DSO Nano) with a very low price.Another advantage is that its hardware and internal software is all open source.
I highly recommend this product for the hobbyist like me.I purchased it from eBay.com
Step 6: ELECTRONICS COMPONENTS


Electronics components are broadly divided into two categoroies
1. passive: does not requires power source
2. active: requires a power source to operate
1. Passive Components :
Resistors:
They are fixed or variable(also known as potentiometer or POT)
Its unit is Ohm/kilo Ohm/Mega Ohm
common registors used are
100ohm,220ohm,330ohm,470ohm,1k,4.7k.10k,20k,50k,1M
1k,5k,10k,20k and 50k potentiometer is sufficient for experiment
capacitors:
They are divided in two categories polarized or non polarized.Its unit is farad/micro farad or pico farad
capacitor with small value(less than 1muF) are non polarized and large value(greater than 1muF) are polarized
Normally ceramic capacitors are non polarized where as electrolytic and tantalum are polarized.
common capacitors:
22pF,0.1muF ceramic
10muF,47muF,100muF,1000muF,2200muF electrolytic
Inductors:
Normally it is made of by coil and operates on the principle of electromagnetism.Its unit is henery/mili henery
Transformer and motor are also based on inductors.
It size varies according to the requirement.So take according to your requirements
Switches:
It is used to make or break the electrical current in the circuit.There are verious type of switches available in the market.
commonly used switches are push button switch,on/off switch,toggle switch
2. Active Components:
Diode:
It carries current in a singe direction used for rectification.
commonly used are:
IN4007,IN4001,UF4007
Transistors:
It can be used as switch or amplifier.It has 3 legs emitter,collector and base.Refer datasheets for leg identification
commonly used are:
2N2222,BC547,BC541,TIP41C
Intigrated Circuits(ICs) :
It is a set of electronic circuits on one small plate ("chip") of semiconductor material, normally silicon.It contains several billion transistors and other electronic components .
microcontrollers- Atmega-8/16/32/168/328
shift registor- 74hc595
opamp-LM393
voltage regulator- LM317,7805,7809
ARDUINO and RASBBERRY PI :
These are the most popular micro controller .You can use it for thousand of project.Search for different arduino projects idea. Arduino official website also provide so many lectures for getting started.
Apart from the above components you should carry few more components which is written bellow :
1. Seven segment display
2. LCD (16x2 or 20x4 character)
3. optoisolators
4.Light dependent registor
5.Thermistor
6.IR led
7.Buzzer and speakers
8.relays
9.connectors and screw terminals,jack and heat sink
10. sensors
11. transformers,dc motor,servo motors
12. mini PCB drill and drill bits (I always take but its optional)
Step 7: HOW TO ARRANGE


The most innovative step is how to arrange so many things in a small back pack.Here I will give you some tips for arrangement.Refer the above pics for better under standing.
1. Place all the similar items in a small bag/box and then place 2 or 3 small bag in a large bag/box
example :
group-1 : all wires
group-2: all the chargers and usb cable
group-3 : pliers,Twizzlers,stripper,screwdriver,glue,tap and scissors
group-4: all components in a large plastic box having several compartment
group-5 :all micro controllers,shields
group-6: pcb drill ,transformer,motor
2. Arrange all registors and capacitors in increasing order of their values.
Place a small printed or hand written token (values or name written on it) in side the small compartment of plastic box. By doing this you can easily search the components from the box.It will save lot of time during your work.
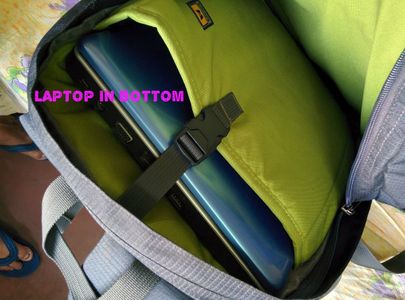
3. Place heavier item in bottom of the back pack and lighter above it
example:
I place my laptop(heavier item) in the bottom.My back pack have proper padding to avoid jerk and shock during traveling.
4. The remaining things can be placed in small compartment of the back pack.
example: I place my multimeter, boom box,kindle
5. I place my delicate mini digital oscilloscope in the very small compartment of the back pack which is actually given for storing mobile.
6.safety :
Mind it you are carrying so many tools with sharp edge.It should not damage the bag ,other items or injure to you.
example: I wrap a thick paper over the sharp edge of my hacksaw.
7. If you have still enough space take a digital camera I forgot to mention .
Congratulation !!!!!!!!! Now your mini lab is ready to go.
I think you enjoyed my instructables.
If you have any good suggestion please comments it...

Participated in the
Portable Workstations Contest

Participated in the
Full Spectrum Laser Contest

Participated in the
Spring's Coming Contest


