

Introduction: PUMPKIN WARS


Summary:
This Instructable will show you how to make a great piece of Halloween Decor inspired by STAR WARS, using two Carved Pumpkins.
Once you have taken this Jedi training it will be all upon you.
May the Force be with you
Step 1: Materials and Supplies Used:

Two Pumpkins
• Cut Protection Gloves
• Protection Glasses
• Orange Permanent Marker
• Spoon
• Bamboo Skewers
• One Piece of Clear Acrylic 1/8” Thick (20” x 4”)
• Wire End Clay Modeling Tools
• Rotary Tool + Accessories
• Gripping Handle out of an Interchangeable Blades Knife Set
• Jigsaw Blade
• Video Projector
• Two Light Bulb Socket - Wire Extensions
• Two Light Bulbs
• White Tempera Painting
• Painting Brush
Step 2: Get the Design Patterns


• Go to Internet and look for images of the Death Star. The ones that I used for my pumpkin carving are simple enough for a trouble free carving. ( http://www.thinkgeek.com/product/ipsk/ )
• Look as well for images of objects exploding (Alderaan Planet). For this specific one I used a screen shot of the Youtube Video: Melon Fragmentation at 2500fps - The Slow Mo Guys.
Step 3: Draw the Patterns on the Pumpkins


• Paint the Pumpkins with the White Tempera Paint (This will improve the definition of the projection on the Pumpkin).
• Project the pattern on the Pumpkin using the Video Projector. You may use am Artwork Projector if you use a printed image instead.
• Draw the Pattern on the Pumpkin Surface using the marker.
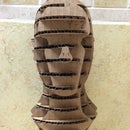
Step 4: Pumpkin Skin Shaving


• Put your Personal Protection Equipment on. I used cut protection gloves and protective glasses.
• Use the Rotary Tool with a Round Engraving Cutter to easily peel off skin at the inside edge of the shaved areas. Do the same to shave the boundaries of the design (i.e. where the design ends with a non-shaved area adjacent to the pumpkin skin outside the carved design. This will act as a clear marking of where the design ends). For this step, I used a Dremel 4000 Rotary Tool and a 107 Engraving Cutter running at about 13,000 RPMs.
• Use the Wire End Clay Modeling Tools to refine the areas that may need a retouch.
• Wash the Pumpkin after the engraving to get rid of the painting and shell residues.
Step 5: Scoop Out the Seeds and Fibrous Strands


• Draw the contour of the hole at the top and at the bottom of the pumpkin, using the Orange Permanent Marker. The most common shape is circle, so if pick this shape, make sure you include a notch to be able to re-position the stem top piece to its original alignment.
• You can make an excellent Pumpkin Cutting Tool as follows: Remove the sharp blade from the big gripping handle of your Knife Set. Replace the sharp blade with the “Wood Clean Scroll” Jigsaw Blade of your Jigsaw Blade Set. The resulting tool is amazing as you will be able to cut thru the pumpkin shell easily just emulating the Jigsaw up and down movement. Highly recommended.
• Cut the top and bottom pieces of the pumpkin using the Jigsaw Blade Tool that you just made. Grasp the Tool firmly while you move it up and down in a Jigsaw like movement, this will help you to reduce as much as possible the force needed to cut thru the pumpkin.
• For these pieces, make sure you cut is angled inward so that the piece keeps on top and not inside the pumpkin.
• Scoop out the guts using the spoon. Once you’ve scooped out most of the insides make sure you use the spoon to scrape the inner surface to remove as much as possible the fibrous strands. It is important to notice that scooping out the guts before you cut and try to take out a cut part of your design, is “crucial” as the inner strands are attached to that cut part, and trying to pull them out with the strands still attached may damage your design.
Step 6: Install the Lights


• Mark the Socket perimeter using the socket itself on the inner side of the Bottom piece that you removed in the previous step.
• Cut a hole that fits the socket using your Jigsaw cutting tool.
• Insert the extension cord passing the plug first thru the bottom piece hole from the inner side to the outer side until fitting the socket on the bottom piece as shown in the photo.
• Do these steps for both pumpkins.
Step 7: Death Star Shot Sequence


• Take the First shot of a steady spot sequence with the 2 Planets (Pumpkins) lighting on.
• Cut the Acrylic in square rods. My Acrylic sheet measured 0.106" for thickness, so I cut the same width to get the square rods. For cutting the Acrylic I used my Laser Cutter and Engraver, but you may use an Acrylic cutting Knife instead. I cut 1 rod 20" long, another one 10" long and 6 small rods measuring 4" long.
• Insert the six 4" long rods on the perimeter of the shooting circle of the Death Star, distributed like the vertices of an hexagon, and pointing to the tip of an imaginary cone where the 6 beams coincide to form a single beam.
• Insert the 10" rod in the center of the shooting circle.
• Start showing just about 1/2" of each rod out of the lighted pumpkin, this will be the 2nd shot of the steady spot sequence.
• Show a little bit more out of each rod to take the 3rd shot.
• After the short rods have reached the tip of the imaginary cone, then you will only need to take out more of the central rod.
• Once you've taken out of the pumpkin most of the 10" rod, you will need to change the central rod for the 20" rod. The reason to have two different length rods is that you can not hide the whole 20" rod inside the pumpkin.
Step 8: Blow Up Alderaan!


• Cut out some pieces of the Explosion Pattern previously engraved on the Alderaan's pumpkin. Cut only some pieces as you don't want the light bulb inside to become visible or the pumpkin to lost it's structural integrity. Consider as well that if you cut a lot of pieces, the Bamboo Skewers will not leave enough space inside for the light bulb.
• Insert one or more Bamboo Skewers in each explosion piece that just got cut.
• Insert the other side of the Bamboo Skewer in the body of the pumpkin. Insert the skewers so that inner surface of each explosion piece gets to the same level as the outer surface of the pumpkin.
• Turn on the lights and Kaboom!!! Goodbye Alderaan!!!

Second Prize in the
Pumpkin Carving Contest 2016

Participated in the
Halloween Decor Contest 2016


