

Introduction: Pallet Christmas Tree With LEDs


This is a quick day project that you can do with existing materials for little to no cost. I would also like to state that this is my first Instructable!
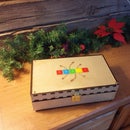
I made this pallet Christmas Tree as a gift for a family member and is currently being displayed outside but you can easily set the tree up in your house as part of your holiday decoration or use as a makeshift Christmas Tree.
Step 1: Cutting It Out!


Below is a list of tools needed to cut out the basic shape of the Christmas Tree:
1. Circular Saw
2. Drill
3. Crow Bar
4. Hammer
5. Straight edge
Lay your pallet board face up on the ground. Measure each bottom corner to the top middle to make a triangle shape and screw the straight edge in place. Run the Circular saw along the straight edge started at one of the bottom corners to the top middle; repeat on the other side. Once cut, you will need to turn the pallet board to the back and using the crow bar remove the horizontal boards holding the midsection in place. After the boards have been removed, you will then have your basic Christmas Tree shape.
Step 2: Details.


Step 2 of this project includes staining and attaching the base/lights to the tree. Below is a list of supplies needed and suggested items:
1. Green Wood Stain (I used Minwax Clear Tint Base Wood Stain tinted in Early Spring)
2. Paintbrush
3. Flat head
4. Drill & Bits
5. Log
6. String of lights (I used a 50 LED multi-colored light string)
7. Finish Nailer (optional)
8. Wood Glue (optional)
If you would like to make your tree more stable, attach 2 pieces of wood (you could use the horizontal boards that were pried off in step 1) to the back side of the tree on both long edges using wood glue. Use the finish nailer to secure the boards.
Determine the size of holes desired based on the size of lights used and coordinate with appropriately sized drill bit. Begin drilling in a random pattern making sure that the distance between bulbs match the spacing of holes. As a note, I drilled one hole at a time while threading the lights to ensure I had the correct spacing. After all the holes have been drilled, place the tree face up on two saw horses or something similar and begin staining. Ensure you stain the edges and gaps in the wood; apply a second coat if desired. Allow the tree to dry for at least 2 hours in a well ventilated area. Conveniently the clear tint base wood stain I used is low odor and fast drying so the wood was dry after an hour and one coat of stain.
Attaching a log on the bottom of the tree helps to enhance the overall look of being a Christmas tree so I obtained a small 5" diameter log from my yard as a tree base. Once you have determined the length of the log, cut a notch in one half of the top of the log as pictured above so it can be attached to the backside board; secure with screws. Now you can begin threading the lights into the holes. Since I used larger bulbed lights, the light cover was able to be taken off by unscrewing, placing the light into the hole and screwing the bulb back on from the front. This ensures the lights are secure and will not fall out.
Step 3: Summary

Once all the lights have been threaded and secured, display inside or outside your house and plug in the lights! I hope you have enjoyed this quick day project and hope you will check out my other projects soon to be posted. Don't forget to comment or share with your friends.

Participated in the
Make It Glow! Contest

Participated in the
Homemade Gifts Contest 2015


