

Introduction: Personalized Paperweight: USMC


Ye Ol' Paperweight. Decorative and can be personalized for Dad in a number of ways. This process should work for a variety of designs. Enjoy!
Step 1: Materials


For the emblem:
Casting Resin
Clay (non-air drying)
Paints
Acrylic Finish Spray (matte, gloss, satin ect...)
Paint brushes
Xacto knife
Curved blade tool
Glue
Casting objects
Petroleum Jelly
Disposable Cup
Mixing stick
Shoe Polish (brown or black)
For the base:
Plaster of Paris
Cardboard
Duck Tape
Marker
Disposable Cup
Mixing stick
Sandpaper (rough to fine grit)
Scissors
Primer Spray Paint
Optional:
Felt
Spray Glue
Step 2: Molding Emblem


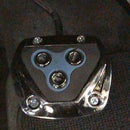
I rummaged around and found the shape i wanted on this grenade lighter. Whatever you choose to use, a light coating of Vaseline will keep the clay from sticking to the item and allow it to release from the clay easier.
Roll and knead the clay to get rid of any air pockets and make it more pliable.
Roll the clay into a ball and press your item into it. Gently twist to release from the clay.
Vaseline the USMC emblem (or whatever item you choose to use) making sure to get into all the little crevasses.
Center the emblem into the impression in your clay and press gently, yet firmly. Try to keep as even a pressure as you can.
When removing the emblem be very careful not to smear the impression in the clay.
Check your mold and make any adjustments or touch ups you need to.
Note: Make sure your mold has a flat bottom for the next step.
Step 3: Casting Emblem


Mix the resin according to the instructions.
I used Amazing Casting Resin:
Measuring equal parts solution A and solution B, stir for approximately 30 seconds and then pour into the mold.
It sets in about 5 minutes, but I leave it for about 10.
Remove cast from the mold and clean up the edges with an Xacto knife, or other sharp blade of choice.
An old toothbrush and some dish detergent work great to get off any excess clay.
Step 4: Casting Base


I liked the size and shape of an empty Duck tape roll and found it a quick mold to make.
Using a piece of cardboard (in this case a Dr. Pepper box) and a pen, trace the shape of the Duck tape roll onto the cardboard.
Cut the shape out with scissors and tape to the Duck tape roll, creating a container.
Mix about 1 cup Plaster of Paris. Rule of thumb is 2 parts Plaster of Paris to 1 part water. Stir thoroughly. Pour into the Duck tape mold.
Shake and jiggle the mold for a bit to work out as many air bubbles as possible.
Let set for about an 30 minutes.
Step 5: Shaping Base


Peel the taped part of the mold away, leaving the Duck tape roll in place for now.
Turn it upside down
At this point, the Plaster should be set but still damp. This will make it easier to shape.
Center the cast emblem made earlier on the plaster that should be flush with the cardboard roll. (Which is why it is now upside down.)
Score a line around the emblem using anything sharp and pointy, toothpick, clay tool, needle ect...
Using the curved blade, or pottery tool, dig out the center of the circle to a depth of about 1/16th of an inch.
Note: A Dremel could be used for this step, however, the plaster should be completely cured if going that route.
After you have it visually level, set the cast emblem into the recess and line it up to your satisfaction.
Make a small tick mark in the plaster and on the resin, be sure to mark the back of the resin as you will be painting the top.
Remove the cardboard mold and clean up the base. It will be sanded later, but this helps make that job a bit quicker.
Curing:
Place plaster in the oven set on Warm for 2 to 4 hours.
OR
Set the plaster to the side for a couple of days until completely dry.
Step 6: Painting Emblem


I was going for a Bloodstone effect. I started with a red base, but inverted the effect at the end. Both were done with the same technique.
Paint I used:
Folkart
Wicker White
Metallic Sequin Black
True Burgundy
Medium Gray
Liquid Leaf
Gold
Silver
Paint the base red. It's fine if it's messy as more paint will be added. This was done with a wet on wet technique.
In quarter sections add more red paint, then load a fine point brush with black. Dab randomly onto the wet red paint in various sizes and spacing.
While the paint is still wet, grab a tooth pick and pull the black into the red and the red into the black using a small circular motion.
(For the final piece I reversed the process and used large spots of red without much of the toothpick technique)
Paint the eagle, globe and rope with silver leaf.
Paint the continents and the anchor with the gold leaf.
Allow to dry completely.
Using a dry brush, work the shoe polish into the details of the USMC emblem.
Take a bit of paper towel and wipe off the high points.
Touch up the leaf if necessary.
Step 7: Prepping Base


After the plaster base is completely dry, gently sand the bottom, sides and recess.
With the rougher grit (60), knock off the edges of the recess and top edge. Pull the rounded sides across the paper, rotating it slowly. Avoid flattening the curve.
I used three different grits, (60, 120 and 220). It shouldn't take too much sanding, as the plaster is quiet soft. I left the small creases that the roll had created in the plaster for character, since I'm going for a stone look.
The recess doesn't need to be completely smooth as you want to leave a surface the glue can adhere to.
Make sure to transfer your tick mark to the bottom of the plaster mold as it will be covered in a moment.
Use the Primer spray paint on the sanded base. Two coats should be fine.
Step 8: Painting Base


For the base I was going for a Black Marble look, so I again used a wet on wet technique.
Paint the base black.
Painting in quarters, thin the grey down with some water and using a fine tip brush, wiggle a few crooked lines up and over the top of the piece towards the recess.
Vary the pressure on the brush to thicken and thin the lines.
Branch some veins off of one another.
While the paint is still wet, grab the tiniest bit of white on the tip of the brush, or grab a toothpick to pick up some white. Follow along the edges of the lines of grey randomly.
Add a few thin jagged streaks along the sides.
Dip the other end of the toothpick into the gold leaf and drag a jagged line of gold along the edges of the grey.
Try to mimic black marble and avoid straight lines.
Create as many or few striations as you wish to get the look your going for.
Step 9: Finishing Touches


Put the resin emblem onto the base and give it a coat of Acrylic spray varnish. I used the Matte finish as that is what I had. A Gloss or Semi Gloss should look nice as well.
When the finish is dry, use a dollop of tacky glue to attach the emblem to the base.
Optional:
To give it that finishing touch, use a piece of felt and some spray glue on the bottom.
Cut a rough square of felt, use a spray adhesive on the piece and firmly press the bottom of the paperweight on to it.
With an Xacto knife, or other sharp blade, cut off the excess material. It is better to do it in sections as it will crinkle up and the adhesive will try to attach to the sides.
Rub your finger around the bottom of the base, pressing gently to even out the edges.
Your paperweight is now complete!
Happy Father's Day!


