

Introduction: Pineapple Batik Tie Dye


This instructable is a mix of the wax batik technique and basic spiral tie dye! It is a great way to get a desired pattern or design into a traditional tie dye shirt.
Step 1: Materials


Blank top
Pineapple stencil
Disappearing ink fabric pen
Electric skillet
Batik Wax
Paintbrush or dropper
Mask
Goggles
Clipboard or piece of cardboard
Pot
Sponge brush
3 Procion Dyes (I used avocado, orange crush, and citrus yellow)
Rubberbands
Rubber gloves
3 Squirt bottles
Urea
Soda Ash
Funnel
Measuring cups
Step 2: Trace Stencil With Fabric Marker


Place your stencil wherever you would like it and use your disappearing ink to mark the fabric. (It will usually disappear in 24 hours)
Step 3: Heat and Apply Wax


Set your temperature based on the instructions that come with your wax. There are many types of resists and they all have different heating instructions. Make sure not to heat too high, the fumes are very toxic! You don't want to let it get to a smoking point.
Place a barrier between the two layers of fabric so the wax doesn't glue the front and back of your shirt together. (I used a clipboard but whatever you have laying around will work.)
To apply the wax you can use the eye dropper tool or tjanting shown in the materials, but I used a small paint brush so that I would have more control over the design. Any method will work though!
The wax must be translucent and hot enough to penetrate the fabric completely. You will be able to tell if it worked if you can feel the wax through the back side of the fabric. If the wax wasn't hot enough you may be able to peel it off very easily and just re-apply. If it doesn't come off easily and you want to be sure the resist will work just add a layer of wax to the back side!
Step 4: Prepare Dyes and Soda Ash Solution


Prepare urea by mixing 1/8 cup of urea with 1/2 quart of room temperature water. Stir until completely dissolved.
Mix 2 tsp of dye with urea solution in 8oz squeeze bottles. Stir until dye powder is completely dissolved.
Boil 2 quarts of water to a boil. Turn off heat and add 1/2 cup of soda ash. Stir until dissolved.
Step 5: Soak Shirt in Soda Ash Solution

Let soda ash solution cool completely before you soak shirt so that you do not melt the wax.
Once completely soaked, wring out excess water.
Step 6: Swirl Shirt and Tie With Rubberbands

Pinch the shirt in the center making sure to grab both layers of the shirt. Swirl tightly in a circle until all of the fabric is bunched and tucked in. Tie with rubber bands tightly. I used three rubberbands so that I could make 6 segments since I had 3 colors. You can make more or less!
Step 7: Add Dye

Place rubberbanded shirt on a sheet of plastic or a plastic bag to catch the excess dye.
Squirt onto shirt into the segments you made in the previous step. Turn over and do the same. Make sure to add enough dye to cover as much white spaces as you would like.
Let dye sit overnight in plastic bag to cure.
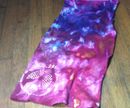
Step 8: Rinse Out Dye

Rinse out dye under room temperature water and remove rubber bands.
TIp: I used a sponge brush to add more of the green dye in between the pineapple pattern to make it more visible. There was a lot of white space in between the design that I needed to fill. This step is optional and you may be able to avoid this by being more thorough in the original dyeing step.
Step 9: Boil Out Batik Wax


Fill pot with water and bring to a boil. Place shirt in pot making sure to keep it at the bottom of the pot. (The wax will float to the top.) If all of the wax doesn't boil out the first, repeat this step.
Wait for water to cool so that you can skim the hardened wax off the top so that none of the wax goes down the drain.
Hang to dry!


