

Introduction: Pocket Sized Portable WiFi Deauther


Today i'll be telling you how to make your own Pocket Sized Portable WiFi Deauther.
WiFi deauther attacks local access points and cuts them off from using internet services.
so lets get started .
Step 1: Materials Required


You'll require the following components to make yourself a WiFi Deauther.
>Node MCU ESP8266
>Connecting wires
>LED (any color of your choice)
>Micro USB cable designed specially for Node MCU unit.
Step 2: Update From Boards Manaager

> Install Arduino and open it.
> Go to File > Preferences
> Add http://arduino.esp8266.com/stable/package_esp8266... to the Additional Boards Manager URLs. (source:
http://arduino.esp8266.com/stable/package_esp8266...
> Go to Tools > Board > Boards Manager> Type in esp8266 > Select version 2.0.0 and click on Install (must be version 2.0.0!)
Step 3: Download Code
Open the folder and run the ino file
Attachments

Step 4:


> Go to File > Preferences
> Open the folder path under More preferences can be edited directly in the file
> Go to packages > esp8266 > hardware > esp8266 > 2.0.0 > tools > sdk > include
> Open user_interface.h with a text editor
>Scroll down and before #endif add following lines:
typedef void (*freedom_outside_cb_t)(uint8 status); int wifi_register_send_pkt_freedom_cb(freedom_outside_cb_t cb); void wifi_unregister_send_pkt_freedom_cb(void); int wifi_send_pkt_freedom(uint8 *buf, int len, bool sys_seq);
Step 5: Go to the SDK_fix Folder of This Project
> Copy ESP8266Wi-Fi.cpp and ESP8266Wi-Fi.h
> Paste these files here packages > esp8266 > hardware > esp8266 > 2.0.0 > libraries > ESP8266WiFi > src
Step 6: Upload Code to Node MCU
> Open esp8266_deauther > esp8266_deauther.ino in Arduino
> Select your ESP8266 board at Tools > Board and the right port at Tools > PortIf no port shows up you may have to reinstall the drivers.
> Depending on your board you may have to adjust the Tools > Board > Flash Frequency and the Tools > Board > Flash Size. I use a 160MHz flash frequency and a 4M (3M SPIFFS) flash size.
>use a micro USB cable to connect your Node MCU with your Arduino IDE.
Step 7: WARNING

This experiment is for educational purpose.
Use it only on your own networks and devices!
Step 8: Scan for Access Points

Step 9: Select Network

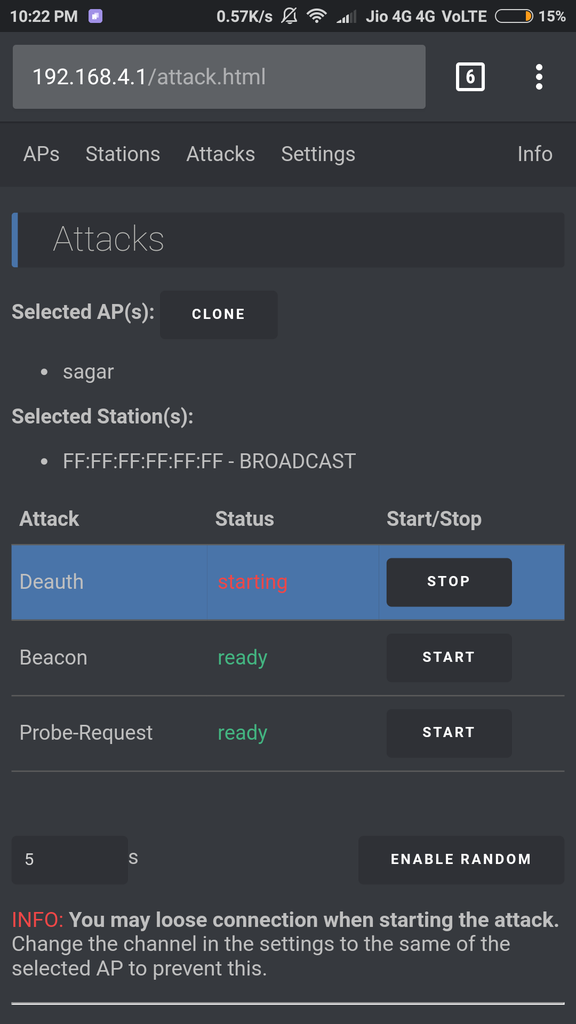
Step 10: Start Deauth Attack
Step 11: Create a Casing

I used a plastic case to create pocket sized Deauther device which you can carry anywhere.
cut out a small window for the micro USB cable .
Step 12: Add Visual Indications

Connect a LED to indicate that the device is powered up.
LED Node MCU
anode ----> D0
cathode ----> GND
Hope you liked this instructable. Feel free to drop in your comments and suggestions.
Happy Making !!!

Participated in the
Wireless Contest


