

Introduction: (16) Power Distribution Panel for Pluggables


To plug in any of the Pluggables, any of the equipment that is modified to not use a Wall Wart or Batteries, needs to have a Power Distribution Panel to provide the proper Voltage to operate.
If you plug in any of your equipment to any but the proper Voltage you Will Burn Out The Unit.
An item that works on 12 Volts can be plugged directly in to a 12 Volt Battery.
An item that works on a Lower Voltage needs to have that Lower Voltage provided to properly do work without burning out.
So what I have here is a Power Distribution Panel that provides 4.5V, 6V, 7.5V, 9V and 12V.
Each of the different Voltages starts at the 12 Volt Battery and goes to 5 DC to DC Converters.
The DC to DC Converters are connected to switches with indicator lights.
When a DC to DC Converter is switched on, an indicator light goes on and power is routed to it's outlet through the panel mount fuse.
In the picture notice the 6V light is on.
That Converter is routing power to run a radio I modified to be plugged in to this panel.
https://www.instructables.com/id/Solar-Adaptation-for-Radio/
The Flood Lights can be plugged in to the 4.5V outlet.
https://www.instructables.com/id/Portfolio-Solar-Landscape-Flood-Lamp-HACK/
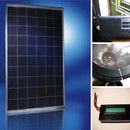
All the power comes from our Solar Panels to charge the battery bank.
https://www.instructables.com/id/12-Volt-PhotoVoltaic-Power-For-The-Tiny-Apartment/
To date I have modified LED Flood Lights, The Radio, a small LED Flashlight, a Blood Pressure Monitor and a Small Battery Charger for AAA's AA's, C, D and 9V batteries.
The 12V Battery Direct Plug accommodates two Amateur Radios and anything else that runs on 12 Volts like the charger for my E-Cigarette Battery.
Step 1: AH-55 DC to DC Converter


The AH-55 DC to DC Converter makes use of the LM317T adjustable voltage regulator. It has fixed carbon resistors and a 7 position switch to achieve the various voltage settings.
Voltage Settings; 1.5V, 3V and 4.5V @300mA
6V, 7.5V, and 9V @500mA
12V @1.2A
Open the cigarette lighter plug, took out the fuse and put it into a Panel Mount Fuse Holder.
Open the AH-55 case by taking out the 2 screws and removed the circuit board.
De-solder the wires on the circuit board that went to the cigarette lighter plug.
Solder new black and red wires to the circuit board.
De-solder the LED from the circuit board, solder new wires to the board where the LED was and solder the LED to the wires minding Polarity.
Solder 10" wires to the Output on the circuit board and done.
Step 2: DC to DC Converter Install


Pictured are 2 of the DC to DC converters installed.
After you get to this point, repeat as many times as you want.
I would like to put a variable Converter in there
See the picture to install the things.


