

Introduction: Premium Leather Dog Harness


I made this leather dog harness for my dog Painter. I modeled it after a leather tool vest I made myself last year. I made this thing to pretty much take any kind of pulling or tugging dogs usually do when they get too excited on the leash. It's also great to just let him off leash and just run around until he gets tired. There is two points where you can attach a leash. One on the back and one centered on the chest.
A quick thing I would like to mention is that during the actual process of making this harness I jump around from task to task because certain things must be done before moving on to the next process or I was just tired of working on one single piece for so long (so the pictures may depict one thing or another done before moving on and so on). On this Instructable I try to separate the tings I did into "steps" but they are more so a guideline. I try to mention why I do one thing before another but if it is not 100% clear let me know and I can clarify whatever it is you have a question on.
I also want to start off by saying that I am by no means a leatherworker. I'm sure there are plenty of things here that I do that someone with more knowledge and experience would do differently. I am also going to start off by detailing how I do certain things that will be done repeatedly throughout the process, so I don't need to keep going into how to do the same thing over and over.
Supplies
Leather
Basic leather working supplies
Dremel
Exacto knife
Paper and pencil
Step 1: Stitching


I use a hand stitched method called saddle stitching throughout the whole project. There are plenty of Instructables on how to saddle stitch so I won't be going into much detail about how to do it, however I did want to take a step to tell you what I do differently. Normally people use a diamond shaped punch that comes in 1-10+ prongs in a straight line to penetrate through the leather they are stitching, then stitch one by one pulling the thread taught each time.
I do not own any of these diamond shaped punches mostly because I dont like the look of the stitching they produce. I prefer round holes in a grooved line. You can purchase the same type of punches with round holes, which are normally called round dent punches, but I do not own any yet. So I use a spacer wheel and hand punch every hole with a leather awl. When I am stitching 2 or more layers of leather I must punch through both sides since my awl is tapered and the leading edge does not create a big enough hole on the underside of where I am punching through.
The thread I choose is waxed nylon thread. It's a durable thread and the nylon properties help with how I end the stitch. Normally when you end a saddle stitch you stitch back a few times and nip the thread at the base. Friction will keep the thread in place. When coming to the end of my stitching line I run the threads back (or forward if its a loop) about 3 full stitches, then one more time on the face side of the leather. This ensures that both ends are on the side that won't be presented when worn. I then tie the threads in a double knot and cut the thread about 1/8 of an inch from the knot. Because nylon is a plastic it melts nicely. The point of tying the knot is not to keep it in place but to provide a mass that I can take a lighter to and use indirect heat to melt that lump of plastic and press it down flat on the underside.
I dont have a stitching horse so for most of my stitching I used the tail vise on my woodworking bench.
Step 2: Burnishing


Burnishing is the process of polishing the rough unfinished edges of leather in your project. Burnishing is not absolutely necessary, but if you choose not to you run the risk of fraying over time and more importantly, an ugly looking project. You can burnish a number of ways, the simplest being a wooden slicker and some elbow grease all the way to a burnishing machine, which looks like a small bench grinder with disks of different diameter gouges on it. I highly suggest looking at other Instructables if you have a particular method you want to try.
My burnishing technique is simple to do if you have a Dremel type machine. I use a 1" felt polishing wheel. I stumbled across this method by accident while working on my tool vest last year. I did not know what the material was but it looked like an abrasive enough fabric to get what I needed done. From what I understand the gist of burnishing is to break down the proteins in the leather by heating them up by friction to a smooth sheen.
I generally like to stitch any areas I need to burnish before burnishing, however sometimes you need to burnish first as you will see in a few areas throughout the process.
When you have a clean cut next to your stitching line that you are looking to burnish you need to round over those square edges. I use a number 5 (I think) edge beveler on both sides of the section I am burnishing. I then take a small cup of water and dip my fingers in and get the full edge wet. You can use a small sponge to do this but I end up ruining them too often to keep buying them. You will need to wet the edge 3 to 4 times for it to stay moist as the leather will soak up some of the moisture. From there I take my felt polishing wheel and use the narrow side to run the edge a few times over at high speed on your Dremel. I typically do one slow pass followed by a few slightly faster ones until the edges are right where I want them. I then run one slow pass on each edge of the leather where we rounded the edge with the beveler. You can see the leather turns almost black when done properly and hardens up quite a bit. At this point you will have a pretty smooth surface but it won't stay very long without extra protection. Next I use a chunk of beeswax and directly apply it to the edge of the leather. Running the wax back and forth on the leathers edge a few times until a small amount of wax residue remains on the edge. Now take your Dremel with felt wheel AT SLOW SPEED and work the wax into the leathers edge. I normally only do this one time but a few coats of wax will protect it for longer.
Another option is edge paint. I did not use this or care for the product so I will not go into it here.
Step 3: Drafting and Design


This whole design is actually pretty simple, 4 pieces total. For the purposes of clarification I'll call them the back piece, chest piece, sternum strap, and belt.
I've always liked the scroll work found in older US currency, so for my tool vest I chose to make the back plate the same shape as one of the shields the "1" sits in on the top right side of the green side of a one dollar bill.
Since Painter is my dog I thought it would be cool for us to rock the same back piece. The chest plate I designed was primarily made for comfort. I started with looking at the area where the piece would sit and made the elongated inverted triangle. From there I got an idea of where I would want the straps around his neck to come in. The angle at which they attach was determined later after fitting pieces to him and eye balling the angle at which they came in. I added a few little details to the corners at the top and the bottom end that attaches to the sternum strap just for the looks, making sure none of these would be uncomfortable for my dog to wear.
You can see in the pictures of the drawings how I made plenty of changes to the design as I went along. I first drew up a couple of ideas in a sketchbook, then when I was happy with an idea I drew them out full size on a large graph notebook. This step is essential because I reference these drawings a lot during the process and use a transfer method to get my drawings on to the leather exactly.
The sternum strap and belt were not drawn out because why would you? All you need to know is the length measurements of the pieces where they will sit on your dog but I would not know those measurements until the back and chest pieces were in place. I did end up changing the sternum strap from 1" to 3/4" for aesthetics and because it does not deal with much stress.
Step 4: Back Piece (main and P)


My dogs name is Painter. So I wanted his back piece to have a nice big P on it.
Back plate.
Working off of my full scale drawing I took a pencil and tracing paper and traced out the full shield. I then carefully cut it out and took it over to my piece of leather. I scribed the outline with a pencil then removed the tracing paper. Now you can carefully cut out the shape of the shield.
To make the "P" I transferred it with the same tracing paper. To do this just realign the cut shield piece of tracing paper and trace your design and then flip the tracing paper over. Trace over the "P" again on the underside of the paper making sure to completely cover the lines on the other side. Now place that side down on the leather and once again trace the outline. This will leave a small amount of lead from the bottom of the paper on the leather.
Carefully cut out the P and save that piece. it is not scrap as we will be using it later.
Somewhere during this time I measured the D rings that I will attach to the piece and cut those holes out for it to sit in.
Step 5: Back Piece (make the P Pop)


I took both of my black back pieces (shield and P) and placed them on a piece of red leather. The P should be on leather facing up and the shield on leather facing down. Roughly cut around the pieces. The piece of leather under the shield will be the back side to the shield. The piece of leather were cutting around the P here will sit underneath the shield where the P has been cut out. leave enough space around the leather for the threads that we will be sewing around the P to keep it in place. Since we're going to be gluing this piece of leather underneath the P hole we want to run the groover tool around the P then burnish the inside edges. Use the groover tool and a grover pen to get all the way around the P. Take the red piece of leather and place it under the P hole, now trace around the P hole with a pencil or scratch awl. This will tell you where you need to apply glue to hold that piece in place. flip the whole thing over and to the same thing to the underside of the back shield. This will give you your glue lines on the black piece. once you have that done glue away.
Now that those two pieces are glued and dried you can work on making the P pop. I took the P that I cut out of the back piece and cut out about 1/4 of an inch from the whole circumference of it. I then beveled the downside face (I chose to do the opposite face on the 6 in the chest piece and that came out looking better). I accomplished this beveling with a combination of my Tandy skiver tool and a few knives for the tight corners. I took this time to also skiver around the read leather on the backside the completed piece doesn't feel lumpy.
Around this time I took one of the D rings and straightened out the flat parts to insert it into the leather. Once it was in place I bent them back together. I show more on how I accomplished this with the D ring I insert into the chest piece. Same process.
Now with the whole piece still face down I pressed the cut and beveled P piece into the red leather. This stretches the leather ever so slightly and leaves you with a nice indication on where you want to apply glue to hold it in place. Take your P and glue the whole face into this indented section. Using this same press down to indent then glue in place method glue the small section of the P in place when you flip the whole thing over.
Step 6: Back Piece (Buckle Holders)


Because my dog likes to pull every so often or if he gets too excited I knew I wanted to use buckles to hold everything together. As you can tell from the full size drawing they extend directly out to the sides. that is to hold the belt from one side to the other going around his belly.
I took my drawing and extended the shape of these buckle holder pieces into the back piece. This is done for one reason only, I need strenght. By doing this I am able to sew through the shield into the buckle holders to make sure that they will be going nowhere soon. the decorative lines you see at the bottom of the back piece sewn with black are what hold these buckle holders to the main piece.
As you can see in the photos I traced the design from my drawing onto leather and cut out 4 pieces, two in black and two in red, making sure I had the nice side of leather facing out on each side. I took the red pieces of leather and made the necessary cuts for the buckles to be attached. I started glue up on this piece by first gluing one side from the buckle, letting that dry, then inserting the buckle and gluing the other side. you can tell in the pictures how I left the red pieces of leather 1/2 longer to accommodate for the 1/2 gap I cut out for the buckle.
I took a few small pieces of wood to clamp this together just to make sure it stayed nice and flat.
Trim any excess off of the red leather and you are set.
Now that you have the shape of your buckle holders you are going to want to know exactly where they go on the back piece. To do this I took the back piece and placed it on my cutting Matt and aligned it perfectly plum with one of the lines. Now look at your drawing and see exactly where you need the buckles to be. Align those pieces reference to your back piece and trace out with pencil where they need to be. you will do two traces. One on the face of the back piece (to show you where you will need to sow to hold them in place later), and one on the Buckle holder pieces (so you can quickly reference where they belong when you go to glue).
You can do it the way I described up there or you can take the time to take that cut out and trace the lines from your original drawing and trace them onto each of the red sides of each piece. Other way is falser. You will still need to align the buckle pieces to the back piece to trace where your sew marks should be later.
I then took my skiving knife and feathered out the inside of each piece. Inside the lines on the part that will be behind the back piece from both sides. Again, this is so the whole back piece does not feel bulky or bumpy when all put together.
Next thing you want to do it sew and burnish these two pieces. Take your grooving tool and spacer wheel and sew from one end to the other. You will want to only sew one or two holes into where the leather will be inside the back piece. On the little box I'm sewing in front of the buckle you should also double stitch for added support. you can see I started at one side close to the buckle so when I looped back around I could continue there for my double stitch in front of it.
The last thing you want to do before gluing this to the back piece is take your grooving pen tool and make a series of parallel grooves from about 1/4 of an inch from grooves in the border of the back piece in until you are a stitch or two from where the buckle holder pieces will be on the inside of the back piece. Once you've made these grooves you can glue the buckle holder pieces on to the back of the back piece. once this is done use the spacer tool, awl, and thread to sew these pieces in place permanently.
Quick note here. Anywhere the buckle holder pieces will interfere with burnishing the back piece after installation should be burnished prior to sewing them in place.
Step 7: Back Piece (Shoulder Straps)


I won't go into too much detail here as these are pretty simple to make. (doubled up leather, black on bottom/red on top)
The one major thing to note here is what angle the straps should leave the back piece. To accomplish this I enlisted the help of my wife to help me hold the incomplete back piece in place while also holding a cut out of the future chest piece to his chest. From there I quickly took a belt and stretched it from the general area I wanted the straps to protrude from around his neck onto his chest, again to the general area I wanted the two to meet. Once I was happy with the look and most importantly, fit of the straps I marked a line along the edges of the belt onto the back piece and chest cut out. From there I simply made extra long straps and flared them at the ends to meet the back piece at aesthetically pleasing angles.
Sadly because my dog thought we were trying to play with him there are no pictures of this process. You will just have to try to figure it out.
As with the buckle holder pieces I extended the material I cut out into where the back piece will sit on top of it. I feathered the edges again, marked where it will sit under the back piece and grooved the back piece prior to gluing and sewing. Also, remember to burnish the back piece where these two pieces meet with its edges. On these pieces I decided to sew a short line extending two spaces under where it will sit on the back piece out about 6 or 8 holes toward the strap ends. I did this because I needed to also burnish the shoulder straps at the point where they intersect the back piece. you can see these small sections in the pictures. The rest of the straps are left unfinished so I can fit them to length once I have the chest piece fully built.
One last thing to note here is the notches I cut out for the D ring I inserted a few steps back. This along with cutting around where the P is ensures I dont end up with a bulky nasty mess.
Step 8: Back Piece (Final - Sort Of)


Now that you have the buckle holders and shoulder straps sewn in you are ready to attach the back to the back piece on. Take the piece of red leather that you cut out oversized in earlier steps and trace out the same shield shape onto it and cut it out. Now you are ready to glue this piece onto the back of the back piece. Glue the whole back of the back piece carefully and glue that red leather on now making sure that the sides that are exposed line up as much as possible. The leather I used is stretchable enough that it didn't take much to make it fit almost perfectly. Use about a million and a half tiny clams to make sure the edges dry properly in place.
I dont have a picture of this yet and dont know if I'll remember to put it in later so I'll just say that once everything is all together the only stitching you want showing on the reverse side of the back piece is the yellow thread that you now get to use to sew the outline of the shield and the letter P.
The reason I put sort of in the title of this step is because you still need to finish the shoulder straps to fully complete this step. However, we have not made the chest piece yet and you need it done to appropriately measure and cut off the excess length of the shoulder straps.
Step 9: Belt and Sternum Strap


These again are pretty easy to make so I won't go into too much detail. Black leather on Red made so that the red is showing while it is being worn. I just made two extra long pieces. I cut one straight line in my leather and then another about 2 1/4" away from it. I then used my strap cutter to run a parallel line off of the straight one right at 1". Repeat this process for the other side of this belt then move the strap cutter down to 3/4" for the sternum strap.
I placed the back piece on my dog and measured his belly from one buckle on the back piece to the other. this is how I got my length. somehow I messed this up though because I ended up with about 4" more than I wanted. Thats not a big deal, I'll fix it some other day. The sternum strap length was measured the same way. placing everything on the dog with the help of my wife and just measuring the missing distance. add about 2" to the sternum strap because that ends up being what the belt loops through on the underside.
Once you have all the measurements, glue the pieces together, cut to length, clean up the edges, grove, sew, bevel and burnish. Place the belts through the buckles to mark out where your eyelet holes go.
For the sternum strap take the extra 2" you added and fold this over. You can now punch through all 4 layers of the belt with your punch and rivet this in place (2 at a time). This will stay attached to your belt at all times. (unless you pull it through) At the other end pull it through your buckle when you are done making your chest piece and measure for the eyelet hole.
Step 10: Chest Piece


As you can see in the full size drawing of this piece at the beginning, I made plenty of changes to the way I was going to make this piece from the start. Most of the changes were due to the ambiguity of how the straps were going to meet the chest piece. As the project progressed I liked the idea of having the shoulder straps sit comfortably and cleanly with the way the black part of the chest piece was shaped.
I made this part the same way I did the pack piece so I won't go into every step. There is one major thing I changed with this part though. Instead of having two individual pieces that I attached to the chest piece I chose to make it one piece that both buckles were connected to. That way the front and back pieces of the chest plate could sandwich that into position.
Another thing I mentioned before was the fact that I beveled the top side of the 6 this time. If I made this again I would do it this way every time to make whatever insert 'pop'. The 6 looks much better this way. you can see in the pictures how it was beveled to achieve this look.
A couple of notes on this piece. I decided to elongate this piece from my original drawing by 2 1/2" to clear my dogs legs. You can see how I made the cuts in the pictures for the buckles. To bend the D rings for both top and chest parts I used some dykes (dont know if this is the proper name for these tools but thats what I was taught since I was a kid, please dont hate me) to cut the weld loose then used a series of pliers, channel locks, and my vise to manipulate it.
Step 11: I Am Not a Smart Man


I mistakenly attached every single belt buckle on this harness backwards (you know how every belt buckle goes one way and not the other). They would still work but the little tongue from the buckle would stick straight out. I contemplated removing all the stitching and glue that would be needed to reverse each buckle and was honestly just devastated by my absolute stupidity. I started this project a little over a week before the pet contest ended and after working on it tirelessly every day I know that I would not have enough time to complete the project if I decided to turn each one around. After a few sips of juice and some thoughts of abandoning the Instructable I found a simple solution. I decided to remove that little tongue piece from each buckle and just reverse them. They still work. Not as intended but it is what it is. To do this I took the dykes to separate the loosely fit tongues and with the help of some channel locks and leverage got them off in about no time. Then I turned them around and used the channel locks again to tighten them back around the stem they are meant to be attached to. This whole thing did not take much time and even made me feel a bit better about my ingenuity.
Step 12: Finish Shoulder Straps

Now that your chest piece is put together you can fit the shoulder straps.
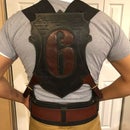
To do this I just put the whole harness on Painter and pulled the extra long straps through the now corrected buckles. I marked off where they eyelet hole goes and where the strap would meet the black part of the chest piece. I subtracted about a quarter of an inch from where that line is and that is where I cut down the shoulder straps to. Take your groover, edge beveler, stitch and then burnish. Now when you put the harness on this precious puppy the shoulder straps sit right up with the chest piece. You can sort of see what I mean in this horrible selfie I tried to take with Painter.
Step 13: Fin


Last thing left to do is put this harness on your dog. My dog is pretty dumb (or smart?) so after all of the measuring and trying to hold him in place for all of the fitting for this harness he did not seem too amused when I went to finally put it on him. After my wife and I took him outside for some action shots with it he now realizes that this thing means he gets to go outside. He loves it.
You've made it to the end. Thank you for following along. Please check out my IG if you like this Instructable
@66Fiend

Participated in the
Pets Challenge


