

Introduction: Pressure and Temperature Arduino Indicator


This project reads the barometric pressure, ambient temperature, date, time and manages the display color of a phone Siemens S55 I gutted.
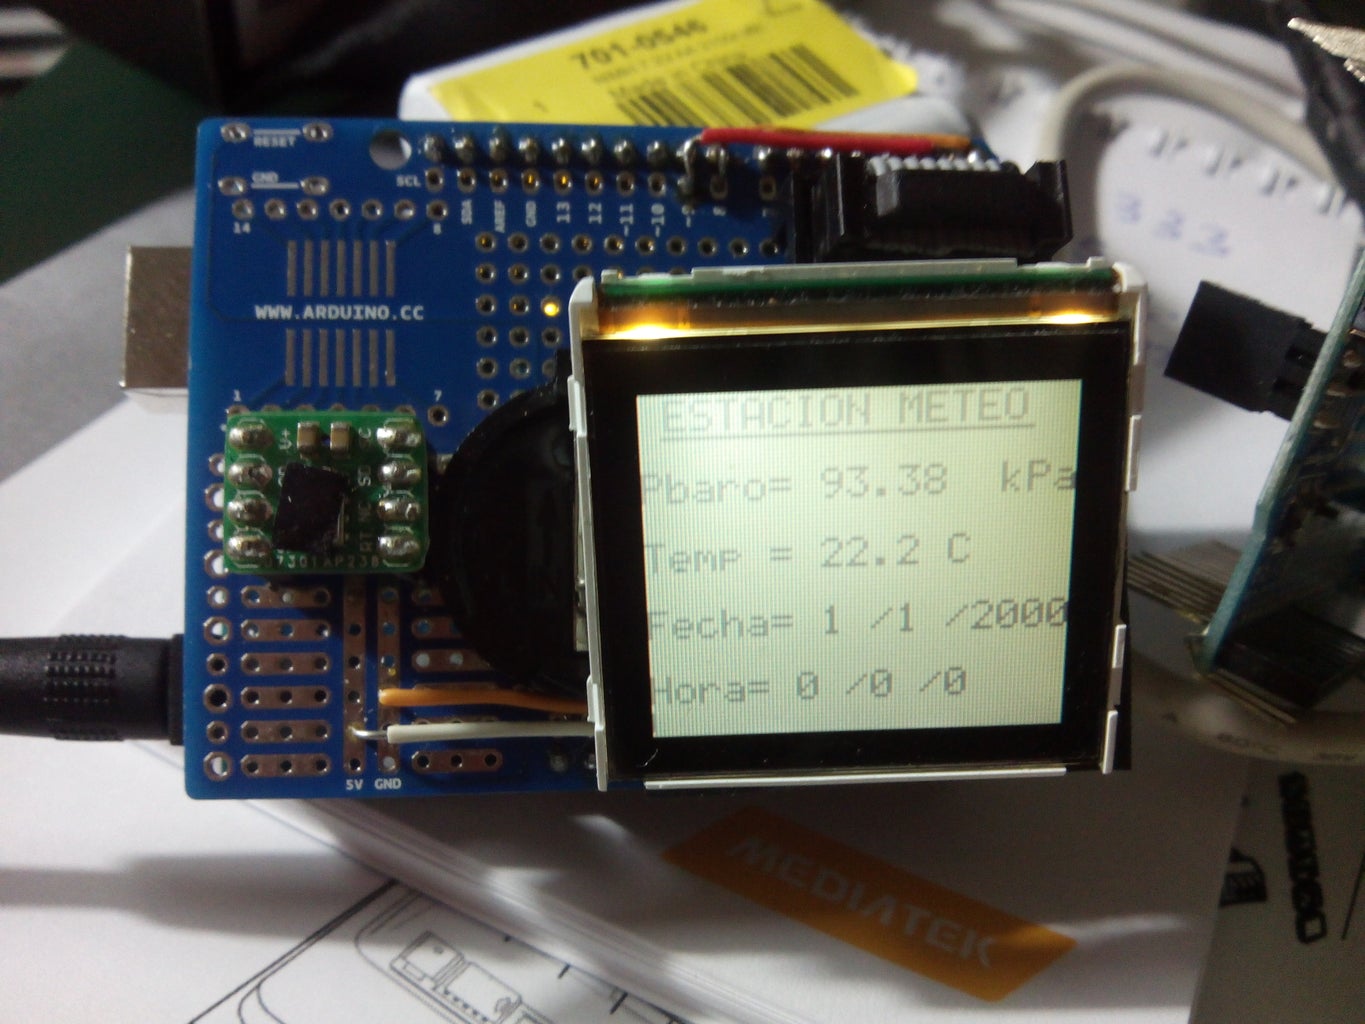
Step 1: System Description

As can be seen in the photos above and in the attached diagram, the system is made up of (BOM):
Arduino Uno R3 model Arduino
Proto shield
DS1307 Real time clock, and 3 volt battery holder
MPL115A2 Barometer / temperature device.
Color screen mobile Siemens S55, LM15SGFNZ07.
In the breadboard, are welded and connected wire to wire, both the top side and the underside, the indicated components, so that containing in the surface.
Step 2: S55 Display LM15SGFNZ07

After removing the color screen from S55 mobile and having cleared the 10 contacts, I have adapted a ribbon cable connector for interfacing with the proto board. (see pin description).
See attached driver to control display.


Step 3: Data Tranfer
The data from both the clock and the temperature and pressure sensor are transmitted to Arduino Uno through the I2C serial bus, which use the common pins (SDA, A4) and (SCL, A5)
Step 4: Arduino Sketch
#include "Wire.h" //libreria para comunicaciones el reloj y el barómetro
#include "Adafruit_MPL115A2.h"// librería barómetro
Adafruit_MPL115A2 mpl115a2;
char sensorPrintPress [6];
char sensorPrintTemp [5];
//Declaración de las cadenas de fecha
char dayPrint [3];
char monthPrint [3];
char yearPrint [5];
//Declaración de las cadenas de hora
char hourPrint [3];
char minPrint [3];
char secPrint [3];
//libreria del reloj DS1307
#include "RTClib.h"
RTC_DS1307 RTC;
int rate = 0;
// Libreria del LCD de Siemens S55
#include "LM15SGFNZ07.h"
LM15SGFNZ07 lcd(2,3,4,5,6); //config lcd conectivity
void setup()
{
lcd.init_lcd();// Inicia la pantalla LCD
lcd.contrast_lcd(0x100); //setting new contrast
lcd.clear_lcd(WHITE);// Pone la pantalla en blanco
delay(100);
Wire.begin(); //Inicia el protocolo wire
RTC.begin(); //Inicia el reloj
mpl115a2.begin();//Inicia el barómetro
}
void loop()
{
DateTime now = RTC.now();//Pide el valor de la hora
float pressureKPA = 0, temperatureC = 0; //define las variables del barómetro
pressureKPA = mpl115a2.getPressure();//lee el valor de la presión
temperatureC = mpl115a2.getTemperature() + 3;//Lee el valor de la temp y Suma tres grados error
lcd.str_lcd(" ESTACION METEO",1, 1, 1, BLACK, -1);
lcd.line_lcd(5, 90, 198, 198, BLACK);
// convert the reading to a string
String sensorP = String(pressureKPA);
// convert the reading to a char array
sensorP.toCharArray(sensorPrintPress, 6);
lcd.str_lcd(sensorPrintPress,8, 3, 1, WHITE, WHITE);
lcd.str_lcd("Pbaro=",1, 3, 1, BLACK, -1);
lcd.str_lcd(sensorPrintPress,8, 3, 1, BLACK, -1);
lcd.str_lcd("kPa",15, 3, 1, BLACK, -1);
// convert the reading to a string
String sensorT = String(temperatureC);
// convert the reading to a char array
sensorT.toCharArray(sensorPrintTemp, 5);
lcd.str_lcd(sensorPrintTemp,8, 5, 1, WHITE, WHITE);
lcd.str_lcd("Temp =",1, 5, 1, BLACK, -1);
lcd.str_lcd(sensorPrintTemp, 8, 5, 1, BLACK, -1);
lcd.str_lcd("C",13, 5, 1, BLACK, -1);
// convert the reading to a string
lcd.str_lcd("Fecha=",1, 7, 1, BLACK, -1);
int sday = now.day();
String ssday = String(sday);
// convert the reading to a char array
ssday.toCharArray(dayPrint, 3);
lcd.str_lcd(dayPrint,8, 7, 1, WHITE, WHITE);
lcd.str_lcd(dayPrint,8, 7, 1, BLACK, -1);
lcd.str_lcd("/",10, 7, 1, BLACK, -1);
// convert the reading to a string
int smonth = now.month();
String ssmonth = String(smonth);
// convert the reading to a char array
ssmonth.toCharArray(monthPrint, 2);
lcd.str_lcd(monthPrint,11, 7, 1, WHITE, WHITE);
lcd.str_lcd(monthPrint,11, 7, 1, BLACK, -1);
lcd.str_lcd("/",13, 7, 1, BLACK, -1);
// convert the reading to a string
int syear = now.year();
String ssyear = String(syear);
// convert the reading to a char array
ssyear.toCharArray(yearPrint, 5);
lcd.str_lcd(yearPrint,14, 7, 1, WHITE, WHITE);
lcd.str_lcd(yearPrint,14, 7, 1, BLACK, -1);
// convert the reading to a string
lcd.str_lcd("Hora=",1, 9, 1, BLACK, -1);
int shour = now.hour();
String sshour = String(shour);
// convert the reading to a char array
sshour.toCharArray(hourPrint, 3);
lcd.str_lcd(hourPrint,7, 9, 1, WHITE, WHITE);
lcd.str_lcd(hourPrint,7, 9, 1, BLACK, -1);
lcd.str_lcd("/",9, 9, 1, BLACK, -1);
// convert the reading to a string
int smin = now.minute();
String ssmin = String(smin)
// convert the reading to a char array
ssmin.toCharArray(minPrint, 3);
lcd.str_lcd(minPrint,10, 9, 1, WHITE, WHITE);
lcd.str_lcd(minPrint,10, 9, 1, BLACK, -1);
lcd.str_lcd("/",12, 9, 1, BLACK, -1);
// convert the reading to a string
int ssec = now.second();
String sssec = String(ssec);
// convert the reading to a char array
sssec.toCharArray(secPrint, 3);
lcd.str_lcd(secPrint,13, 9, 1, WHITE, WHITE);
lcd.str_lcd(secPrint,13, 9, 1, BLACK, -1);
if (ssec < 56) {
lcd.line_lcd(0, ssec,1 , 1, BLUE);
lcd.line_lcd(0, ssec,2 , 2, BLUE);
lcd.line_lcd(0, ssec,3 , 3, BLUE);
lcd.line_lcd(0, ssec,4 , 4, BLUE);
lcd.line_lcd(0, ssec,5 , 5, BLUE);
}
else {
lcd.line_lcd(0, 60,1 , 1, WHITE);
lcd.line_lcd(0, 60,2 , 2, WHITE);
lcd.line_lcd(0, 60,3 , 3, WHITE);
lcd.line_lcd(0, 60,4 , 4, WHITE);
lcd.line_lcd(0, 60,5 , 5, WHITE);
}
//delay(1000);
//lcd.clear_lcd(WHITE);
}
Attachments
Step 5: Resume
This instrument assembly welding requires some skill but it is actually a fun and interesting project by using equipment recovered from discarded material. Control LCD display is easy and shows the writing characters and some simple graphics.
I hope you enjoy it.
In any case if you know Codebender web site, it is possible to found the shared project.


