

Introduction: Programming a HTTP Server on ESP-8266-12E


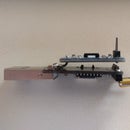
In this Instructable, together we will undertake the journey of programming the ESP8266-12E WIFI Development Board as an HTTP server. Using a web browser we will send instructions to the ESP8266-E12 to change it's behavior. Throughout the process, at each step we will also look under the hood to see what is going on inside. While doing this we will control the on board LED to turn ON and OFF with commands issued via a web browser.
In my previous Instructable Programming the ESP8266-12E using Arduino software/IDE I have described how to add the ESP8266-E12 board to the Arduino software/IDE and write your first sketch to blink the on board LED. The code is hardwired, hence on power up the ESP-8266-12E does what it is suppose to do - blink the LEDs. One cannot change the behavior of the board without reprogramming it.
In an ideal world of IoT the ESP8266-E12 should communicate with us over WiFi and over the the internet. We should be able to control the ESP-8266-E12 over Wifi using protocols specific to the internet. We should be able to instruct the ESP-8266-12E to do "Things" without having to reprogram.
Step 1: Opening the "Connect to a Network" Window


In your Windows environment open the Network and Sharing Center. You get to the Network and Sharing Center via the Control Panel.
Click on Connect to a network to open theConnect to a networkwindow. Leave it open, we will be referring to this window often. You may shut the Network and Sharing Center.
Step 2: Writing the SimpleWebServer Sketch

Connect your ESP8266-12E to your computer.
Open your Arduino program/IDE and paste the following code:
#include <ESP8266WiFi.h>
WiFiServer server(80); //Initialize the server on Port 80
void setup() {
WiFi.mode(WIFI_AP); //Our ESP8266-12E is an AccessPoint
WiFi.softAP("Hello_IoT", "12345678"); // Provide the (SSID, password); .
server.begin(); // Start the HTTP Server
}
void loop() { }
This boiler plate code will be a part of every ESP8266 sketch we write. This code does the following:
- Includes the ESP8266 library ESP8266WiFi.h.
- Creates the instance "server" of the class "WiFiServer" listening on port 80. Notice "server" is a global instance.
- Set the mode of our ESP8266 to be an Access Point (AP).
- Provide the SSID and password. The password / passphrase has to be at least 8 characters long.
- Fire-up our server by calling the begin() method.
Save as SimpleWebServer sketch. Compile and upload the sketch to your ESP8266-12E.
Step 3: Checking Our Server

Open the "Connect to network" window. You should see our server with SSID "Hello_IoT" in the list. Select the Hello_IoT network, provide the password/passphrase and save it.
Hurrah our ESP8266-12E is operating as a HTTP server listening on port 80.
Step 4: Looking Under the Hood

Launch the Serial MonitorTools | Serial Monitor or with the shortcut keys Crtl-Shift-M.
Step 5: Get HTTP Server Information From the ESP8266-12E
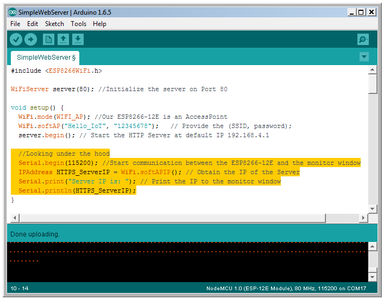

Add the following piece of code in the end of the setup() function:
//Looking under the hood
Serial.begin(115200); //Start communication between the ESP8266-12E and the monitor window
IPAddress HTTPS_ServerIP= WiFi.softAPIP(); // Obtain the IP of the Server
Serial.print("Server IP is: "); // Print the IP to the monitor window
Serial.println(HTTPS_ServerIP);
Compile and load the sketch and watch the Monitor Window. You should see the default IP address of the ESP8266-12E as 192.168.4.1.
Step 6: Web Browser Connects/Talks to Server


It is time for a web browser to connect to our HTTP server.
Enter the following code within the loop() function:
WiFiClient client = server.available();
if (!client) {
return;
}
//Looking under the hood
Serial.println("Somebody has connected :)");
Compile and load to the ESP8266-E12.
Open a browser window and enter http://192.168.4.1 and and hit enter.
Observe your Monitor window to check for a connection.
Step 7: Listen to What the Browser Is Sending to the HTTP Server


The web browser connects to the HTTP server and sends the request. The server receives the request and does something with it. Rather it can do a lot of different things.
Enter the following code in the loop() function.
//Read what the browser has sent into a String class and print the request to the monitor
String request = client.readString();
//Looking under the hood
Serial.println(request);
Compile and upload to the ESP8266-E12. Enter the following in the address field of your browser http://192.168.4.1/PARAM.
The browser sends a GET request to the server. Notice "/PARAM" following the GET request. Off all the text sent we are only interested in the first line of the request. Thus we replace the code
String request = client.readString();
with
String request = client.readStringUntil('\r');
Step 8: Turning the LED ON/OFF Through the Web Browser


We are ready to turn the LED on GPIO16 ON/OFF through commands given via the web browser.
Firstly initialize the digital port GPIO16 as an output port and keep the initial state of the LED ON.
At the bottom of setup() function add the following lines of code:
pinMode(LED_PIN, OUTPUT); //GPIO16 is an OUTPUT pin;
digitalWrite(LED_PIN, LOW); //Initial state is ON
At the bottom of loop() function add the following lines of code:
// Handle the Request
if (request.indexOf("/OFF") != -1){
digitalWrite(LED_PIN, HIGH); }
else if (request.indexOf("/ON") != -1){
digitalWrite(LED_PIN, LOW);
}
In the address bar of your browse type the following URL:
http://192.168.4.1/OFF
The LED on the ESP8266-E12 will turn OFF.
Then type the following URL:
http://192.168.4.1/ON
The LED on the ESP8266-E12 will turn ON.
Step 9: Let Us Get a Little Fancy


It is cumbersome to change the URL each time we need to turn the LED ON or OFF. Let us add some HTML code and some buttons.
Copy this code and add it at the bottom of the Loop() function:
// Prepare the HTML document to respond and add buttons:
INSTRUCTABLES MANGLES THE HTML CODE
//Serve the HTML document to the browser.
client.flush(); //clear previous info in the stream
client.print(s); // Send the response to the client
delay(1);
Serial.println("Client disonnected"); //Looking under the hood
Compile and load.
HAPPY IoTing!!!


