

Introduction: Programming an FRC Robot

For Inspiration and Recognition of Science and Technology (FIRST) is an organization with the mission of inspiring young people to become involved in science and technology through the use of programs that give them hands-on experience in various engineering and technological areas. FIRST Robotics Competition (FRC) is a worldwide competition they hold every year to give high school students the opportunity to build their very own robot from scratch and compete with and against other teams. For more information on this great organization, visit usfirst.org.
I was the programmer for Team 4733 – Scarlett Robotics and in this tutorial I will be covering how to program a FIRST Robotics Competition robot using C++ and WPILib. A basic understanding of C++ is necessary to understand some of the terms used in this instructable and to be able to adapt your code to your team's specific needs. There are many online resources you can use to learn C++, such as thenewboston, thecplusplusguy, or cplusplus.com.
Update: Programming an FRC Robot significantly changed in 2015, especially in terms of setup. I have updated this instructable accordingly. If however you want to look at instructions more relevant for previous years for some reason, please check out the archived version of this page here.
Step 1: Installation and Setup


To start off, you will want to install Eclipse on the computer of your choice. Eclipse is a popular IDE made by Oracle. To install this, go to https://www.eclipse.org/downloads/, and find the download labeled Eclipse IDE for C/C++ developers. After going through the installation process, you next have to install the FRC roboRIO Toolchain which can be downloaded by going to http://first.wpi.edu/FRC/roborio/toolchains/ and selecting the link for your operating system. You will not notice any new applications installed after installing the toolchain. Now open up Eclipse. You will encounter a popup asking what workspace you wish to use. I would suggest creating a folder in your Documents called something like "FRCWorkspace". This will be the location of all your source files along with various other files such as output files and configuration files.
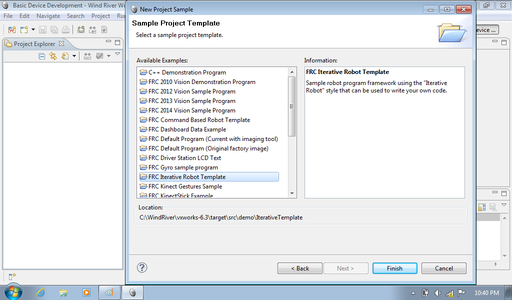
If you wish to see or use the example programs provided by FIRST, File > New > Example... > VxWorks Downloadable Kernel Module Sample Project. You should then be presented with a list of projects that have been written for you. Clicking on one of the options will reveal more information on what it contains. Even if you want to program everything from scratch, you should still start your project using one of these examples because they setup all the includes, build configurations, flags, etc. For the purposes of this tutorial, chose IterativeTemplate. To start off you will want to clean up your project a little bit. In your project explorer, right-click sample.txt and select delete, then press OK. Then right-click IterativeTemplate and select rename. Change the name of your project to anything you want. Avoid using spaces or special characters other than a hyphen or an underscore. I would suggest that you do something like 'TeamName2014'. Press OK when you have decided on a name and have typed it in the provided text field. Your window may seem a little cluttered right now with boxes along all the edges taking up space. Feel free to drag and drop the various tabs wherever you want. You typically want lots of room for your file editor in the middle and a project explorer visible at all times.
Step 2: Going Through the Default Code
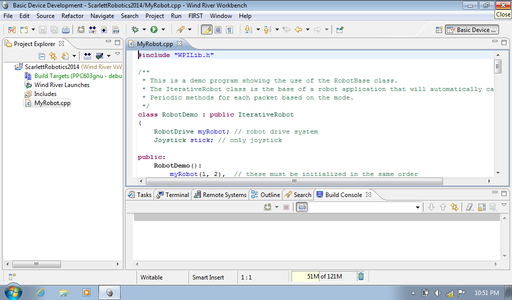
Now lets get down to the fun part, the actual programming! Double-click MyRobot.cpp in the Project Explorer. In front of you now is a working program that will drive the robot in arcade mode during the teleoperated period. Let's quickly go through the code to understand what is going on so far.
#include “WPILib.h”
This line adds all the WPILib functions and classes into your code. You will need these if you want to do anything useful with your robot. In addition to the inclusion of WPILib, this will conveniently also include string.h and iostream.
class RobotDemo : public IterativeRobot<br>{This begins the class called RobotDemo. You can change 'RobotDemo' to something else, but you just have to make sure that every instance of 'RobotDemo' in the file is changed to your new name as well. The colon means that IterativeRobot is a parent class of RobotDemo and RobotDemo inherits all methods from IterativeRobot. This will be important for us later.
RobotDrive myRobot;
Joystick stick;
This defines two private variables: myRobot and stick. myRobot contains all the functions for driving your robot and the stick variable obviously holds the functions for reading input from the joystick.
myRobot.setExpiration(0.1);
This sets an expiration time in seconds for the motors in the RobotDrive class. If the motor's watchdog is not feed within this time, it will assume that your robot's program has frozen and will automatically stop the motors. 0.1 seconds should be plenty of time, but if you are running vision processing or some other cpu intensive task and the motors are stopping when they are not supposed to be, try increasing the expiration time.
this->SetPeriod(0);
Sets the time between calls to periodic functions in seconds. If set to zero, it will sync with the driver station control data (which ends up calling the function about every 0.02 seconds). If this function is not called, it defaults to 0.0, so this line is kind of useless.
RobotDemo : myRobot(1,2), stick(1)
This is an initialization list. As the comment suggests, they must initialized in the order that you declared them. The parameters for myRobot are: port number for your robot's left motor followed by the port number for your robot's right motor. This assumes that you are using Jaguars as motor controllers. The parameter for stick is the joystick number. You can see what this is by going to the ? tab of your DriverStation and looking at the position of your joystick in the list. The default joystick number is 1.
void RobotDemo::RobotInit() {}A function that is called by WPILib when the robot is turned on, it is only called once, which makes it a confident place to initialize variables and allocate dynamic memory.
void RobotDemo::AutonomousInit() {}<br>void RobotDemo::TeleopInit() {}<br>void RobotDemo::TestInit() {}These functions are called automatically by WPILib whenever the mode of the robot is changed, either by the driver station or the FMS(Field Messaging System) the init function with the name of the new mode is called. Usually all autonomous code is written in the AutonomousInit function.
void RobotDemo::DisabledInit() {}DisabledInit does not follow the rules of the other mode initialization functions. DisabledInit is only called the first time that the robot is disabled. This is most likely because the robot will only be disabled once during an actual game.
void RobotDemo::DisabledPeriodic() {}<br>void RobotDemo::AutonomousPeriodic{}<br>void RobotDemo::TeleopPeriodic() {}
void RobotDemo::TestPeriodic() {}
These functions will be called about 50 times per second while in the appropriate mode (unless you called this->SetPeriod() with a parameter other than 0.02 or 0, in which case the periodic functions will be called (1/period) times per second).
An important note about init and periodic functions: the periodic functions for a mode WILL NOT RUN unless the initialization function is finished. For example, if you have something like this:
void RobotDemo::AutomousInit() {<br> while(true) {<br> cout << "I like dogs" << endl;<br> }<br>}<br>void RobotDemo::AutonomousPeriodic() {<br> cout << "But cats are better" << endl;<br>}Your robot will continuously output that it likes dogs, and even when left in autonomous mode for a long time it will not output the fact that cats are better. Long-running code in your initialization functions may not be this obvious, but this is always an important issue to watch out for while programming your robot.
};
This bracket closes the RobotDemo class. The end of a class is one of the few situations where you need a semicolon after after a bracket. Do not forget to include this.
START_ROBOT_CLASS(RobotDemo);
This should always be the final line of code in your MyRobot.cpp file. It is a macro that is defined in RobotBase.h and tells the rest of the WPILib that your RobotDemo class is the class that it should be using to call init functions, periodic functions, etc. Without this line, you will probably get a No Robot Code error when you deploy it to the cRIO.
Step 3: Adding New Features
For some teams, this code may be all that they need. More often however, you will want to customize the code to meet the needs of your robot. Since I don't know exactly what your robot needs, you will need to figure some of it out for yourself. I can only provide several examples of things that our team did this year to improve our program. Although it is fine to skip any of the following steps that don't apply to your team, I strongly advise that you read them all to give you a better sense of how the WPILib operates and how to add these features (or similar features) in the future.
Step 4: Tank Drive Vs Arcade Drive

It is important that you, and your team's drive team know the difference between arcade and tank drive. Arcade drive uses one joystick to control the robot. When you move the joystick forward and back it changes the speed, and when you move it side to side it changes the rotation of the robot. Tank drive on the other hand, uses two joysticks. Each of them corresponds to the wheels on one side of the robot. When you move your right controller forward, your robot's right wheels will move forward and your robot will turn left. Many people (especially gamers) find tank drive very confusing, but I would strongly advise that your team uses tank drive. Tank drive gives you much greater control over your robot's motion, and with a little bit of practice, your drivers will be driving the robot just as well as if they were using arcade drive.
Arcade drive is already set up for you in the template. If you want to switch to tank drive, you need to declare two Joystick variables instead of one. I would suggest calling them something like rightStick and leftStick so you can easily tell them apart. Then put them both in the initialization list, passing a value of 1 into the constructor for your first joystick, and a 2 into the constructor for your second joystick. Finally replace the line 'myRobot.ArcadeDrive(stick);' with 'myRobot.TankDrive(leftStick, rightStick);'. Tah-dah, your robot now drives in tank drive!
Step 5: Complete Pneumatics System

Pneumatics can be useful for improving the functionality of your robot and are quite simple to implement, both in building and in programming. To understand the building aspect of pneumatics, see this instructable by Zaphod Beetlebrox, where he does an excellent job of explaining all of the components of a pneumatic system and how to put it all together. Let's start programming the pneumatics system by adding the compressor:
Compressor compressor;
compressor(<pressure_switch_port>,<relay_port>);
compressor.Start();
The first line goes with the rest of your variable definitions, the second line goes in your initializer list, and the thirds goes in your RobotInit function. The constructor parameters for compressor are the port numbers where your pressure switch and spike relay are plugged into the Digital Sidecar. The pressure switch should be plugged into one of the Digital IO ports, and the Spike relay should be plugged into one of the Relay ports. This is all the code that you need to get the compressor working, it will start up automatically and will continue to run until the pressure switch is triggered. With the standard pressure switch from AndyMarks, this should be at 120 psi, but in reality it's usually a little lower than that (ours triggers at 110 psi).
The next step in programming a pneumatics system is to fire solenoids. The wiring and programming differs between models, but there are two primary types of solenoids, single solenoids and double solenoids. Single solenoids only have two wires going to them. They direct pressure to one output by default and will only direct pressure to the other output while the solenoid is being powered. A double solenoid has two pairs of wires, one going to each side of the device. When a side is powered, the solenoid will switch its output to that side. When power is turned off the output will remain wherever it is. If both of them are turned on at the same time the output will also remain the same. If you are using a single solenoid the code goes like this:
Solenoid solenoid;
solenoid(<channel>);
solenoid.Set(<true/false>);
The first two lines go in the same place as the first two lines of the example compressor code. The third line should be placed in an if statement controlled by a button press or perhaps in your autonomous code. Passing a value of true into the Set function will switch the output of the solenoid to the non-default output. Likewise when set to false it will return the output to its default position. If you want to use a double solenoid, all you have to do is change the class of the solenoid variable to DoubleSolenoid instead of Solenoid and change the parameter of the Set function. The Set function parameter is no longer a boolean value because there are three available options: turn only one side on, turn only the other side on, and turn both sides off. To control this, use DoubleSolenoid::kForward, DoubleSolenoid::kReverse, or DoubleSolenoid::kOff as the parameter for your Set function.
Step 6: Joystick Buttons

To run periodic code while the joystick buttons are working, simply insert the following code into one of your periodic mode functions:
if(stick.GetRawButton(1)) {
	cout << “Button 1 has been pressed” << endl;
}
This code will spam the console with “Button 1 has been pressed” messages only when the button number 1 on the joystick referenced by the stick variable is pressed. Once you release the button the messages will stop again. While this is useful in some situations, there may be other times when you simply want it to be called once when the button is pressed. Modifying your code to something like this should achieve the results you are looking for:
if(stick.GetRawButton(1) != isButtonPressed) {
	if(stick.GetRawButton(1)) {
		cout << “Button 1 has been pressed” << endl;
		isButtonPressed = true;
	}
	else {
		cout << “Button 1 has be released” << endl;
		isButtonPressed = false;
	}
}
You have to define isButtonPressed as a boolean with a class-wide scope (just the same as you did with myRobot or stick) for this to work. In this situation, “Button 1 has been pressed” will only be output once when it is first pushed down, and “Button 1 has been released” will only be output once when it is released.
Step 7: Custom Controller

Your drive team may come up to you and say, “We want to use to move our robot”. With this example I will show you how easy it is to adapt your code to a controller other than the Attack3. As a side note, Xbox controllers are typically not a very good controller for driving your robot. The asymmetrical joysticks make driving straight a challenge with tank drive and the small size of the joysticks make the controls very touchy. To start off, download the Joystick Explorer utility program for WPILib. Start it up and plug your joystick in. Make sure your controller is selected from the dropdown menu. Move the joysticks and observe what axis number changes. You should record an x axis and a y axis for each of your joysticks (and maybe a z axis depending on your particular controller). Now you go to your code and put these axis numbers to use. Remove your current myRobot.TankDrive or myRobot.ArcadeDrive function and add the following code in the teleop periodic function.
Tank drive:
myRobot.TankDrive(stick.GetRawAxis(<left_y_axis>), stick.GetRawAxis(<right_y_axis>));
Tank drive with Z axis for speed:
myRobot.TankDrive(stick.GetRawAxis(<left_y_axis>) * stick.GetRawAxis(<left_z_axis>), stick.GetRawAxis(<right_y_axis>) * stick.GetRawAxis(<right_z_axis>));
Arcade drive:
myRobot.ArcadeDrive(stick.GetRawAxis(<y_axis>), stick.GetRawAxis(<x_axis>));
Arcade drive with Z axis for speed:
myRobot.ArcadeDrive(stick.GetRawAxis(<y_axis>) * stick.GetRawAxis(<z_axis>), stick.GetRawAxis(<x_axis>));
You will of course need to change the modify anything with < > around it to match the axis numbers that you recorded from the Joystick Explorer.
Step 8: Microswitches

They make an awesome clicking noise, but that's not their only use! They can be used to sense if a game piece is loaded into your robot during autonomous or to detect collisions. Perhaps you have your own creative use for them. Whatever the need may be, they are easy to wire and program, so you should know how it's done. Here is what the code for them looks like:
DigitalInput microswitch;
microswitch(1) // This goes in the initialization list
microswitch.Get()
The Get function returns a unsigned 32-bit integer. If you want to get a boolean value from this to handle it like a button, simply compare the returned value to zero. Depending on the wiring of the switch, you may have to use == or != to give the desired result. It is simply easiest to try one and see if it works as you expect it to.
Step 9: Final Notes
Some of these notes are very important, so read them!
- Features of C++11 will not be available for use in your program because it is not supported by the Wind River compiler.
- Normally, there is no way to view anything you put in the standard output stream using cout or printf. I strongly suggest that you use NetConsole. It requires minimal setup and then you can just run it along with your driver station and it will show all of the stuff that you output. It can be a tremendously useful tool for helping to diagnose what is going wrong or simply giving some feedback for the drivers.
- If you need help with the programming of your FRC robot, the best place to find it is at Chief Delphi. There are always experienced and knowledgeable people on there to help you out. You can also leave a comment to this instructable and I will try to get back to you.
- It is very important to make sure that your cRIO image and your Wind River workbench is up to date. For the cRIO just find the latest copy of the cRIO imaging tool provide by FIRST. For the Wind River workbench, there is usually a 'C++ Update' on FIRST's Technical Resources page.
- I still have a couple of topics that I would like to write up on, such as programming spike relays, encoders, arduino communication, and vision processing. I also want to go over the details of deploying your code to the cRIO. So please check back on this instructable in a couple weeks to get a more complete overview of programming for FIRST Robotics.

Participated in the
Robot Contest


