

Introduction: Projection Mapping


Welcome to my projection mapping tutorial!
There's a lot of material on the web showcasing this technique, but how one creates this effect remains elusive at best. So many people have made detailed tutorials but i feel they don't apply it in their work, and that's why my approach to explaining this technique is to walk you through a completed installation. I feel its more concrete this way. And plus, it's about time instructable got a nice projection mapping project on its site!
I have long wondered how a projector can be used to create such a magical and immersive experience, after years of incubation in my mind I finally got the chance to create an installation using the technique. This is my first attempt into the world of projection mapping. If you think my work and instructable deserves your vote, please do vote for me!
Here a video of my work, it also shows the construction process:
This most delightful piece of music is called Life by Ludovico Einaudi.
For creating this i needed medium level skill in 3d modeling software, and of course access to a projector!
So what is projection mapping?
Projection mapping describes the technique that uses a projector on any surface and can turn it into a dynamic visual display.Instead of using a boring flat white screen, it can be used to bring buildings and objects to life, create immersive environments and to provide exciting interactive experiences. A variety of different methods can be employed to achieve the desired effect but it always involves a combination of a creative mind and intricate technical planning. Typically the content features a mixture of computer animation, 2D and 3D effects.
Projection Mapping uses everyday video projectors, light is mapped onto any surface, turning common objects of any 3D shape into interactive displays. Projection mapping can be used for advertising, live concerts, theater, gaming, computing, decoration and anything else you can think of. I have decided to use this technique to create an installation that surround you in an ambient, soothing wash of color and texture.
Step 1: Choosing Your Canvas

As my canvas I have decided to go with translucent sheets of plastic. They allow light from the projector to glow through them, creating an ethereal feeling. Choose your canvas wisely! You don't want to create something to project upon that is unable to express what you want it to.
Here's a few inspiring examples to show you what other people have used as their canvas.
Here's a video of one of AntiVJ's installations, it was my inspiration for this project.
Projection mapping can be used to create immersive experiences for theater, television or in the home.
Projection mapping can bring everyday objects to life (like shoes).
You can even project on a car!
These are just a couple of random examples from a rapidly growing form of new media. See the many blogs for hundreds of more examples.
Step 2: Sketching and Finalyzing the Concept


I started by brainstorming about what i want to express. I then made sketches (which i've lost) and finally moved on to the computer. With a concrete concept in my mind I modelled it to scale along with the location where i was going to install it. It's very important to think of scale, too big and and you are lost and the effect is diluted. Too small and it's simply not effective enough!
An easy way to get an idea of scale is to put a human being into the scene.
Here are some of the iterations i went through.
Step 3: Optional Step for Understanding the Parametric Model I Used.
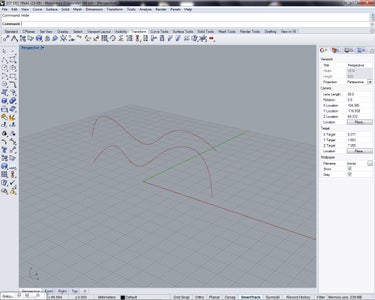


We have all at some point used a spreadsheet to solve a specific
mathematical problem. Starting with intentionally chosen values, and under certain rules that we have imposed on the system when setting it up, we are able to instantly obtain very complex results, which also, can be immediately recalculated by simply tweaking the original parameters.
But, what if we could mimic this process with geometry?
The benefits of this process are immediate. It is a huge leap in the quality of our process, since we are not bound by our tools anymore; now it will be us who design our own tools. On the other hand, parametric design is fundamental when minimizing the effort needed to create and test design variants.
Even though my concept was clear i wanted to be able to vary quickly and easily my model to try other variations, and that's why i chose to build a parametric model using Grasshopper for Rhino. If you find yourself in a situation like this, I recommend learning parametric modeling. It will prove invaluable.
Step 4: The Build


Once i was completely happy with the model and how it looks, it was time to build it! The picture i have attached describes the plan from top view, along panel lengths. The plastic I bought comes in a large roll, I bought mine according to the width i needed. The sheets were first cut and numbered in an organized way.Next, two pieces of wood were prepared for each sheet.
I decided to use thin fishing line to hold the panels up. First attaching on the ceiling frame and then anchoring to the ground so that they do not fly around. Keep in mind that with nylon fishing line its quite troublesome to tie knots with! Constantly using my digital model as a reference, I basically used digital fabrication but this was more of a manual fabrication. Its tedious work!
Step 5: Mapping Begins


Now that our canvas was completely prepared it was finally time to start mapping!
We first acquired two projectors and two laptops. We then decided the optimal placing for the projectors. This is important, as the resolution of your final work will be affected by this. Place the projector at a location where its throw perfectly covers everything you want it to project on. Get as close as you can!
For our structure, as we wanted all of the front panels to be able to take on a colour of its own, we decided to use two projectors placed in such a way that from the projector's point of view, none of the panels were intersecting.
After being satisfied that the projectors were in the right place we marked their locations with tape so that we can recreate the same setup many times.
After that we started up Resolume Arena, using which we created masks for each of the panels. We then had two masks, one for the left projector and one for the right.
Now that we have these masks, we know exactly what the projector is seeing. We now need to align our camera in our 3d software to see the same thing as our projector.
In Cinema4d we set the mask as a back ground image and approximately place the cinema4d camera so that it matches the projectors position. And then by guessing and luck we moved and rotated the cinema4d camera until our 3d scene matched exactly the digital scene. We had to do this for both cinema4d cameras. This is a tricky step, take your time, everything depends on how well you align the digital model to the masks.
Step 6: Content! Create, Borrow or Steal!


Ok! If you made it this far you can finally take a breather. This is now the fun creative part, watch lots of videos for inspiration, use tutorials to learn, or simply download content from other generous artists. I used Adobe After Effects to create most of my content.
I found the tutorials on this site to be very useful: http://www.videocopilot.net/
I picked lots of color gradients as i wanted a glow.
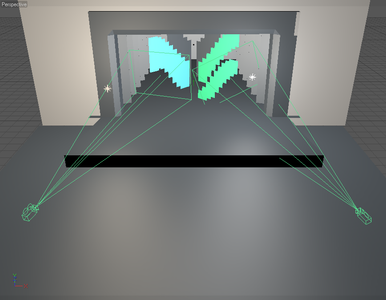
Step 7: Creating a Virtual Point of View.


This is where the true mapping happens. By now we have prepared a grand canvas, placed our projectors optimally and aligned our digital cameras to out projectors. Now, in this step you as an artist must decide from which angle you want your work to to seen from. Remember, projection mapping typically only works from one point of view.
After deciding this you now need to place a third camera in cinema4d, this camera represents the audience's point of view. You want that the viewer standing at this point sees a completely unwarped image. And that is why, in cinema4d we convert this camera into a projector.
To convert a camera to a projector within cinema4d, you select the material tag of the object you want it to project on, there you need to change the mapping to camera mapping and then select the the camera you wish to convert. See the last picture.
Within the software we use it to project our content on the panels. For this to work you need to use a jpeg sequence of your content. I did this through the export settings of Adobe premiere. We then record this through the virtual cameras in cinema4d.
Step 8: Render Away!

Now that almost everything is set up, it's time to render what the virtual cameras are seeing, so that it can be used to project on your canvas of choice. Make sure you render to the projector's resolution. At this point you are basically done!
You have reached the end of the journey through my instructable. I hope seeing projection mapping being used in a project has inspired you and opened a new media of expression in your repertoire.

First Prize in the
Let's Party! Challenge

Runner Up in the
3D Design Contest

Second Prize in the
Make it Glow!


