

Introduction: Projector IR Control Using Arduino Uno


During Halloween and Christmas, I project video on a window at my house. The system utilizes an LED projector that displays virtual characters on a window. The effect makes it appear as if the character(s) are really inside your home.
While the whole concept is appreciated by the casual observer, it is a pain in the rear to turn on every night since there is no guarantee that I will be home to do this at the appropriate time. The process requires going upstairs to the projector and cycle through several menus to select the video that I want to be looped. Once this is all done, I have to go back at the end of the night and shut it all down.
My home is very automated thanks to an Elk M1 system. Therefore, I wanted to have the house (Elk M1 system) send a show start command at 6:00pm and a show stop command at 10:00pm to the projector and drapery control. The command part was simple, I incorporated a few X-10 PUM01 modules that create a momentary dry contact closures for show start and show stop. The programming is as simple as scheduling lights to turn on and off with the Elk M1 system. With that out of the way, I needed a device to send a sequence of remote commands to the FAVI projector that I use for the window projection. The system must send ta sequence such as:
Press Projector On
Wait 18 Seconds
Press the Right Key
Wait 1 Second
Press the Right Key
Wait 1 Second
Press the OK Key
Wait 1 Second
Press the OK Key
Wait 1 Second
Press the Right Key
Wait 1 Second
Press the OK Key
Wait 1 Second
Press the Play Key
This document describes how I did this using an Arduino Uno to control the Favi projector.
Step 1: Projection on Window
The window was achieved via projection from the inside of the house.
Projector - Purchased from Amazon. FAVI RioHD-LED-3 Mini Projector with 120" Picture.
Audio - Purchased from Amazon. Acoustic Research AWS63S Portable Wireless Outdoor Speaker.
Screen Window Material - Purchased from Holidayprojectors.com. Mylar Projection Screen
Window Animation - Purchased from Holidayprojectors.com. They sell many types of projection content.
Tape the Mylar film to your window on the inside. Setup the projector to project onto the Mylar. The projector has an audio jack that I plugged the Bluetooth speaker transmitter into. The transmitter comes with the speaker. The speaker is placed outside. I have the speaker 40' away from the transmitter with no issues. The transmitter is connected to my projector inside the house above the garage. The speaker is outside and at ground level.
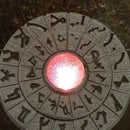
Five window projections are shown below.

Step 2: Gather IR Playback Components - Arduino Uno R3

Arduino Uno R3
The system utilizes one Arduino Uno R3 controller. The Arduino Uno R3 is programmed to monitor the status of two X-10 PUM01 modules and send remote codes to a projector. It also controls two relays that emulate button presses on a Somfy remote control.
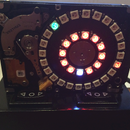
Step 3: Gather IR Playback Components - Radio Shack Project Enclosure (6”x4”x2”)

Radio Shack Project Enclosure (6”x4”x2”)
I decided to enclose the Arduino in a project box enclosure since I needed to add pushbutton, indicators, a switch and a terminal block for connecting the X-10 contact closures. This project was not pretty but it was a fast way to get done what I wanted in s short amount of time since there is not much time left until Christmas.
Step 4: Gather IR Playback Components - X10 Universal Module PUM01

X10 Universal Module PUM01
My home has about 20 X10 lighting devices that arecontrolled by an ELK M1 system. Therefore, I used the X10 universal modules to provide a momentary contact closure for “Show Start” and “Show Stop”. The timing of when the X10 modules trigger is programmed in the Elk M1 system. I purchased the modules for Amazon.com.
Step 5: Gather IR Playback Components - High Output Infrared LED

High Output Infrared LED
To transmit the IR signal to the projector, I hooked up
a Radio Shack 276-0143 Infrared LED to the Arduino.
Step 6: Gather IR Playback Components - 38KHZ Infrared Receiver Module

38KHZ Infrared Receiver Module
An infrared receiver was added to the circuit to decode the IR signals. Once the decoding process was complete, the infrared receiver was removed for future I hooked up a Radio Shack 276-0640 receiver to the Arduino. The picture below shows a metal shroud and the one that I purchase from Radio Shack does not have the shroud.
Step 7: Arduino IR Control Library
I used the IR library that Ken Sherriff created. I am not going to go into all of the details since he has a wealth of information at http://www.righto.com/2009/08/multi-protocol-infrared-remote-library.html.
Between Ken’s information and the information contained at https://learn.adafruit.com/ir-sensor/reading-ir-commands, I was able to get an understanding of what to do in about an hour. Your mileage may vary.
Caution 1:
I originally used an Arduino Mega, the IR detection worked just fine but the transmit function would not work. The library must have the IR transmitter connected to pin 3 of the Arduino. An Arduino Uno works well but an Arduino Mega does not. There is information on the Web about getting a Mega to work but I was on a fast track to get done.
Caution 2:
The other thing I discovered is that if the remote does not use NEC, Sony, RC5, or RC6 IR code types, the software will say it is unknown and give you the raw codes. I checked several other remotes I had around the house for various TV’s and such. Even though the devices were not NEC or Sony,, the remote codes showed up as one that is in the library (NEX, Sony, RC5, RC6) and they worked.
Caution 3:
The final thing to keep in mind is that a value for the remote code displays a number like 68B92, this is hex 0x68B92. Each hex digit is 4 bits so the length for this number shown above is 20 bits since it is 5 digits. Play around with it and these tips will all make sense.
Step 8: IR Controller


While nothing fancy, I built the controller with parts I had on hand. The goal was to get a working unit completed in a few hours. The top of the enclosure is shown below.
Component Definitions
Each of the devices and their associated function is listed below.
Start Pushbutton - Initiates IR sequence to projector for playing a window show
Stop Pushbutton - Initiates IR sequence to projector for turning off the projector
IR Sending LED - Flashes to mimic pulses that the IR LED is sending out. This is useful for debug and test
Running LED - Turns on when aan Arduino subroutine is running. Useful for knowing a sequence is running when there are large delays in the program.
Holiday Switch - This is used to select the desired Arduino subroutine to run, The Halloween subroutine requires and additional remote IR command to be sent to select the correct video from the USB drive. I have the Christmas and Halloween MP4 files on the same USB drive.
IR Emitter - This is the IR Emitter that is aimed at the projector IR receiver.
X-10 Contact Closure Terminal Strip - Not pretty but this is the terminal strip located on the side of the enclosure for interfacing the X-10 contact closures to the Arduino controller.
Step 9: More Information & Code Listing
You can get an electrical circuit drawing, code listing, and other information at www.guarnero.com.
The schematic is listed below.
Program Listing
Emitter The code for the Arduino Mega, Arduino Uno, and the Maestro servo controller is shown in the following sections.
Arduino Uno R3
The Arduino Uno R3 sends a series of IR remote commands that will power up the projector, select the desired holiday file, and play the file. When a show start trigger is received by the Arduino, it will issue a projector On/Off command to turn off the projector. I could have made the code more compact by adding a single command based on the Holiday switch position but this was a fast way to get it going without any effort. The Arduino code is listed below.
// John Guarnero - http://guarnero.com
// December 2014
// IR Control of Favi projector with the Arduino Uno
// Remote library supplied by Ken Shirriff http://arcfn.com
#include
int HOLIDAY_PIN = 8;
int PLAYING_PIN = 11;
int BUTTON_START_PIN = 12;
int BUTTON_STOP_PIN = 10;
int STATUS_PIN = 13;
IRsend irsend;
void setup()
{
pinMode(BUTTON_START_PIN, INPUT);
pinMode(BUTTON_STOP_PIN, INPUT);
pinMode(STATUS_PIN, OUTPUT);
pinMode(PLAYING_PIN, OUTPUT);
pinMode(HOLIDAY_PIN, INPUT);
}
void loop()
{
int ButtonState_Start = digitalRead(BUTTON_START_PIN);
int ButtonState_Stop = digitalRead(BUTTON_STOP_PIN);
int Holiday_Switch = digitalRead(HOLIDAY_PIN);
//Play Christmas Video
if (ButtonState_Start ==1 && Holiday_Switch == 1) //1 is when holiday switch in the up position (Christmas) - Christmas requires on right arow push and Halloween requires two pushes
{
digitalWrite(PLAYING_PIN, HIGH);
delay(4000);
digitalWrite(PLAYING_PIN, HIGH);
//Start Projection
irsend.sendNEC(0x61D600FF, 32); // Send NEC Power On Each Hex is 4 bits so 32 bits total
digitalWrite(STATUS_PIN, HIGH);
delay(40);
digitalWrite(STATUS_PIN, LOW);
delay (18000); //Wait 18 seconds
irsend.sendNEC(0x61D628D7, 32); // Send Right Each Hex is 4 bits so 32 bits total
digitalWrite(STATUS_PIN, HIGH);
delay(40);
digitalWrite(STATUS_PIN, LOW);
delay (1000); //Wait 1 second
irsend.sendNEC(0x61D628D7, 32); // Send Right Each Hex is 4 bits so 32 bits total
digitalWrite(STATUS_PIN, HIGH);
delay(40);
digitalWrite(STATUS_PIN, LOW);
delay (1000); //Wait 1 second
irsend.sendNEC(0x61D6A857, 32); // Send OK Each Hex is 4 bits so 32 bits total
digitalWrite(STATUS_PIN, HIGH);
delay(40);
digitalWrite(STATUS_PIN, LOW);
delay (1000); //Wait 1 second
irsend.sendNEC(0x61D6A857, 32); // Send OK Each Hex is 4 bits so 32 bits total
digitalWrite(STATUS_PIN, HIGH);
delay(40);
digitalWrite(STATUS_PIN, LOW);
delay (1000); //Wait 1 second
irsend.sendNEC(0x61D628D7, 32); // Send Right Each Hex is 4 bits so 32 bits total
digitalWrite(STATUS_PIN, HIGH);
delay(40);
digitalWrite(STATUS_PIN, LOW);
delay (1000); //Wait 1 second
irsend.sendNEC(0x61D6A857, 32); // Send OK Each Hex is 4 bits so 32 bits total
digitalWrite(STATUS_PIN, HIGH);
delay(40);
digitalWrite(STATUS_PIN, LOW);
delay (1000); //Wait 1 second
irsend.sendNEC(0x61D67887, 32); // Send Play Each Hex is 4 bits so 32 bits total
digitalWrite(STATUS_PIN, HIGH);
delay(40);
digitalWrite(STATUS_PIN, LOW);
digitalWrite(PLAYING_PIN, LOW);
}
//Play Halloween Video
if (ButtonState_Start ==1 && Holiday_Switch == 0) //0 is when the holiday switch in the down position (Halloween) - Christmas requires on right arow push and Halloween requires two pushes
{
digitalWrite(PLAYING_PIN, HIGH);
delay(4000);
digitalWrite(PLAYING_PIN, HIGH);
//Start Projection
irsend.sendNEC(0x61D600FF, 32); // Send NEC Power On Each Hex is 4 bits so 32 bits total
digitalWrite(STATUS_PIN, HIGH);
delay(40);
digitalWrite(STATUS_PIN, LOW);
delay (18000); //Wait 18 seconds
irsend.sendNEC(0x61D628D7, 32); // Send Right Each Hex is 4 bits so 32 bits total
digitalWrite(STATUS_PIN, HIGH);
delay(40);
digitalWrite(STATUS_PIN, LOW);
delay (1000); //Wait 1 second
irsend.sendNEC(0x61D628D7, 32); // Send Right Each Hex is 4 bits so 32 bits total
digitalWrite(STATUS_PIN, HIGH);
delay(40);
digitalWrite(STATUS_PIN, LOW);
delay (1000); //Wait 1 second
irsend.sendNEC(0x61D6A857, 32); // Send OK Each Hex is 4 bits so 32 bits total
digitalWrite(STATUS_PIN, HIGH);
delay(40);
digitalWrite(STATUS_PIN, LOW);
delay (1000); //Wait 1 second
irsend.sendNEC(0x61D6A857, 32); // Send OK Each Hex is 4 bits so 32 bits total
digitalWrite(STATUS_PIN, HIGH);
delay(40);
digitalWrite(STATUS_PIN, LOW);
delay (1000); //Wait 1 second
irsend.sendNEC(0x61D628D7, 32); // Send Right Each Hex is 4 bits so 32 bits total
digitalWrite(STATUS_PIN, HIGH);
delay(40);
digitalWrite(STATUS_PIN, LOW);
delay (1000); //Wait 1 second
irsend.sendNEC(0x61D628D7, 32); // Send Right Each Hex is 4 bits so 32 bits total
digitalWrite(STATUS_PIN, HIGH);
delay(40);
digitalWrite(STATUS_PIN, LOW);
delay (1000); //Wait 1 second
irsend.sendNEC(0x61D6A857, 32); // Send OK Each Hex is 4 bits so 32 bits total
digitalWrite(STATUS_PIN, HIGH);
delay(40);
digitalWrite(STATUS_PIN, LOW);
delay (1000); //Wait 1 second
irsend.sendNEC(0x61D67887, 32); // Send Play Each Hex is 4 bits so 32 bits total
digitalWrite(STATUS_PIN, HIGH);
delay(40);
digitalWrite(STATUS_PIN, LOW);
digitalWrite(PLAYING_PIN, LOW);
}
//Turn Off Projector
if (ButtonState_Stop)
{
digitalWrite(PLAYING_PIN, HIGH);
delay(4000);
//Stop Projection
digitalWrite(PLAYING_PIN, HIGH);
irsend.sendNEC(0x61D600FF, 32); // Send NEC Power On/Off (Each Hex is 4 bits so 32 bits total)
digitalWrite(STATUS_PIN, HIGH);
delay(40);
digitalWrite(STATUS_PIN, LOW);
delay (1000); //Wait 1 seconds
digitalWrite(PLAYING_PIN, LOW);
}
}
Attachments


Participated in the
Halloween Decor Contest 2015


