

Introduction: Pure Pi: Control Custom Stompbox Effects on a Raspberry Pi With a Smartphone


This is my first instructable, although I have been working with Pure Data, Raspberry Pi, and other digital audio for quite some time. If you'd like to see more instructables like this, vote for me!
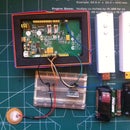
Ever wonder how digital effects are created? Want to customize your favorite effects wirelessly from a smartphone? Then Pure Pi may be your best option. The Pure Pi uses a Raspberry Pi Model B running the Raspbian distro of Pure Data Extended, all controlled from an iPhone or Android phone via TouchOSC. Sounds like a lot of work, but thanks to the work done by the Pure Data and Raspberry Pi communities, it’s a Wheezy breeze. Here are the steps to getting the Pure Pi set up on your Raspberry Pi and controlling it by phone.
Step 1: Materials Needed

- Raspberry Pi running Raspbian (any model should work, I’ve used Model B)
- USB audio interface (I’ve used a Behringer UCG102, there are several that work out of the box)
- A WiFi dongle (if you don’t want to connect via ethernet cable)
- A Smartphone with TouchOSC installed (see below) or similar OSC software
- (optional) wireless access point connected to your Raspberry Pi
Step 2: Install Pure Data Extended on the Pi


Pure Data is an open source visual 'computer music system' which allows you to create and customize digital effects, called "patches", to tweak and mod audio to your heart's content. The most popular version, PD extended, has built in features and patches to make it easier to learn how to use Pure Data and design your custom effects.
(Update: A newer version of PD Extended has been released for Raspian on SourceForge, it may be easier to download directly from them but I'll provide steps for installing from the Pi).
The following installation guide is what I used to install PD Extended on my Raspberry Pi running the newest version of Raspbian Wheezy (the $ lines are typed into the Pi terminal without the $ symbol):
1. Edit the sources list to include the new archives
$ sudo nano /etc/apt/sources.list
2. Add the following line to the end of the list (note the spaces):
deb-src http://archive.raspbian.org/raspbian wheezy main contrib non-free rpi
3. Save and Exit:
ctrl+o, Enter (to save). ctrl+x (to exit)
4. Update Raspbian:
$ sudo apt-get update
5. Download PD Extended:
$ wget https://puredata.info/downloads/pd-extended-0-43-3-on-raspberry-pi-raspbian-wheezy-armhf/releases/1.0/Pd-0.43.3-extended-20121004.deb
6. Unpack the PD Extended .deb file:
$ sudo dpkg -i Pd-0.43.3-extended-20121004.deb
7. Install PD Extended
$ sudo apt-get -f install
8. After installation type this for root priorities:
$ sudo chmod 4755 /usr/bin/pd-extended
If everything went successfully, you should now have PD Extended installed on your Raspberry Pi. Feel free to poke around in PD to learn how to use it, configure PD, install plugins or try out various patches.
Step 3: Configure Your Audio Input/output

Depending on your audio card, you might need to download drivers or configure the Raspberry Pi audio settings (I use Pi’s standard ALSA). For me, it was as simple as plugging in the USB and typing lsusb and/or lsmod (those are lowercase L's) in the Pi terminal to show if it was working correctly. Most USB audio cards should work out-of-box but check the ALSA Project page to make sure if your card is compatible or not. Once you’ve plugged in the USB interface it’s as simple as running PD extended (type pd-extended in the terminal) and then opening the PD test patch to see that the audio is working. (Note: in order to see the graphical PD windows while running 'headless' you need to use a GUI like LXDE).
At this point you should be able to hear something coming from your USB audio output. If you're having problems with your USB audio or sound quality not what you expected, check out these helpful links:
Step 4: Install the LADSPA Plugins and Custom Patches
If you’re interested in using my own custom patch for TouchOSC, then first you need to install plugins that contain most of the effects by downloading the TAP-Plugins from SourceForge or this instructable. Once you’ve downloaded them you can copy the file directly to your Raspberry Pi. I use WinSCP to directly transfer files to the Raspberry Pi, but you can also download the files directly from the Pi by typing the following into the Pi terminal:
1. Update Raspbian:
$ sudo apt-get update
2. Install the tap-plugins:
$ sudo apt-get install tap-plugins
Once you’ve got these plugins installed, you can mess around with them in PD-Extended using the [plugin~] command. Check GuitarExtended’s site for more details if you’re interested in learning more about how to use plugins within PureData, as well as a ton of cool patches I’ve included in my own set. If you want to just use my patch collection, then go ahead and download the osc_munch.pd file from this instructable.
This is the patch I use for jamming and gigs. It contains 16 different
effects (roughly grouped into 4 categories: “Distortion”, “Pitch”, “Modulation” and “Echo/Delay”) as well as a 4-stage mixer and tap-tempo controlled looper. You can use the patch directly without a phone, though it may seem a bit confusing to anyone new to Pure Data. If you get any errors you might need to re-install the LADSPA plugins above, or unclick the OSC router to stop constantly attempting to connect to a phone.

Step 5: Install TouchOSC and Connect!


I’ve used MIDI in the past to control effects in PD (check out my sixplugins patch set to see how to use MIDI commands with various patches in PD Extended), but recently found a huge improvement in communication control thanks to OSC. By using WiFi instead of cables, it also allows you to control your patches wireless by phone or any device with an OSC app installed. For android phones, it's as simple as installing the Android version of TouchOSC onto the phone, and then creating my own custom interface by installing touchOSCeditor on my computer. If you just want the layout I use on my phone, then follow these steps:
1. Download and install the appropriate version of TouchOSC from the Appstore/GooglePlay
2. Download the munchlayout.touchosc file and copy it to your phone's TouchOSC folder
3. Open TouchOSC and select Layout -> Add from File -> munchlayout.touchosc
4. Run the OSC_munch patch in PD-Extended and make sure your phone and Raspberry Pi are on the same WiFi router (see the next step to learn how to create an AD-HOC connection without a router).
5. You might need to adjust the settings in TouchOSC and in the PD Patch to send/receive messages.
- In TouchOSC on your phone, change the following settings:
- Host – your Raspberry Pi’s IP address
- Port(outgoing) – 8000
- Port(incoming) – 9000
- In the munch_OSC patch in PD-extended:
- Open up the PD patch in the top-right corner called [pd OSCrouter]
- Hit Ctrl+E to enter edit mode, click on the message that says [connect 192.168.42.3 9000] and change it to your phone’s IP address
That should do it, now you’re ready to rock out with a phone-controlled 16-effect DSP machine! Throw the Pi into a Hammond 1590BB case, add a few lines of code to auto-load your patch on startup and you’ve got your own custom effect pedal. Feel free to modify the patch to your needs, or post comments/questions in the comments section for more help.
Step 6: Going Further: Set Up Your Pi to Auto-connect Directly With Your Phone

This step is a work in progress, as I’ve only recently managed to find a way to hack my android phone in order to connect to ad-hoc networks. I won’t get into the details, but there are several sources on the web for setting up a rooted android phone to connect to an ad-hoc network. If you’ve got an iPhone or have a rooted/ad-hoc friendly Android phone, then this might just work for you.
Notice I say might work, as I’ve had unreliable connections from my WiFi dongle. It may be a power issue or a crappy WiFi module, since it sometimes doesn’t send/receive messages correctly, doesn’t stay connected, or my phone can’t see it at all. But, if you’re still reading this and are undaunted, continue on:
1. Set up your Raspberry Pi to run headless (no keyboard, mouse, or screen)
2. Configure your Pi to either connect to WiFi or create an Ad-Hoc network
This step brought me a lot of frustration and I nearly gave up until I realized it was my WiFi dongle that wasn’t working properly. I think some WiFi dongles can't draw enough power for AdHoc mode without an external powered USB hub. Once you complete these two steps you should have an available network connection to your Pi even when there isn’t a router available. Now set up your Pi to auto-load the patch on startup.
3. To Auto-login your Pi on startup, type:
$ sudo nano /etc/inittab
comment out (by typing # in front of the line):
1:2345:respawn:/sbin/getty -coclear 38400 tty1
add the following line (note the spaces):
1:2345:respawn:/bin/login -f pi tty1 /dev/tty1 2>&1
4. To Load a Pure Data patch on startup, type:
$ nano guitar.sh
Type the following 5 lines exactly as they appear:
#!
startx &
sleep 10 #delay for xserver
export DISPLAY=:0 #This is a zero
pd-extended -alsa -alsamidi -midiindev “1” /home/pi/osc_munch.pd #change this to your pd patch
Save and exit, then edit your startup file:
$ sudo nano /etc/rc.local
add the following line:
sudo sh /home/pi/guitar.sh
Now you should have a standalone effect box that will allow you to directly connect to your phone without the need of a router. Add a shutdown button, set up serial port MIDI, throw it in a 1590BB stomp box and you’ve got it made! It’s Pure Pi.

Participated in the
First Time Author Contest

Participated in the
Phone Contest

Participated in the
Raspberry Pi Contest


