

Introduction: Quick-Fix Welding for a Broken BBQ Grill


A few weeks ago, the metal plate on the bottom of my barbecue grill broke. This piece distributes the heat from the burner. Without it, the grill was useless. The blue propane flame was only cooking portions of the veggies, fish or meat.
I like to fix things but I don't like having a list of things to fix. For this sort of problem, I'd normally order the $40 part and be done with it. But, a replacement part simply wasn't available.
This Instructable will detail how to fix this using basic metalworking techniques. The power tools I used were a sandblaster, horizontal band and a MIG welder.
This is a quick n' dirty approach to fixing this. It is, after all the bottom of my BBQ grill.
The repair took less than an hour.
Step 1: Assess the Damage, Make a Plan

There are two pieces of steel that comprise the BBQ place: an inner round plate and an outer ring which fits into the barbecue shell. These were originally held by eight thin tabs as a single piece, which snapped off after just two years of moderate use.
What I decided to was to find some scrap steel and cut eight replacement tabs and tack-weld them onto the plate. Each tab was about 1/2" wide.
Step 2: Find Matching Thickness Steel


It's a lot easer to weld steel with the same gauge (thickness). Using calipers, I found that the BBQ plate was 1/8" steel. I found a piece of matching scrap for the tabs.
Step 3: Measure and Mark


I measured and marked several 1/2" intervals by hand.
There are far more accurate ways to do this job, such as using steel blue, a scribe and some sort of square. But this was a quick n' dirty fix, so I used a piece of metal as my straightedge and a sharpie.
Step 4: Make Cuts With the Horizontal Band Saw


A horizontal band saw is the best tool for this job. 1/2" pieces doesn't allow enough room for a fence with the vertical band saw.
I cut 10 pieces (2 extra just in case). I didn't spend much time making sure the cuts were just right, so some of the pieces were slightly off. Once again, there is a time for perfection. This is not one of them.
Step 5: Hand File the Burrs

These pieces are too small to safely use on a belt sander. I put them in a vise and hand-filed each one to remove the sharp burr.
Elapsed time: 5 minutes.
Step 6: Clean the Weld Area With the Sandblaster


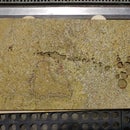
All surfaces need to be clean before welding and there was a layer of sticky gunk covering the BBQ plate. Using a sandblasting tool, I cleaned off the areas where I'd be welding.
Step 7: Verify This Is Steel With a Magnet


Using a magnet, I verified that this was indeed steel and not some other type of metal.
I tried this before sandblasting, but all the BBQ gunk prevented the magnet from working properly.
Yep, it was steel. Phew.
Step 8: Set Up Your Workspace

I propped up the metal pieces on the welding table, using other scrap metal pieces.
Because of the curved shape of this BBQ plates, this was difficult to clamp. If I were going for perfection, I'd have made some sort of holding jig, but this would be fine.
Step 9: Put First Tab on and Weld


I tack-welded the first tab on this piece, using the settings on the welding chart for 1/8" steel. There wasn't not really a way for me to practice, other than running a bead on a piece of 1/8" steel (which I did).
How do you weld? Check out this popular Instructable.
Step 10: Add Second Tab

When welding, you usually want to weld on opposite sides, rather than go in a circular pattern.
This will make it more likely that your two pieces will be properly aligned.
Step 11: Finish Off the Job

More tacks, on each piece. There were a few gaps, but I was able to bridge them without any difficulty.
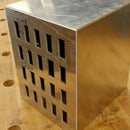
Step 12: Done!

Here's the finished piece.
It's not pretty, but the welds have proper penetration.
There's some extra metal bits on the top of the plate, from some arcing. I cleaned this off with a wire brush. Done.
I hope this was helpful!
Scott Kildall
For more on the my actual art projects, you can find me here:
@kildall or www.kildall.com/blog


