

Introduction: RC Boat


Describe the topic to which your project is related.
Since we decided to create an RC boat, we could say that our projet is related to electronics (Arduino - Motor, servo) and 3D printing (Body, propeller, etc). To begin with, electronics is a very diverse and complexe topic. But even thought it is complicated to get used to, It can be very useful to know about it in everyday situations (Televisions, cell phones, bulb, etc). With the fast evolution of technology, it is even more important to know at least the basics of electronics. Now, 3D printing was also something very important for the creation of our boat. The concept of a 3D printer is very simple. A 3D printer is just like a normal printer but like it says in the name, it prints in 3D. Devices like this are fairly new to our society. 3D printing is very game changing, since you can design and print your own pieces, but I feel like the technology is still so new that the printers are not so reliable (they break often).
Describe your project.
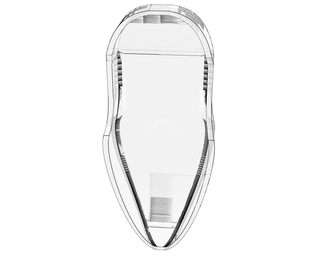
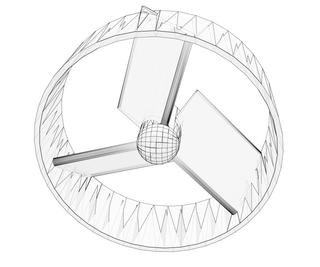
Now lets talk about our projet. Our projet consists of a basic RC boat. There is motor and a servo, which works with what we call an "Arduino". They both have been programmed the way we wanted (speed, breaks, etc. Attached to the motor is a 3D printed propeller and attached to the servo is 3D printed servo extension.The propeller makes the boat move with the force of the wind and the servo extension controls the direction of the boat. The body of the boat was supposed to be 3d printed but the printing failed too many times so we had to take a Ziplock Jar. It was the best thing we could do to replicate the 3D printed body since we didn't have many more time left.
Describe how to use the result of your original project.
Using our project is fairly simple. First of all, we need to make sure that the codes for the Arduino are all in the device itself (we transfer them using a wire that connects the device to the computer). Once the codes are in the device, all we have to do is connect the system with a battery and the motor and servo will both automatically start to work properly. At this point, we put our boat in the water and it should move at a constant speed. It should also go right, left, right, left, etc. The cycle continues. The boat works on its own once its in the water, no remote is required.
Explain the purpose of your new project and give applications for this new
project.
Our project really doesn't have any other purpose than having fun. We created the RC boat because it is something that we both enjoy. We knew it would be fun to create and to play with once it would be done. The applications are also pretty straight forward. We put the RC boat in any kind of water and see how it works.
Videos: -one in water and one in the air-
Step 1: Tools, Material and Files
Tools needed:
1) Arduino Software
2) 3D printer
3) Ruler
4) Drill
5) Computers
6) 3D modelling software (123D Design)
7) hot glue gun
Materials needed:
1) DC motor
2) The "Arduino" itself
3) Servo
4) Wires
5) Resistor
6) Ziplock Jar (3D printed boat)
7) 3D printed propeller
8) 3D printed servo extension
9) Batteries
10) Transistor
11) Hot glue
12) Tape
Hyperlinks to other people's project:
1) Propeller - http://www.thingiverse.com/thing:15354
List of software (and where it can be downloaded):
1) Arduino - https://www.arduino.cc/en/Main/Software
2) 123 Design - http://www.123dapp.com/design
Files needed:

Step 2: The Electronics


1) -Installation of the DC motor Arduino circuit- The first step of our project was to set up the Arduino circuit for a DC motor. In order to achieved this step we plugged the wires in the their respective places on the breadboard. You can refer yourself to the image 1 above.
2) -Coding of the Arduino (DC motor)- The second step is to enter this code in the Arduino software (the code can be found on the Arduino website) and modify the needed sections. After you connected the Arduino to your computer, upload the code to the Arduino and test it. The motor is supposed to rotate.
3) -Installation of the servo Arduino circuit- The third step in order to build our RC boat was to set-up the Arduino circuit for a Servo. In order to achieved this step we plugged the wires in the their respective places on the breadboard. You can refer yourself to the image 2 above.
4) -Coding of the Arduino (servo)- The fourth step is to enter this code in the Arduino software (the code can be found on the Arduino website) and modify the needed sections. After you connected the Arduino to your computer, upload the code to the Arduino and test it. The servo is supposed to turned from left to right.
5) -Assembling the Arduino systems- The next step is basically to combine the two circuit together on one Arduino and one breadboard. This step is only to diminish the weight of the boat in order to allow the boat to float. Refer you to the picture 3 above.
6) -Combining the codes- After everything is on one Arduino breadboard, combine the codes together so that the servo and the DC motor works at the same time.
Step 3: 3D Modelling and Assembling


7) -Modelling of the parts- Using a 3D modeling software (123D Design), the next step is actually to design and print your RC boat hull, the servo extension and the propeller. Make sure that the boat is wide and high enough to place the Arduino and the breadboard in the boat.
8) Now, you need to use a drill to make a hole in the propeller. The hole needs to be about 2mm (diameter of the end of the DC motor)
9) The next step is to glue the servo extension to the servo with hot glue.
10) -Assembling the parts of the boat- When you have your 3D printed parts ready, you need to assemble your boat. This mean that you have to put the Arduino and the breadboard in your boat and install the propeller on the motor.
11) You are now done! The next step is to test your boat and have fun!
Step 4: Conclusion


Problems:
In the process of building our RC boat, we faced some problems. One of them was that for some obscure reasons our DC motor didn’t want to rotate fast enough. This problem wasn’t caused by the code, so in order to fix the problem we decided to change all the wires on the Arduino. After this little change, the DC motor started to rotate twice as fast.
Another problem was that the first boat we printed was not wide enough for the Arduino to enter the boat. We then printed another boat 3cm wider but the printer broke during the process. In order to present you a “boat” we used a Ziploc food plate to simulate a boat hull.
Improvements:
To improve this project, we could take the time to print an actual RC boat hull.This way, it would be easier for the boat to actually float and it would look way better. Also, it would be a good idea to simply make the boat look better (better aesthetic). Finally, we could use an ‘’Arduino Nano’’ to reduce the weight of the boat, since it is way too heavy right now.


