

Introduction: RGB Color Selector


RGB led color selector is a easy to use visual color mixer created on processing development environment. It's a fun easy way to understand color combination and communication between arduino and processing.
For this project you need:
- Arduino Uno or similar board (I'm using arduino Leonardo);
- 1x RGB LED
- 1x Breadboard
- 3x 330 Ohm resistors
- Jumper wires
- (optional) 1x white ping pong ball as light diffuser
Step 1: Wiring

To see all color range, our LED has to be connected to pins that allow pulse-width modulation, so we'll have to connect the LED to the (~) PWM pins. In this case we'll use pins 9 for red led, 10 for green and 11 for blue.
More on PWM here: http://arduino.cc/en/Tutorial/PWM.
The resistors protect the LED from burning out. The value of the resistors can vary, but any value between 220 and 470 Ohm will work fine.
Ok, circuitry done! Let's code.
Step 2: Code


To run this example we'll use an arduino library for processing. It's a really practical library that makes arduino/processing interface a lot easier.
You can visit processing's webpage by clicking here: https://www.processing.org/.
To download the library and for more information on how to install and use it, you can visit the link bellow: http://playground.arduino.cc/Interfacing/Processing
So the library is installed. Now we need to upload to arduino the Standard firmata example (firmware); to find it on the arduino IDE open File>Examples>Firmata>StandardFirmata. Select your COM port, arduino board and upload the example.
For the processing code:
Window:
When we run a processing project, the opened window has a certain width and height and every shape such as buttons, lines, etc. are sized to fit that window in some aesthetic/functional way. But what if we want or need a larger window; or a smaller one? Should we need to re-size everything?
To keep things proportional, I sketched on paper the desired aspect for the window. Then, always thinking in percentages, divided the window in useful areas and borders as you can see in the image above.
In this case I came up with these proportions:
80% for the columns width and 20% for borders and spacing's, so b=80%*width/number of columns, c=20%*width/number of columns.
//Automatic window and column re-sizing
float b=0.8*w/3; //default is at 0.8;
float c=0.2*w/3;
float a=c/2;     //c=2*a
float d=h-3*a-b;
float e=w-c;
Column:
Each column was made by several colored lines and as the column height vary with the window height, so does each lines color. To deal with this I used the map function witch is very useful in, well, mapping values between a given range.
To see one column appearing slowly, you can run the "One column" file in processing.
Communicating with arduino:
What happens in the main function of the code:
void draw()
{
if(mouseX>a && mouseX<a+b && mouseY>a && mouseY<a+d && mousePressed)
//If mouse pointer inside red column and mouse left button pressed, do what follows
{
//The position of the pointer in this column will determine the red value to be between 0 and 255
Rv=map(mouseY, a+d, a, 0, 255);
while(now-before)
{
now=millis();
}
arduino.analogWrite(Rled, (int)Rv); //Sending Red value (from 0 to 255) to arduino
}
//Do a similar if statement to Green and Blue values. (shown in the source code attached)
//Show color in preview box
fill(Rv,Gv,Bv); //Values sent to arduino are the same as entered here
rect(a, 2*a+d,e,b); //draw bottom box (preview box)
before=now; //"Reset" delay
}

Step 3: Thoughts
This was a quick and simple way of communicating with arduino through Processing.
Such interaction between arduino and Processing is useful and powerful for a lot of cool aplications other than controling LEDs; you can control the speed of 3 DC motors with this code, for example (this would require a different wiring, though).
Using these color columns makes color selection intuitive and fast too.
The window resizing proportions are, maybe, not that intuitive, but they're pratical. If you need a smaller or bigger window, you only need to adjust the width and height parameters on the processing code and the window should resize all boxes to this new change in the parameters.
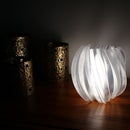
Now you can control a mood lamp easily by using arduino and processing.
I hope you enjoyed this instructable.


