

Introduction: Raspberry Pi Probability Spinner


Have you ever wanted to do a probability spinner simulation that felt more hands on? I personally wanted to simulate a 3 point shoot out against Steph Curry (which I inevitably lost), but creating a spinner that was easily dynamic felt like a chore. This project allows me to draw up the probability circle graph of most scenarios using dry erase markers on the back of old CDs. You'll need access to a 3D printer and a Raspberry Pi if you want to create my spinner, but if you at least have a Raspberry Pi you can get creative and make the physical part any way you'd like. Enjoy!
Materials
1) Raspberry Pi w/ installed operating system
2) 4 female to male jumper wires
3) 10 male to male jumper wires
4) Bidirectional Drive Circuit / H-Bridge / L293D control IC (All the same thing)
5) Push button
6) DC motor
7) Optional: Access to 3D Printer, Slicing software, and Filament
Step 1: Set Up the RPi Circuit


Create the diagram pictured above. Found base code from Python 3 gpiozero documentation at http://gpiozero.readthedocs.io/en/stable/recipes.h...
Detailed Description and Technical Details of H Bridge from Adafruit found here:
https://www.adafruit.com/product/807
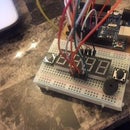
When Complete should look something like this:
Step 2: Write Python Program to Control Motor With Button


After you've gotten the motor to work in step 1, wire in a button. My code is written to send the signal in from pin 15, but you could choose any. If you've never programmed a button on the Raspberry Pi, I recommend looking up a tutorial for that first. Here is an example on the gpiozero documentation http://gpiozero.readthedocs.io/en/stable/recipes.h...
Step 3: Making the Physical Mount

The purpose here is really just to create a housing for the motor to sit in, the CD with the probability graph to rest on, and an arrow to spin.
If you're choosig to use my parts, 3D Print these parts linked below at 115% to create a little extra room for the wires connecting to the motor.
https://www.tinkercad.com/things/a0pKxW71SvC-spinn...
Step 4: Final Product
The final product should act something like the video portraits. I'd say to hold the button down for at least 1 second so you get a true random spin. Please share your results and share with your math teacher!!


