

Introduction: Rechargeable Bluetooth Pan and Tilt Laser Controller


I've always hoped to make a laser controller with servos since a few years back. So one day, I was buying my first two servo motors from Ebay and I thought why not I make my dream come true....... So, here is it, the
Rechargeable Bluetooth Pan and Tilt Laser Controller !
Summary of whole project:
This project is started on a breadboard and an Arduino Uno as the microcontroller. After the coding is complete, the microcontroller is switched to an Atmel Attiny84A running the arduino-tiny core. After modifications for the Servo controlling part of the sketch the circuit is transferred to a 5x7 cm perforated board. With the main controller circuit complete the next part is adding the battery, the charging and boosting circuit. All of the circuit is installed on top of a 9x15x1.2cm plywood with screws and hot glue.
Special thanks to these people:
Estacado's ltd for the application Arduino Bluetooth Controller on the Play Store.
The developers for the Arduino Tiny core.
User tylernt in the Arduino forums for his TinyServo Library. (Link to forum thread)
With all that said now I will guide you through the process of me building this project.
Step 1: Parts, Materials and Tools


This are the parts, materials and tools I've used in my whole build (from start to finish)
An Attiny84A microcontroller + 14 pin IC socket (I got them from element14)
Two servo motors (I got them from ebay)
A laser module (ebay too)
A HC-05 bluetooth UART module (ebay again, haha)
One red 5mm and one green 3mm LED
Five tactile switches
One Switch
One MMBT3906 PNP transistor (Used a 2N2222 NPN transistor in early stages due to not having a through hole PNP transistor)
A Lithium-ion battery charger and a 5v booster (not shown, bought from ebay)
5x7 cm peforated board (pad-per-hole)
One 0402 SMD 1nF cap
Resistors: 150 ohm, 220 ohm, 1.8 kohm, 3.3 kohm, 4.7 kohm, 10 kohm.
Breakaway header pins: Male 1x3(x5), Male 1x2(x2), Female 1x6, Female 1x3(x2), Female 1x2
Two salvaged Lithium-ion batteries from a laptop battery pack
An unknown length of hookup wire for connecting everything together
Some rectangular PVC electrical conduit
A piece of 15x9x1.2 cm plywood as base to mount everything
Screws
As for tools I used:
A soldering iron
Solder
Hot Glue Gun
Hot Glue
Drill
Screwdriver
Saw (to cut the plywood into size)
Sandpaper (to sand the edges of the plywood after cutting)
An Arduino Uno R3 in my early stages to develop the code
A Usbasp programmer to program the code into the microcontroller
Step 2: Prototyping


I started this project with rubber bands to tie the servo together to some aluminium brackets that i cut to size and made space for the servos to move. After that I connected them to the Arduino Uno and start playing around with the examples code given here. After knowing how to use the servos I continue by adding some buttons on breadboard and wire them to the Arduino.
I also modified my laser by adding DS18B20 temperature sensor (optional) as I found out the laser overheats and gets dim when I leave to run for a long time.(That explains why the laser module has 3 wires: power, ground, 1-wire)
But in the end I didn't actually used the temperature sensor...... But I plan to use it when I have the ability to create my own android app.....
The buttons do not need pull up resistors as I've used the built-in pullup resistors that can be found in AVR chips. (Lowers my cost by a small bit.)
Attached is the latest code I used on my Arduino before porting it to support the Attiny84.

Step 3: Porting to ATtiny84


After the code written on Arduino is complete, I proceed by getting the libraries (TinyServo) and porting the code to work with the ATtiny84 microcontroller.
I reassembled the circuit on another breadboard and programmed the ATtiny84 with a USBasp programmer I got from ebay.
The arduino-tiny core and the TinyServo Library is required to compile the code. I burned the fuses of the microcontroller to run on the internal 8 Mhz clock speed.
*First picture is a GIF animation
Attachments
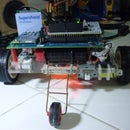
Step 4: Assembling the Circuit on the Perforated Board


After porting the code, I continued by assembling the parts on the 5x7 cm perforated board. I used 22AWG solid core wires and 30AWG warping wire for wiring the components together.
*First picture is a GIF animation
Step 5: Connecting the Lithium-ion Battery, Charger and Power Booster Together.


Sorry for the lack of pictures in this step... i got too excited and forgot to take pictures of it when I was assembling them.
The charger tends to get warm when charging so I used screws to hold it in place instead of using hot glue.
The booster is held on together with hot glue and also screw.
The battery is wired then it's terminals are hot glued to insulate it and protect it from shorts. The wiring of the charger and booster is also hot glued for the same reason.
For the circuit board four holes are drilled on the plywood and screws are used to hold the board in place.
The wires of the servo and laser are zip tied to tidy everything up.
Step 6: Using the Bluetooth Controller.


I downloaded the ArduinoRC/Arduino Bluetooth Controller and installed it into my tablet. After that I open it and used the Controller Mode to control my project. I configured the buttons to pan, tilt, go to middle and on or off the laser.
The left direction buttons sends a continuous stream of data while the right direction button sends data once per press. Select is go to middle while Start is turn the laser on or off.
Step 7: Complete


Some test results: I switched it on and left it there idling when I went out and when I came back (>6 hours) It's still running OK. Voltage (4.2V ---- 4.0V) The batteries are salvaged from an old laptop and the capacity would be around 2000mAh~ per cell based on the label (It's abit old so I expect it to degrade abit already)
In the future I plan to put a camera (Raspicam/webcam) instead of a laser and use it for taking pictures automatically. With the pan and tilt system in I should also be able to do Panoramic photography.
So what do you think about this project? Leave a comment! Your suggestions can help to build me and others up.
Feel free to ask if you have any questions! I would be glad to answer!
Thank you for reading this instructable! Hope you've enjoyed it! Do vote for me for the Make it Glow contest if you think I deserve it. Have a good day!

Participated in the
Make it Glow!

Participated in the
Homemade Gifts Contest


