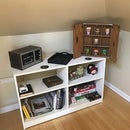
Introduction: Record Player Stand
Here is a simple record player (media) stand made from two plywood rectangles, one inside the other. Made to a custom length, height, and width to fit our space. We also went paint outside and stain inside, can do the other way around if wanted. Iron hair pin legs add great support and weight.
Step 1: Cutting Plywood
Cut the plywood to width and length. Due to the size, I used a Bora guide rail and multiple measurements to get the right width and then length for our table. The important aspect is to remain square. Repeat the cuts for width for the inside rectangle.
Step 2: Joinery
For this project, the outside layer was connected with kreg pocket screws. Mainly because the pocket holes will be covered by the inside layer.
Step 3: Edge-banding
To keep the plywood from looking like plywood, iron on edge-banding was use to cover gaps and cracks. Very useful and easy to do if you've never tried.
Step 4: Inside Layer
The inside layer was placed using wood glue and clamps. After glued tried a little, screws were placed to hold permanently.
Step 5: Dividers
Dividers were evenly spaced and laid out. Once square, were held into place using glue and screws. Wood filler was later used to fill the over the screws and hide within the paint.
Step 6: Staining and Painting
For out stand, the inside was giving a dark walnut stain. And the outside was given an off white paint. Use whichever pattern works for y'all. It might be helpful to paint prior to assembly if possible. Definitely would save a few headaches.
Step 7: Legs and Decorating
We used hair pin legs for ours. We like the metal/wood look. Shop around if you would like a different appearance. Hope everyone enjoyed, never stop building.


