

Introduction: How to Recycle Old Laptop Battery


Welcome everybody. In this instructable I will show you how you can recycle old laptop battery pack. If you are using a laptop then after few years of usage the battery performance decreases and a time comes when your battery pack is no longer supplying power. Actually this happened to me. That's why I thought it would be nice to share what I did to that battery pack.
Step 1: Some Basic Ideas


Have you ever wondered what is inside the battery pack of laptop? What kind of battery is used? Why there are 8 pins to connect the battery pack?
Okay let me explain this. Actually there are 6 li-ion cells inside the battery pack. These are 18650 batteries. The cells are connected in different combinations depending on specific brand or model. Generally there are 2 rows and 3 cells in each row connected in series and the two rows are connected in parallel. Cell voltage of each 18650 cell is 3.7 V. So 3 cells in series gives 12.1V. Now if each cell has charge capacity of 2000 mAh then 2 rows in parallel gives 4000 mAh. So the battery pack gives 12.1V, 4000mAh.
Now there are 8 pins that connect the battery to laptop. 6 of these gives the cell voltage of each cell and 2 of these pins are for power supply. The cell voltage is monitored by laptop so that if any of the cell dies the battery pack stops supplying power. Also these 6 pins are used for balance charging.
When your battery pack is completely dead you will definitely look for a new one. But what to do with this damaged one? Don't through it away. Disposing these batteries requires special techniques. The battery pack may not be of any use but all the cells are not dead. you can recycle the good ones and make a separate battery pack or you can use them to make you own DIY mobile phone power bank!
In my case 2 of the 6 cells are dead. So I have to through them anyway. But 4 cells are working good. So I thought to make a 2S lithium ion battery pack.
Step 2: Charging of Lithium Cells


Charging of lithium cells are quite different from all other types of batteries. The charging process has two main stages - constant current (CC) and constant voltage (CV). In order to charge a cell in the two stages we need some special types of chargers. The most widely used charger is the Balance charger. The name itself suggests that its balances the charge. What it actually means is it balances the charge of each cell.
Another widely used charging method is by using TP4056 modules. These are very much cheap then the balance chargers. you can use any 5V supply to charge the cells. But the main problem is you can charge only one cell at a time or you may connect multiple cells in parallel. (It would be slower as you increase no. of cells).
Well there are many other types of charger available in the market. Finally its upto you which charger to choose. I am going to use Skyrc imax B6 mini charger.
Step 3: List of Items


1 x female JST connector
1 x 3 pin Relimate Connector
Single sided tape
small piece of copper wire
Equipments
Soldering iron
Flux cored Solder wire
Helping hand
Step 4: Making the Connections


Solder the two battery terminals in series to make a 2S li-ion pack. You may connect 3 of these in series to get 11.1V. Now the choice is yours whatever you are going to make just make the connections accordingly.
I have a t 2S li-ion pack so the 2 cells are in series. Now solder the copper wire in the negative of cell 1 and positive of cell 2 to make the connections in series. Solder the middle wire of balance connector to this copper wire (check the image attached). Finally solder the red and black wire of JST connector and balance connector with the respective positive and negative of cell 1 and cell 2 and then wrap the cells together and cover all the conducting parts.
As there is a comment from omnibot, says there is a risk that during soldering lithium batteries may explode. I found another safe way by using battery holders. These battery holders as available as single, or multi cell holders.
If you don't find the battery holder then you may go for soldering the terminals. Just make sure you don't heat up the battery terminal for more than 10 sec.
Go for soldering only if you have a good soldering skill. Not recommended for beginners.
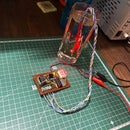
Step 5: Ready to Go


So far we have made the battery pack. Now let's charge the battery pack with a balance charger. Simply connect the balancing plug to the balance port of the charger and JST connector to the charging port using cable converters. These cable converters are supplied with the charger. Power the balance charger from a 12 V DC source and when its ready select LiIo from the main menu then select LiIo Balance CHG. Set the maximum charging current to 1.0 A (your charger may support very high charging current but for 18650 Lithium cells 1 A is the maximum charging current. Don't apply higher charging current or you may damage the cell or the cell may blast).
When the battery pack is fully charged it automatically stops charging.
Note: It is highly recommended to use a good quality charger. I recommend Skyrc imax B6 charger/discharger or any other charger of Skyrc.
Step 6: Extract Cells From the Dead Battery Pack


To extract the cells you will need a sharp knife or a cutter and a small hammer. Align the sharp edge of knife with the edge of the battery pack and hammer the knife softly. Repeat this until you see that the whole edge is cracked. Then pull out the batteries. Now you will see each cell is connected to a circuit. This is actually the cell protection circuit which protects the cells from deep discharging and overcharging.
Separate the protection circuit from the cells and disconnect all the terminals. Now test each of the cell voltage with a multimeter. Cells with voltage below 3 V are dead. These are of no use. Dispose the dead cells properly. Keep the cells which gives voltage more than 3 V.
This step may be done in many other ways. Search for it and you will get plenty of ways. I found this most convenient so I thought to share it.
I actually forgot to mention this step. After lathe_makeatio asked me how I figured out dead batteries from the battery back, I thought to post this step.
Step 7: Social Links
If you like my work and want to keep in touch for more blogs and tutorials, please subscribe to my YouTube channel: https://www.youtube.com/channel/UCNCysNXP8MPSaOOKa...
can also visit my website: https://digitaleclab.com/
Follow my page on Instagram: https://www.instagram.com/digitaleclab/ Facebook: https://www.facebook.com/digitaleclab


