

Introduction: Recycled Handlebar Bike Rack


My dear beloved bike Gunther met an untimely demise when he and I "won the door prize" (got doored) and he was sent careening off into the Great Bicycle Beyond.
This project is dedicated in his memory (and created with some of his remains ;)
THIS INSTRUCTABLE WILL SHOW YOU HOW TO MAKE A WALL-MOUNTED BICYCLE RACK OUT OF USED BICYCLE PARTS
I wanted to solve the everyday problem of having a good place to put my bicycle in a messy garage. I used recycled materials and a bit of random electrical and utility items to make something aesthetically pleasing and functional.
This project was inspired by the concept of "Bicycle Horns" as a play on words and the challenge of recycling otherwise unsafe-to-reuse parts
It requires a certain amount of "Macgyvering" to reconfigure the pieces but if you have a scraps from a old bike, some utility parts and a few simple tools, you can certainly make this project!
Step 1: Materials and Tools


Materials:
Wooden plaque -Michael's, $2
Wood stain - for plaque, I used what was available to me
Pressure connector 3/4" or 1" -seals the stem expander bolt to the base, Home Depot, $2
Floor Mount 3/4" or 1" -mounts the pressure connector to the plaque, Home Depot, $4
*IMPORTANT* choose a quill stem and expander bolt that works with the size pressure connector and mount you use
8 Screws, Quarter-inch- Home Depot, $1
Picture Hooks - I used PerfectHang because the hangings looked robust, Home Depot, $3
Quill Stem -- *Used Bicycle Part see http://en.wikipedia.org/wiki/Stem_(bicycle_part)#Quill_stems
Bicycle "Drop" Handlebars -- *Used Bicycle Part
see http://en.wikipedia.org/wiki/Bicycle_handlebar#Drop
Bicycle Inner Tube -- *Used Bicycle Part
see http://en.wikipedia.org/wiki/Tire#Associated_components
Bar End Plugs-- *Used BicyclePart
see http://en.wikipedia.org/wiki/Bicycle_handlebar#Plugs
Optional:
Electric Tape - if you want to use sections of bicycle tube (see later step) or bar tape to cover horns
Drywall screws or other mounting hardware -my friend wall mounted in his living room
-------------------------------------------------------
Tools
Paper towels were used to apply stain
Phillips head bit on a cordless power drill
Ruler for alignment
Scissors for cutting inner tube
A hex head for tightening the stem's expander bolt
Optional:
Laser cutter (was used for engraving)
Stud finder (for alternative living room mounting)
Step 2: Staining


I chose a $2 plaque from Michaels for my project. My friend who made his in parallel chose the more expensive wood mount. I applied stain with paper towels. I happen to spill when applying to the paper towel so be careful. If you haven't stained before consider wearing something you don't care about and if you don't like getting your hands dirty wear gloves. Stain in a well ventilated area as the fumes may pose a health risk. I stained after I had laser engraved but after consulting a friend the order is not critical. I went with a darker stain to be a bit more somber but you can get stain at a place like home depot and choose whatever suits your taste. I do regret doing the engraving below the bicycle "horns" and not above. I used adobe illustrator and a public domain font and public domain image of a bicycle for my commemorative etching.
Step 3: Mouting


I chose to mount above my etching. In hindsight this may have been a mistake. I kept spacing from the edges of the plaque and had two screws at the bottom vs. the 1 screw configuration because I thought it would be more secure. I used the 3/4 wood screws with the power drill. I used these screw on the back as well.. I chose to use screws over nails because this is a weight bearing project. Keeping everything aligned and tight really helps later keeping things secure and level on the wall.
Step 4: Hook Installation


*IMPORTANT* The hangings must be aligned level, otherwise the bike will not sit level when racked on the handlebars. I know this seems obvious but doing this right the first time saves alot of annoyance. I used PerfectHang. I have never used them before but so far so good. Home depot didn't have anything cheaper that worked.
If you are going to put this project on a wall you might consider a stud finder and screws for the wall hooks that feed into the rings
Step 5: Stem Installation

I unscrewed my expander bolt from stem and then unthreaded the locking connector and passed the expander bolt up through the locking connector before threading the locking connector back in. I then tightened the expander bolt back onto the stem. It sounds alot more complicated than it is. Depending on the fit of your stem/expander bolt in relation to your mount and locking connector this step may be difficult. Getting everything fitting snugly and aligned straight. I did some trial and error here. My friends stem fit perfectly and locked down easily so your mileage may vary.
Step 6: Handlebar Installation
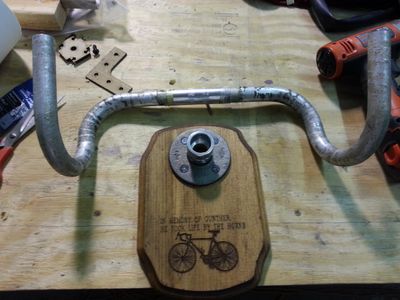


Gunther's bars were pretty beat up. I decided to cover them with his popped inner tube. I cut the tube slipped it on and left an inch + of excess innertube as a fudge factor on both ends. The inner tube not only hides the beat up and kinda gross drop bars it also prevents scratching the hanging bicycle frame by putting something between the metal on metal. My friend went with the more traditional look of two pieces of tube and electrical tape. I think my way is cleaner.
To get bars onto stem thread the end of bar through stem end and rotate bars. This can be done with the tire on it just takes finagling. Keep at the twisting motion with the bars. To make things easier half put on the inner tube thread bars through stem half way. pull inner tube through stem connector then grip. Bunch up tube at the tube covered side of the stem connector and feed/pull while twisting. It is all easier than it sounds.
Once everything is on and tightened cap your bar ends. I used my original bar ends which happened to work. It was very snug. You might consider using a rubber mallet to make things easier if it is very tight. My friend went with wine corks. Instead of stuffing down the excess into the bars he wrapped the bar ends with electrical tape. This choice is more aesthetic than functional.

Runner Up in the
Bike Contest

Participated in the
Instructables Green Design Contest

Participated in the
Jury Rig It! Contest


