

Introduction: Refurbish Old Laptop Into New Secure Machine


I'm sure you've ended up in a situation where your current laptop just doesn't cut it. It has nicks and scratches, paint is worn off, and the poor machine is just chock full of viruses that just won't go away, and it just doesn't keep you safe. I had a computer like this, but rather than get rid of it, I figured I should clean it up and start fresh.
This way, we can take an old, damaged computer and save some money making work like new again for no more than 30 USD (I paid more like 15-20 dollars), so you don't have to drop 500$ to get a brand new computer. In addition, this refurbished computer will run faster and will be less likely to get virus in the future, as well as keeping you secure from prying eyes!
As a result, this Instructable is divided into two parts-- the part where I walk you through the new paint job, and the part where I turned my old laptop into a fresh, secure, and fast new machine, good as new!
So, a sort of table of contents here:
1) The refurbishing of the computer
2) The 'breathing of new life' into the computer (by installing Linux; either by doing a full wipe and install or by partitioning for a dual boot)
3) The installation of programs and teaching of habits to turn it into a secure, reliable machine that can be used normally while still keeping you and your online habits safe.
This will, of course, work with a desktop PC, but the process of taking it apart is different.
Step 1: What We'll Need!

Again, two parts to this Instructable.
To start with, we'll obviously need the laptop that's going to be refurbished.
---
For refurbishing:
Parts/materials:
- Sandpaper (of various grits)
- Painters tape
- Plastic bags (or any light, paint-proof plastic sheet, these are just the most ready)
- Spray paint (Check that it'll work on plastic!)
- Sharpie (Just for some minor detailing, completely optional)
---
Tools/handy things to have:
- A clean rag
- Glass cleaner
- Screwdrivers (Not magnetic! We'll be using them to take the laptop apart)
- Electronics pliers/tweezers (You can do without them, but they make it so much easier)
- Assorted bowls (there's going to be lots of screws, and you need to keep track of them!)
- A painting surface (Like a nice spot outside)
- Exacto knife
- Sandpaper
-------
For the transformation into a faster, better machine (code-wise):
- A live USB (If you don't have one, learn how in one of my previous instructables)
- An internet connection (Doesn't matter how, just get on the internet!)
---
Step 2: Taking Apart the Computer


If we want to give it a new paint job, we can hardly do it in it's current, assembled condition. That means the first step is to take it apart!
By the way, if you break anything beyond repair, it'll likely be here. If you don't know what you're doing, you can really mess things up beyond repair, so either be somebody who knows what they're doing or use a laptop you can sacrifice. Next, back up your data. We also need to make sure there's no more power inside the laptop by unplugging it, removing the battery, and holding the power button for a while so that the energy can drain.
If that's all set, let's take it apart!
Using non-magnetic screwdrivers, you'll likely have to take the screws out of the back. Be sure not to lose any and that you've kept good track of what goes where. When this is done, you'll likely have to pop off the keyboard section. Your computer is likely different from mine, and I can't teach you how to get each one, so if you can't figure it out there are plenty of internet resources out there. Don't worry about it too much, though-- we only want to separate the area around the keyboard from the rest of the computer. I didn't try to remove the area covering the screen, I was nervous about breaking something! It wasn't totally necessary to remove it, anyway.
With the screws out of the way, it should be as simple as popping the sections apart. There will be cables connecting the top half to the bottom-- record where these go and gently remove them from their ports.
To protect them from damage, you should consider removing the RAM and hard drive temporarily, so that they don't fall out or get bumped, causing damage to the inner workings of the machine.
Step 3: Prepping for Paint


We now have two lovely computer pieces. Now we can paint them!
Well, not in my case, actually. My computer was covered in dings and scratches, as well as areas where the paint simply wore off from usage. None of the scratches were super deep, but they did go through the paint. In addition, the actual paint has a laminate layer that might make it difficult for the paint to adhere. As a result, this is where the sandpaper comes in! You can see I sanded some areas more aggressively than others, but I didn't mind too much as I would be painting over it and I just needed to get rid of the basic laminate while slightly abraising the surface to help the paint adhere. Be warned, however, that if the abrasions are too deep, they'll show up through the paint layers.
We are almost ready for paint, but we don't want any critical computer bits getting a lovely, think coating of Black #5, so I covered up the edges I wanted to keep with painters tape, and helped keep the rest safe with the aid of some plastic bags, making sure that there were no holes (and covering any holes I found with tape). I also made sure the screen was safe by covering it in tape (in retrospect, I should have realized that this could lead to tape residue on the screen, and used a plastic bag instead).
To preserve the keyboard, I used strips of painters tape to cover the area, and then used an Exacto knife to carefully cut out the edge. I did the same thing to preserve the HP logo on the back, and the power button. Again, plastic bags and tape where used to keep the electronics safe. I only did this to keep the keyboard safe, as for some reason, I had difficulty in separating the outer piece from the actual typing section.
Step 4: Painting


I don't have any images of the actual spray painting part (I was spray painting at the time), but I do have a nice before-and-after image for you.
The painting itself was rather simple. I painted the section using long, smooth strokes back and forth (making sure not to focus on one area or go so slow as to allow it to pool). Allowing for so much as to let the paint run or drip will lead to a worse looking result, and may also damage electronics.
Once a layer was tacky, I inspected it and added another. I repeated this until I had 5 (or more, I'm not totally sure) layers on the computer. These thicker layers would, hopefully, allow for a more durable paint layer and one that was harder to see previous dings through.
Your urge will be to remove the paint before it is totally dry. Don't! I fell to this temptation, and the little bits where there is paint missing (showing the silver underneath) is thanks to that. Once it is totally dry (tacky isn't good enough, as I learned the hard way!), you can remove the paint to reveal your handiwork.
Step 5: Re-assembly


At this point, you can re-assemble even before the minor aesthetics. They'll be easier to add to a complete machine, anyway. Thanks to the various system of bowls and whatnot, it should easy to put the screws back where they need to be, as well as the hard drive and RAM. The hard part will be attaching the actual cables back into their respective ports. This takes dexterity and perhaps a pair of electronics tweezers, depending on the setup of your computer.
While we're here, we may as well clean off the keyboard from whatever grime it may have picked up (A cloth or dry sponge works well), and the screen can get cleaned with a clean rag/paper towel and glass cleaner.
Step 6: Minor Aesthetics: the Logo


Just for fun, I'd like to change the HP logo on the back. I also wanted to do it in such a way that it could cover up the scratch I had made earlier. To change the HP logo, I covered the basic area with tape so that I then cut the logo shape out of, revealing only the HP logo and leaving the area around it protected. After this, I simply sanded off the paint, revealing a nice, circular surface on which to do my work.
You may recall my mentioning that I fell to the temptation of removing the tape too soon, and this, combined with an accidental incision from the knife when applying tape, meant that I had to cover up a mistake. I started by using sharpie, but it doesn't do a great job of covering up the scratch, although it does help. Instead, I decided to go with it, and create a small solar system, using pencil to plan it out and then sharpie to finalize my work.
To do this, I started by creating 6 rings that would be the orbits of my small planets. I found a compass to be very helpful, as it allowed me to create 3 thin ringed areas of a good distance apart.


Again with the compass, I created three planets to fit in the orbits. The stray pencil marks are from when my compass slipped slightly, since I was creating small circles on a slippery surface.

I then drew out an outline for the sun at the center. I find this to be particularly fitting because in the case of my computer, the logo glows, so that in this design, when the computer is active the center of the solar system's sun will light up.

I colored everything in with sharpie. The pencil didn't take well to erasing on the paint, so I ended up just widening everything to just cover the pencil sketch. I also added a small asteroid belt.

And here's what it looks like lit up. Sorry the quality isn't perfect, but getting the lighting right to show both the subtle Sharpie detail as well as the glow was rather tough.

Step 7: Minor Aesthetics: the Windows Key


Since this is going to be a Linux machine, the Windows key is going to have to go. To accomplish this task, I used an Exacto knife to chip away at the Windows logo and peel it away from the key. This led to a mostly smooth surface, but the sandpaper helped make it smoother. I ended up with a nice ring in the place of the Windows key that I can use as a Super key.
Step 8: Getting a Boot Disk


Above is the logo for UNetBootin, a tool for creating Boot disks. The UNetBootIn logo is licensed under CC-BY-SA 3.0.
I'm not going to bore you with the technical details of all this, but for those of you that aren't aware: The operating system is the 'behind the scenes' stuff that allows you to run programs and all that. For example, Windows 8, Windows 7, Mac OS, and Ubuntu are all examples of operating systems.
In my own opinion, Linux (an open source, free, and reliable family of operating systems, of which Ubuntu and Linux Mint are both examples) is the way to go here. It allows for functionality, speed, and security, while remaining reliable and really hard to catch a virus on. In order to install Linux, you'll need a Live Boot disk.
Don't worry, though, they're super easy to make. In fact, I made an Instructable on how you can make one yourself a while back, in which I outline for you how it all works, how to try it without downloading it, what distro you may wish to choose, and what different kinds of software you'll need to actually make a disk of your own. This link will take you there, and it also includes information about operating systems that you may find helpful to know.
You can also purchase boot disks. For example, Canonical (The company that makes Ubuntu) will sell you a disk, ready to use.
You can just as easily make your own, however. The process, although simple, is too long to explain here, but here's a summary copied from the Instructable I mentioned a moment ago:
- Download the UNetBootIn or YUMI open-source tools
- Download the .ISO File of the operating system you want or choose it from the list in UNetBootIn or YUMI
- Plug in USB drive, select it in the software, select the proper operating system.
That's the USB prepared, now for usage:
- Plug into the computer you wish to use - Restart/Turn on computer
- Enter boot menu at start up - Select USB Device
- Select operating system (Live version, or install if you wish to install it)
- Use operating system. When done:
- Shut down computer
- It may have specific instructions on how to shut down from a USB, for me, it tells me when to remove the USB and when I have, to hit enter. You can pull it out but that crashes the computer. And after the USB is out, everything returns to normal! Turning on the laptop will select the default operating system.
Of course, we want to install, but what if you want to dual boot? That's also an option- to have Linux alongside you current operating system, but choose which OS to use in the beginning. That's what we'll be going over next.
Step 9: Installation: Partitioning


Now we install! Plug in the USB or disk, and turn on the computer, making sure to select the proper device. (If you don't know this stuff already, I would encourage you to check out This Part of my Make a Live USB Instructable).
If you do happen to mind wiping the old operating system, you'll want to dual boot, in which we allow the computer to have two different operating systems that we choose between at start-up. In order to do this, we'll need to make a partition in the drive.
You have two options, depending on what you're trying to install. Linux Mint, for example, has an option for you to alongside Windows that you can use. The other option is to manually partition and install into that partition.
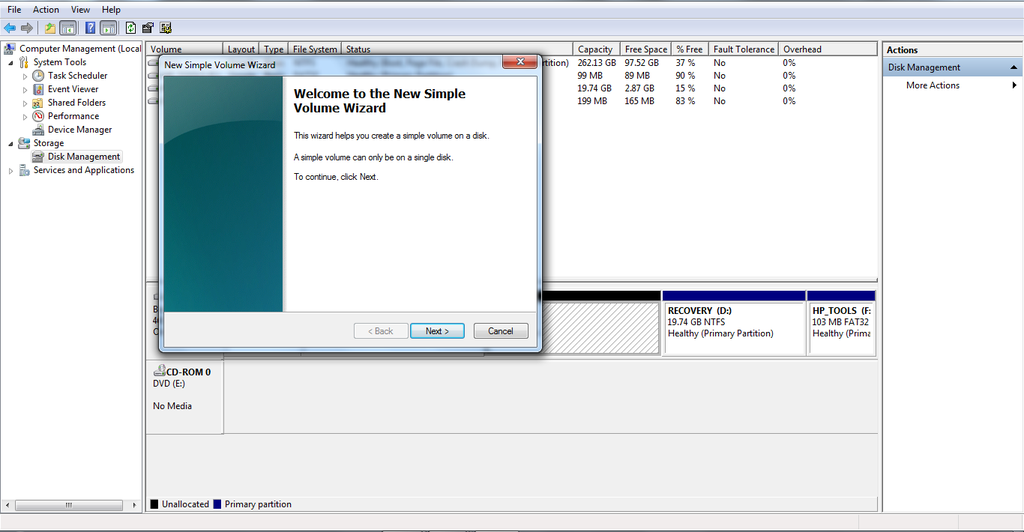
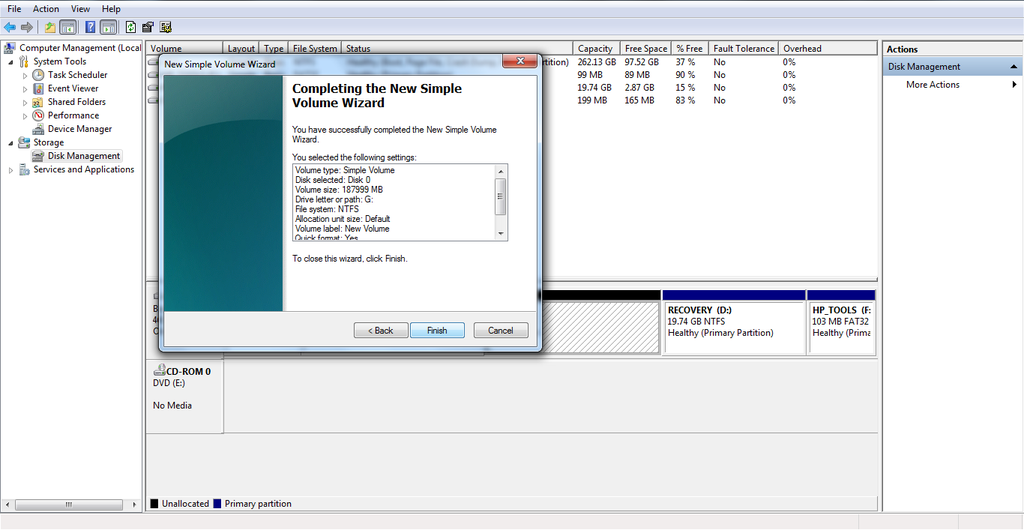
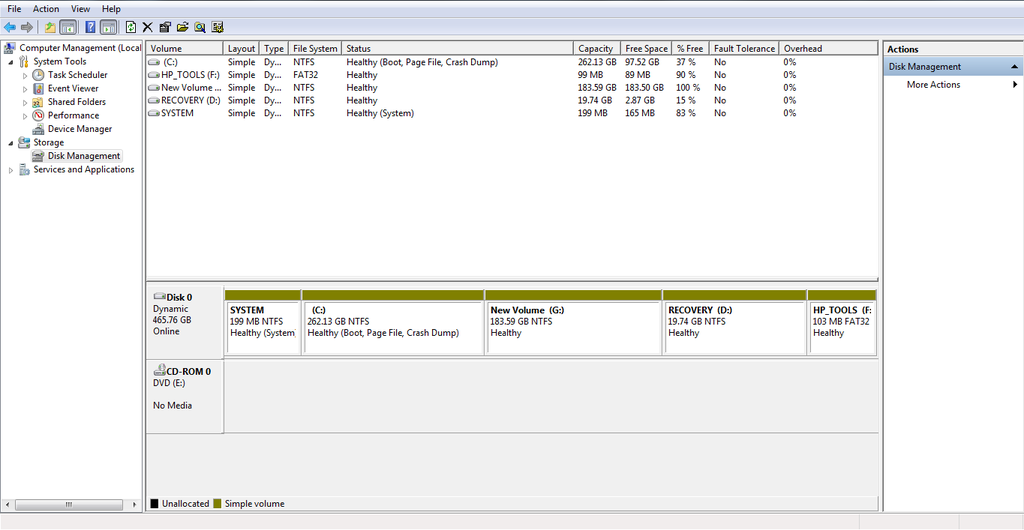
How you partition your drive depends on your operating system. In my case, I was able to make a partition in Windows 7 by using Control Panel -> System and Security -> Administrative tools -> Computer management -> Storage. From here, I resized my C: drive so that there would be a blank spot on my drive (I used the 'Shrink drive' option), which I then right-clicked the empty space and selected the New Simple Volume wizard, from which I selected the size I wanted the new partition to be. I now had a blank partition!


Others may choose to use the built-in partition editors, or partition tools like GParted. Be careful, however! I have attempted to partition and dual boot before and ended up bricking my Windows partition. Exercise caution and make backups!
The rest you'll have to do on your own, but feel free to do a search about it- there's plenty of resources out there! I chose to wipe the disk entirely and play with Linux Mint after that. In the case of Linux Mint, you'll have to reboot before you can install anything, so go ahead and do that when you're ready.
Step 10: Instillation: Downloading


To do a full wipe and install, again we plug in the USB or disk, and turn on the computer, making sure to select the proper device.
For those of you that don't mind wiping the old operating system away, simply hit install (in the case of Linux Mint, there was an icon on the desktop) and let the USB stick (or disk) do its thing. Above you can see the process of installation: The USB is plugged in and selected from the boot menu, and the installation wizard is followed.
Step 11: Essential Software


Images:
1) The logos for the different programs included in LibreOffice. Photo copyrighted under CC-BY-SA 3.0 by the LibreOffice foundation, image taken from www.libreoffice.org
2) The logo for Firefox. Photo copyrighted under CC-BY-SA 3.0 by Mozilla.org, taken from www.Mozilla.org.
In order to use your computer, there are some tools and downloads you'll need or want. You will need internet access to get to them, so connect to the internet like you would on any other computer. For everything I've seen, if you didn't connect to the internet at the install stage, you can simply click the WiFi icon, find your WiFi, and type in the password. All Linux distros come with a basic web browser that you can use to get one you prefer.
Once you're connected, there are some things you'll need to be able to function normally.
Office Utilities: LibreOffice. It offers all of the features of Windows Office (such as word processing, spreadsheets, and slideshow presentations). It also comes default with many distributions, so it's very likely that you may not need to download it (in our case, it comes with Linux Mint so there's no need to install!). Writer has all kinds of handy features to make writing more efficient. It also is available for Windows, and I was able to save a fair amount of money on a laptop I purchased by using that instead of Microsoft Office.
Internet Browsing: Mozilla Firefox. A lot of distributions come with Firefox installed (again, including Linux Mint and most others I've played with), and this is a great option, as it offers speed with ease of use, customization, and security. If security is something you are interested in, stay away from Chrome. Google's method of making money is to gather information about you that is then sold, and Chrome aids with this process. Unlike Chrome, Firefox does not gather your personal information to send to a larger company. Firefox is also open source!
Antivirus Scanning: ClamTK. If you're using Linux, you really don't need to worry about picking up viruses too much anymore. There aren't many viruses out there for Linux, and it's pretty hard for a virus to infect Linux anyway-- the way files are stored and the way privileges work are different. However, I like to install ClamAV (The GUI version is ClamTK, and is very easy to use), because it allows me to scan potentially malicious files.
Mail: Thunderbird Mail. It's simple, customizable, free, and open source. It's very easy to get multiple email accounts on Thunderbird, and if you need one, you can even create a new email account right there!
So those are my basic recommendations. I'd start with downloading Firefox and LibreOffice for now (if you don't already have them), and do the rest later if you want to. However, there are a lot more open source tools out there that are available, and the more developed distros will have, at the very least, LibreOffice and Firefox (although some prefer to stay lightweight by not installing these things). Next, let's make it secure!
Step 12: Securing Yourself on the Internet Part 1: Private Browsing and Why


The first image contains a shot of the website DuckDuckGo.com.
You've probably seen a lot of articles on this already, but it's worth going over, and I think I have some stuff beyond the typical that you may have heard (although there's some of that, too).
Okay, so first let's use Firefox. I'm intentionally not including anything about Chrome, because if you care about keeping your private information safe, you aren't using Chrome.
First, let's set up the privacy settings in Firefox. Select the menu in the upper right, and then Preferences. Under the 'Privacy' tab, you can set Firefox to default to Private browsing (By selecting the 'Use Custom Settings' dropdown). This means that cookies are not saved, and neither is your history (although you can use the custom settings drop down to make it do what you like in this area).
Why is this good? For a bunch of reasons:
You know those ads that follow you around? Private browsing helps get that out of the way. You may also notice that a lot of browsers prompt you to 'remember this password', but this tends to be a bad idea, because this means that your password has been saved on some part of your computer, or worse, in the Cloud. If you use Private Browsing modes, this never happens.
Another reason is for shopping. A lot of websites (travel sites are notorious for this) will change the prices depending on what you've purchased there in the past or if you've visited the site earlier. They'll raise the prices assuming that you've come back to buy. If you use Private Browsing, however, this doesn't happen.
Also, you know those sites that say, 'you can only read (number) amount of articles a day unless you subscribe'? A lot of the time, private browsing (with aid from the add-ons I'll be mentioning in a bit), can foil these plots.
What I'm getting at is, there are a lot of good reasons to use Private Browsing other than the, ...er... less than socially acceptable reasons that often spring to mind when people think of not keeping a search history.
Step 13: Securing Yourself on the Internet Part 2: Add-ons

Firefox has a massive database of add-ons that you can use in order to do all kinds of things, and one of the categories is Security. To access add-ons, go to the menu (the three stripes in the upper right hand corner), and select Add-ons. You'll be brought to a page where you can add themes for customization, while also learning more and actually adding the add-ons.
These are all free, by the way. Here's what I would recommend:
DuckDuckGo Plus: This allows you to use DuckDuckGo in your browser. I'll discuss the benefits of DuckDuckGo in another step.
BetterPrivacy: We've gotten rid of Cookies, but Local Shared Objects (often dubbed 'Super Cookies') can still get in. BetterPrivacy makes sure that doesn't happen.
Ghostery is a tool I really like, as it disables a lot of potential trackers. We'll go over what that is and how to use it in the next step.
Step 14: Securing Yourself on the Internet Part 3: Ghostery


The image at the top is the Ghostery logo, and the two following images are of their welcome page, property of Ghostery, inc. The site following it is the National Enquirer, property of American Media, Inc.
Ghostery is a add-on that blocks things that can track you. A lot of them are things like Google Analytics, which sites use to track individual users and gain information about what kinds of things they like so that ads can be targeted, and also so that information can be collected by Google. Ghostery uses a little ghost emblem in the corner that displays what's being blocked, and if I choose to, I can whitelist a site, pause or unpause blocking, or temporarily enable certain potential trackers. It's a great tool that can double as an ad blocker.
Once you've gone to the add-ons and installed it, after a restart of Firefox you'll be brought into the Ghostery welcome and setup wizard. This will allow you to choose what potential trackers to block. In my own case, I've chosen to block everything. In the fair amount of time I've been using this tool, I haven't found it to cause any issues except for the occasional disabling of a widget (but it's easy to temporarily re-enable it).
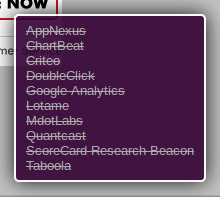
With Ghostery installed, you'll notice that if I visit a site Ghostery will notice potential trackers, notify me by bringing up the text in the lower right, and disable them. (This notification can be removed in settings, and it does go away after a choosable amount of time.)
For an example, I've chosen to visit a site that I figured might have the sort of things that could track people or get analytics, the National Enquirer. Please not that I'm not picking on this site in particular-- Trackers are often used by sites to figure out what people are looking at on a site and the like. Almost all sites will have a couple.

A close up on the trackers Ghostery found appear in the lower right. As I have told Ghostery to block everything, you can see that all the potential trackers have been crossed off, to show that they've been blocked.
By clicking on the Ghostery icon in the upper right corner, I can choose to temporarily pause blocking, whitelist this site, allow specific applications to run, or temporarily allow specific applications to run.

Step 15: Securing Yourself on the Internet Part 4: Searching


As I've mentioned before, security means breaking the Google habit, and that's going to include the search engine. Beyond targeting ads, there's also search bubbling.
Search Bubbling is when search engines (Google is notorious for this), based off of what you've searched in the past, tailor your results to you. So for example, if somebody with a Democratic party mindset (as shown by the sites they've been googleing) searches for, say, guns, they might get results about a petition to increase gun regulation. Somebody with a more Republican party mindset would, from the same search, get results about the NRA. Although they can find each others results, this takes a bit more searching and is an example of how your history can be used to limit the information you get.
There are a lot of different options you can use:
----
DuckDuckGo is a great alternative. It's been gaining a lot of traction recently, because its whole business model is that it doesn't track you. Furthermore, it actually doesn't keep track of what you do at all. This means that they keep no records of what sites you've visited, what ads you might be interested in, and so on. They also don't do search bubbling.
You can read more about their privacy policy here, their description of search bubbling here, DoNotTrack here, and check out their About page. I admit the descriptions will likely be biased, but the information enclosed is correct.
DuckDuckGo can also do some things that Google doesn't, but because I'm attempting to improve security not advertise, I won't be mentioning them. The DuckDuckGo Plus add-on I mentioned earlier allows you to use it in browser.
And by the way, DuckDuckGo is open source!
---
Proxies are another option, and there are thousands of them. I won't link to any, because in some cases they can be illegal and they tend to change often anyway. Do your research!
---
Step 16: Final Touches
That's pretty much everything, but there are a few things that could be done to help out a bit. One thing to do is cover up the webcam. I colored over a strip of tape and put this over the webcam, which shows up really well in the photos but is far more subtle in person. This is done in order to prevent Ratting, a malicious computer attack in which it is possible to gain access to the webcam and watch or record whatever it is seeing (which, most of the time, is you or somebody you know). There are even forums where access to these webcams is traded, so this is something that although appears paranoid, is likely a good idea.
There's also the basic tips that people already know, but a little refresher anyway: Don't save passwords, and passwords should be (ideally) 14 characters, and include non-alphanumeric characters (such as <>/+_ and so on) as well as numbers. This is because rainbow tables (which are often used to crack passwords) will get foiled at this stage. Well, not foiled, actually, but it will become so inefficient that there isn't much of a point compared to what they'd get out of it. Be sure not to use the same password twice, and be sure not to use important accounts on public WiFi, where malicious hackers can pick them up and take them.
If you ever travel, rather than using your important email account, set it up so that it can forward to an account that you don't care about. This way, you can check your email in areas that are not secure, and respond if you need to, without putting your important email account in danger. The account you don't care about can get thrown out later.
Step 17: TaDa!


We now have a refurbished, clean, fast, and secure laptop out of the rubble that was the old one. I hope I've inspired you in some way to attempt this project yourself to get new usage out of an old laptop that you thought had expired.
Feel free to vote for this in the Security contest and/or the On a Budget contest if you think it deserves to do well in those areas. But only if you think it deserves it, of course!
Please let me know what you thought, and if you have any questions or comments, I'd love to hear them. As always, Have a Nice Day!
/AssemblyRequired

Participated in the
On a Budget Contest

Participated in the
Protected Contest


