

Introduction: Remote Controlled Hose Valve


I'm not sure how many practical applications can be found for this device, but the idea is sound and it was a quick, easy build so I thought I'd share it with others.
We've got an outdoor cat, and recently I noticed his food bowl was getting emptied daily, which wasn't normal for him. I assumed something else was eating it. Sure enough, I've since seen not one but two other cats that are showing up and chowing down on his food. Right off the bat I started thinking up automated feeders that would open in response to an RFID chip on my cat's collar, but those ideas seemed too complicated and cost prohibitive.
I thought at the very least I could try some sort of negative reinforcement on the errant cats and hope I could condition them to stay away. The only problem with that is that they're on my deck, and I have to go out a door to get near them, and by then they've already run away. Yelling at them and banging on the door or chasing them off the deck isn't quite enough of a deterrent.
That's when I got the idea for this instructable. I had most of the stuff lying around the garage so it wasn't tough to put together. Basically it's a common sprinkler valve hooked up to a wireless remote so I can turn the hose on from anywhere in the house. So I can put out food at prime cat time, monitor the area from elsewhere via a webcam and my laptop while I watch TV or do other things, and dole out a healthy spraying the instant the cat touches the food. Even if it doesn't work over the long term it'll make me feel like justice was served.
Step 1: Tools and Materials

Remote Switch - I already had one of these laying around. They're maybe $15-$20, and you can find them online or locally at a home improvement or big-box store. They're commonly used for things like turning holiday lights on and off. Mine is designed for outdoor use which is handy since there's going to be water around.
Sprinkler Valve - I picked one up for $11 at the home improvement store in the plumbing/irrigation aisle. Get a 3/4" model.
24V Transformer - This you'll need to power the valve. I've got in-ground sprinklers at my house and thus have a sprinkler controller powered by one of these. Since I won't be using it for the next 4 or 5 months (It's plenty rainy here this time of year) I'm scavenging it. I just opened the case of the controller and there were two quick release levers I flipped to pull the cord out. If you don't have one you can find them near the valves at the store for maybe $15-$20, though it makes the project a little pricier.
Adapters - These are Male NPT to Female Hose Thread. It might look like a standard garden hose will screw into the valve directly but it won't; the threading is different. Get two of these. These were also in the irrigation section right near the two previous items.
Short Piece of Hose - This is a couple foot section of hose I chopped off the end of one the of hoses I already owned. I needed this because I couldn't find a Male NPT to Male Hose Thread adapter, which would have let me screw a nozzle right to the adapter. The hose and the menders basically allowed me to make a short piece of Male/Male hose which I needed to attach everything. It actually works well because it gives a little flexibility in aiming the nozzle, which would be harder if I didn't have it. If you can find other adapters, by all means hook things up in a way which makes sense to you.
Male Ended Hose Mender - I needed two of these. One went to the other end of the short piece of hose I cut off making the Male/Male section, and the second went to fix the hose I chopped the short piece off of. (Otherwise I would have wasted the entire hose.)
Teflon Tape - For the threads of the adapters.
Step 2: Hose Mending


Use the hose mender to make the Male/Male hose section. Take the clamp and slide it over the cut end of the hose, and then insert the barbed end of the mender into the hose. Push it all the way in, and then tighten the clamp.
Step 3: Inserting the Adapters


Wrap the threads of both the adapters with a healthy amount of teflon tape, and then screw them into the valve. Don't go overboard; finger snug is plenty. No pipe wrenches needed.
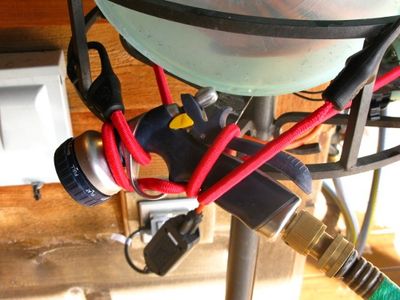
Step 4: Wire the Transformer

Next we need to attach our transformer to the sprinkler valve. Since I don't plan on this being permanent, I didn't solder them. I did a quick splice and wrapped them with electrical tape. (I was also too lazy to yank out the soldering iron.) Connect them as you see fit. You can always cut out the splice later if you solder it.
Step 5: Assembly


Now we just need to put the pieces together. Depending on where you want to do this and how far you are from a hose bib and an outlet your setup may differ from mine.
In my situation, I've got a handy outlet about a foot away from my hose bib. You may recognize this from the Squirt Gun Refill Station instructable. My garden hose was already connected to the bib, so I removed the spray gun from the other end.
I screwed the hose into one end of the prepared valve, and screwed the short Male/Male hose section to the other. Lastly I put the spray gun back onto the end of the short section.
Next I had to hook up the power. You'll notice I've got an extension cord added into the mix. The only reason for this is that the remote switch that I have has a little protrusion on it which makes it impossible to connect the transformer directly. (I think it's so that if the switch is outdoors and laying on the ground, water won't fall into the space between the plug and the switch body. So the extension cord is there just to get around that.
I had a 3 gallon bucket handy so I rested it in the top of the planter and stuffed all the cords inside to provide a little shelter.
To tidy up I zip-tied the valve to the planter to keep it off the ground. The last thing to do was to get the nozzle aimed. I used a couple of bungee cords to secure it in place, then turned the water on and tweaked things until it was pointed where I wanted it. Also remember that if you have a spray-gun typle nozzle you need some way to keep it in the 'ON' position. Most of them have a lock for this.
Step 6: Valve in Action
I leave it up to the reader to think up some more creative uses for this. In the summer my kids would probably get a kick out of it, running in front of the nozzle and not knowing when it's going to spray them. There's also the possibility of some pranks, too. Maybe you could set up a defense perimeter on your house to hose down people who wanted to egg it.
All I know is that I'm going to hose down some cats.
Here it is in action.
Step 7: Update


This almost warrants an entire new instructable, but I wasn't planning on making one so I didn't take my normal step-by-step pictures of the building process. It's getting a little late in the season for outdoor water-related activities, so I just wanted to share these to tide people over until next summer. I figured it would be nice to show you all some animal getting soaked.
As it turns out the real culprits weren't the neighborhood cats. It was these guys.
They warranted a bit more than a hose spraying, so I threw together this little puppy.
It's a 33 gallon trash can lashed to a piece of chain link post which is being held up my ladder. When the can is upright it's held in that position with a electromagnetic door magnet which can be remotely operated with the wireless switched used in the hose valve instructable. So you just tip it upright, turn on the magnet, fill it up with water and then wait. This is what happens.
The problem here was that I put the food in the center of the dump zone. I didn't realize that in the time it took to spill, the raccoon would spook and be off the deck before the water could come down. So it was back to the drawing board.
This time I put the food back underneath the ladder and made a sort of crude funnel with some lawn chairs so that when the bucket started to drop, the raccoon would probably be in the drop zone because he'd be running back through it instead of starting there. It worked pretty well.
This was a fun little project, and I'll most likely revisit it next summer when I don't have to worry about ice on my deck or hypothermic raccoons.


