

Introduction: Repair Broken Pry-bar


Some time ago, at least two years, one of the pry-bars I favor broke, probably from abuse. So recently I finally took time to tackle the project of repairing it. Because why would I throw anything away that I can fix? The only problem was finding the time to do it.
Stuff I used:
- Metal Lathe
- 4 1/2 inch grinder with various accessories
- 7 inch grinder
- Some clamps
- Bench grinder
- Anvil
- Hammers of various size
- MIG welder
- Temp stick
- Non-contact
- Infrared thermometer
- Oxy-fuel torch with rose bud tip
- Weed burner
- Bucket of sand
- Used oil
- A few made-up custom rigs
What it's made of:
- Broken pry-bar
- 1 inch, schedule 40, black pipe
Step 1: Proper Planning Prevents Poor Performance


From the start I knew that I would need to deal with the tempered nature of the pry-bar, which led me to conclude that some blacksmith techniques would be in order. I am in no way a blacksmith, but I could probably play one on TV. Otherwise this is a straight up welding fix.
Thinking like a welder makes me want to add metal to things, for strength. So the initial plan was to bevel out the bar at the break, weld it together, and slide a piece of pipe over it like a splint. But having nearly two years to dwell on the topic is always a bad thing for me. I added extra steps, that sounded really simple at the time, but ended up being a bit of a pain later. So the new plan was to repair the bar and slide the pipe over just like before. But I added the extra step of shrinking the pipe down to match the taper of the pry-bar for added strength.
Step 2: Bevel, Pre-heat, Weld


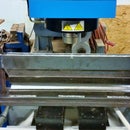
This was the easiest step because it was the most familiar process to me. First I took the broken pry-bar and beveled the edges of the break using the lathe. Lathes work super slick for bevel treatments of round stuff in preparation of welding. The bevel is exactly what you want and is uniform around the whole circumference.
Next I pre-heated both ends of the bar. Pre-heated material leads to stronger welds. I am uncertain of the pre-heat temperature. The infrared thermometer I used did not have enough range. And the temp stick I have is only 200 degrees Fahrenheit.
After that I aligned the pieces of the pry-bar for welding. I was especially careful to prevent making a crook in the bar. Once satisfied with the alignment I proceeded to weld the bar back together, making it one piece instead of two.
Step 3: The Nature of Metals


Here is where the process goes off the rails. The pry-bar had been hardened tool steel. And I just welded it, effectively re-arranging the molecular structure of the material. The resultant product is a softer and more flexible steel, bonded by harder inflexible weld. This does not make a strong pry-bar.
So I needed to return the molecular structure to something more like its native state. Which means heat treating. I know a little bit about the processes involved, but I am by no measure an expert of the topic. While the weld was still hot I applied heat until the weld and a few inches to either side of it were glowing red. Should have been somewhere in the neighborhood of 1100 to 1400 degrees Fahrenheit. Then I cooled it in sand.
The idea here is that by applying that amount of heat, the molecules in the steel will space themselves more uniformly. And by cooling it in sand, the steel is insulated by the sand allowing the steel to cool slowly. Which will supposedly let that uniformity hold until fully crystallized, but without any shear stress from heat shock.
With any luck I have made the structure of the weld the same as the bar around it. However that structure is soft and malleable and will need to be changed later.
Step 4: Prepare to Add the Splint


Over the years of use this pry-bar has been bent and mangled. And while it was two pieces the splint pipe fit in place nicely. Because I was not sliding it over the bar. But now that it is whole again, there is too much distortion to slide the pipe in place.
Simple fix, hit it with a hammer! Metal always responds well to being beaten. To correct the wavy bits, strike what is not flat on the anvil. Striking what is on the anvil will only stretch the metal, kind of like pinching Play-dough between your fingers.
Step 5: CALAMITY!!!


While beating my pry-bar back into shape, it snapped. YAY! I was already fixing it, so why not get some more practice. My fault for trying to coax hard iron to bend. I should have heated it, and then hit it with a hammer. Live and learn.
Step 6: Repeat the Previous Steps!


Bevel, pre-heat, align, and weld. Just like before. Only this time I could not get half the bar into my lathe. So I used the bench grinder to cut the bevel on one side.
This also meant I had to repeat the heating and cooling process. So while I had things warmed up I beat the waves out of the bar. And made sure the splint would fit by grinding the welds flush. With that all done I gave the bar another nap in the sand.
Step 7: Splint the Pry-bar


This step should have been easy. Slide on pipe, weld until satisfied. But I had to get these fancy ideas in my head. The pipe slides on the pry-bar. A quick tack weld to hold it in place, it would have to be made bigger later. And then on to the process of shrinking the pipe to the taper of the bar.
Shrinking metal is not all that difficult. It is just a lot of hard work. Remember my Play-dough analogy from before. Yep, using it again because it is the best way to think about altering the form of metal by force. To build up Play-dough you push it towards one spot. To stretch it, you need to squeeze it between something. Most metal is no different.
So if I hit my pipe with air between it and the bar, it will shrink ever so slightly. But if I pinch it between the hammer, bar, anvil sandwich, it will stretch. The best way to tell what is going on is by ear. Dull thud-like sounds are generally going to shrink metal. High ringing sounds are almost always metal being stretched.
This was a very unpleasant process for me. I do not swing hammers enough, and had very little stamina. On top of that, my anvil rest is also my welding table which is about a foot higher than is comfortable. So I did not have the patience to do the work properly.
Step 8: Weld the Splint in Place


Again this is pretty straight forward. I did not let much time go by between shrinking the pipe, so the iron would still be hot and pre-heated. And all I had to do was weld both ends of the pipe to the pry-bar. But this time my heat and cool process was different.
Step 9: Final Heat Treating Part I


I know I once read something in one of my Dad's welding books about heat treating tools like chisels. But I am yet to rediscover that information. So this is being related directly from my memory. Trust it at your own caution.
The first thing that needs to be done is to harden the pry-bar. Which means heating it to just below the melting point. And rapidly cooling it in water, a process known as quenching. The theory for this is that the carbon in the steel will be distributed most evenly at that temperature. Diamonds are made of carbon, so carbon equals hard stuff. And rapidly cooling steel from this temperature should ensure that the carbon will remain evenly distributed within the crystalline structure of the steel.
Heating the pry-bar is simple enough but finding a vessel big enough to fit it is a bit of a trick. I was only doing half the bar, which is probably a mistake. But 24 inches sounded better than the full 40 inches.
At two feet in length, a five gallon bucket is too short. I discovered this just as I shoved the hot pry-bar into it. Luckily the concrete sink in the shop is huge and fit the parts of the bar I was wanting to cool.
Please forgive my lack of pictures here. I was a little preoccupied with blazing hot iron.
Step 10: Final Heat Treating Part II


After quenching the pry-bar it should be hard, but brittle. Brittle pry-bars do not get to live very long. So I need a way to add some strength to the bar. To achieve this the bar needs to be heated to something like 800 degrees Fahrenheit. Or a dull purple-ish color. And quenched in oil.
The idea here is that the steel needs to be mellowed. By heating at a lower heat the crystalline structure will relax into a slightly more malleable state. By releasing stress from the hardening process. Then quenching it in oil will allow the steel to cool more slowly, but still quickly enough to retain stiffness. Stiff with a little flexibility does make a strong pry-bar.
I did hit a little wrinkle at this point. I was almost out of acetylene. And I did not want this project to lapse into another day so I improvised. I faked a forge together out of the weed burner, a large diameter pipe, and a couple of cinder blocks. This 'forge' does come with a "Don't try this at home," disclaimer. I was very surprised that the cinder blocks did not 'pop.' Cinder blocks are not rated for heat. And worse yet. The ones I found had been outside in the weather, frozen to the ground, before I put heat to them. Don't be a dummy like me, go get more acetylene.
So with my bomb of a forge I heated the pry-bar until I had the purple-ish color I was looking for. And then I quenched it in my home made oil-quenching tank which was a chunk of 2 1/2 inch exhaust tubing capped with some 11 gauge sheet metal. The oil I used was what I had drained out of my pick-up. I am pretty sure that engine oil is the wrong oil for this, but I used what I had on hand.
SAFETY NOTE: Placing hot iron in oil will most likely start the oil on fire.
- Do this far away from flammable materials. Fire bad.
- Do this in a well ventilated area. There will be smoke, and hot oil smell.
- Have Fire extinguishers on hand. Things may get out of control.
Step 11: The Final Product


Once the pry-bar was sufficiently cooled. I inspected my work. Originally I had thought that I would need to grind and smooth some sharp edges. Then sandblast and paint it. But I found the only happy accident of the project. By quenching the hot pry-bar in oil, it seems to have picked up a durable black coating. I ran a punch point over the surface and it did not easily surrender. So I deemed it worthy of being my finish coat.
Step 12: Hindsight

There are a few things I wish I had done differently:
- Having a proper forge would have made most of the heating of the pry-bar much easier.
- Remembering not to shock load hardened steel would have prevented breaking the bar the second time.
- A larger quenching tank would have prevented the big fiery mess I made.
But that is why I do stuff. To learn and know what to do better the next time.


