

Introduction: Restore Old Paper Cutter


One of my favorite things is to find and repair old tools. Old typewriters, hammers, scissors, anything I can get my hands on - I just love bringing new life into vintage things. When I saw this old paper cutter I knew it would make the perfect item to refurbish and gift to my wife, who is a school teacher (she's crazy for these old school paper cutters over the newer style ones).
This paper cutter wasn't in terrible shape and the cutting action still kind of worked, but it needed some serious love to get back to its former glory. Here's how I brought a neglected paper cutter back to life.
Ready? let's make!
Step 1: Source Your Item

Hunting for old tools is the only reason I ever stop at garage sales. I usually do a quick drive by and scope the scene, and more than a few times I've found a big box of random junk that's been in someone's garage for the last decade. This box of random junk almost always has some kind of old tool that I end up buying for next to nothing - it pays to keep an eye out.
An alternative would be to look for online ads selling vintage tools, there's a cottage industry of people who buy, sell, and trade these types of things. I got mine of eBay.
The paper cutter I got was in okay shape, but had warped from age and had seen many years of use and abuse. Some highlights of areas to fix were:
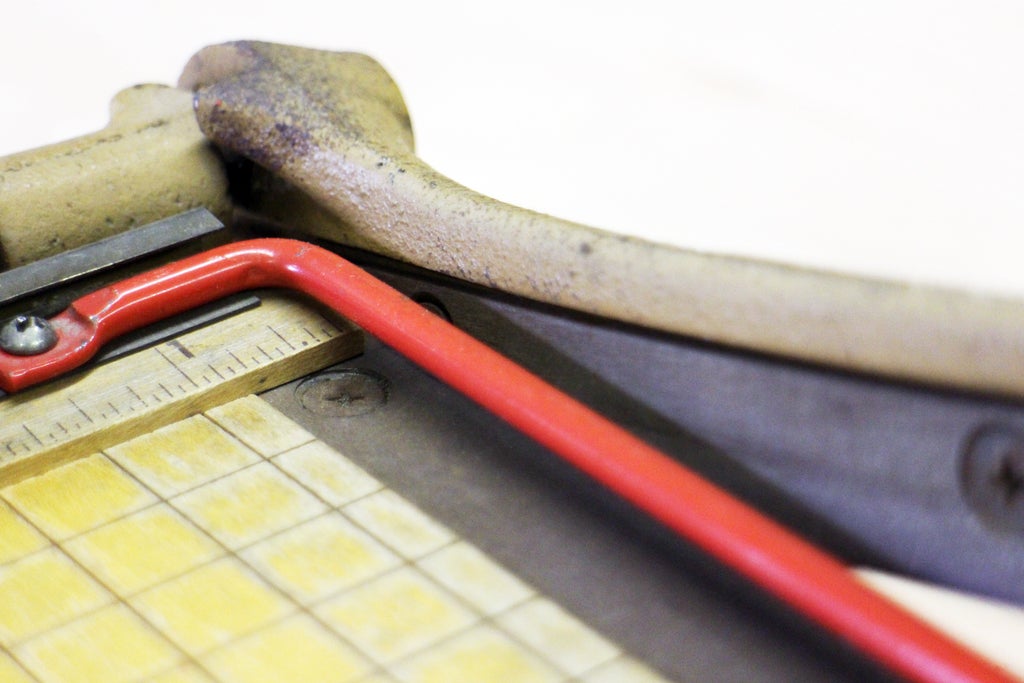
Tarnished cutting blade and plate. Debris and age had turned the metal a dark brownish grey and the blade action was sticking in some areas. Where the cutting arm attaches to the base there's a spring which was in good shape but not tensioning properly. This entire junction where the arm meets the base, blade meets plate, ruler, cutting guide, and spring assembly was a constellation of problems that needed the most care and attention.
 |  |
The struts that gold the base had an attractive dovetail dado and key that had warped over time. After some investigation it turned out the strut was bent and not the maple base, which would have been much more work to correct. Both struts were warped, and a different wood than the maple base. The strut wood was a softer variety (I guessed Spruce) which would be the area that would warp more.

Worn ruler and bent metal alignment guide. The ruler was legible, but worn and smeared in some areas (see the numbers 7 and 8 in the picture above). There is a brass alignment guide above the ruler, I'm not sure exactly what it's for but there's a dent near the screw head and the entire guide had a patina.

Paint worn away, in some places missing completely. The handle, seeing the most action, was by far the worst. Since I was investing in paint I decided to apply new paint in a few additional places from the original manufacturer to give this paper cutter a fresh new look.
Step 2: Dismantle

Removing all the pieces is the only way to go when restoring old tools, it allows you access to hidden parts and allows you to really inspect the work so there's no surprises later on.
The maple base is what holds all the components for this paper cutter. The cutting arm is held on by a cast iron retainer with 3 screws, the arm and tension spring can then be removed from the retainer. Once the arm is off the ruler and alignment guide were removed, allowing the red safety bar to come loose. Lastly, the cutting blade and plate could be unscrewed.
Step 3: Get Scrubbing

All the metal parts were gathered and thoroughly cleaned. I use a combination of simple green cleaner, a few Scotch-Brite scouring pads, and some various grades of steel wool to carefully scrub each piece until the grime and patina is removed.

Just like I teach in the sanding lesson of my Woodworking Class (you should enroll, it's free!), start with the coarsest grit/grade of scrubbing to remove as much as possible, then step your way up to finer grits progressively.
In the above picture you can see the dent on the brass alignment guide seen earlier.
Step 4: Hand or Power?

Cleaning metal by hand is hard work, and you'll be scrubbing for a while before you start to notice a difference. Using coarse grit to break through to the bare metal again is really the only way to do it, otherwise you're just polishing up the aged patina and not bringing out the original shine.

The process can be easily sped up by using power tools. For stubborn areas I used an air-powered angle grinder with conditioning discs.
Step 5: Sanding the Base

As discussed in the sanding lesson of my Woodworking Class (did I mention free?!), go from coarse to fine when sanding. I started with an 80 grit pad on a random orbital sander and blasted off whatever coating was on the maple base and got down to fresh wood. I continued with a coarse grit over the entire surface of the cutter until it was all down to just wood.

The only part I decided not to sand was the very front face that had the Ingento logo. I liked the way it looked, and since it wasn't damaged chose to leave it alone as a reminder of what the cutter used to look like.
After rough sanding I stepped up the grits to 180. I decided not to go further since there's really no need.
Step 6: Glue

Focusing on the warped struts I used scooped and poked wood glue as far into the separated opening as I could, then clamped the warped pieces back together.
I used a straight scrap of walnut on the top of the base to protect the surface from damage from the clamp. This also served a secondary purpose of ensuring the maple base was straight wile being clamped. Since the walnut was straight and the maple base was, too, I could see if I was using too much pressure and warping the cutting base further from over tightening the clamp.
While the glue was setting I could start painting.
Step 7: Masking

The arm of the paper cutter is held onto the retainer by a friction fitted bolt. Once installed at the factory that made this paper cutter there's little chance to remove it, so I decided to work around it. The neck and threads of the bolt were cleaned along with the rest of the metal pieces, so it was important to make sure it was properly masked to prevent paint from getting on it.
While I was masking this bolt on the cutting arm I decided to mark the threads of the large screws that hold the arm retainer to the cutter base. These screws are on the back of the cutter and usually not visible, but I decided to add a black color to them.
After the pieces were masked they were gently scrubbed with a fine Scotch Brite pad to remove any surface debris and paint chips.
Step 8: Paint

For the cutting arm and the arm retainer I color matched as best I could and found a camouflage tan that was fairly close. I didn't bother to use a primer and just sprayed 3 coats of the matte tan.

Once dry I used multiple coats of satin clear polyurethane. I really wanted to make this paper cutter finish bulletproof, so I kept applying coats until I finished the can, I think it was about 5 coats.

Since the retainer screws were not previously painted I primed them with white primer, then coated with a black semi-gloss.
With the paint drying I could move onto the maple cutting base.
Step 9: Protect Maple Base

Protecting the new maple base was important, so I went with a durable polyurethane finish.
By now the repair glue had dried and all surfaces were brushed with a soft bristle brush to remove any dust

Using a foam brush, all wood surfaces were coated with polyurethane. Waiting for the previous coat to dry between applications, I painted on 4 coats to really make this durable.
Step 10: Wax Metal Parts

To seal and protect the metal parts of the paper cutter I used a metal wax. Though this isn't necessary I think adding a protective coat will help provide a few extra years against abuse that these parts will endure.
You can apply the wax directly to the bare metal with a shop rag and just rub it in, but to ensure smooth and even coverage I decided to heat my metal pieces up slightly with a heat gun.

Each piece was gently heated with the heat gun on the lowest setting. The aim here is to relax the metal and allow the wax to easily be applied to the metal and melt into every groove and pore evenly.

With the metal warmed a gob of paste wax was applied to each metal part. Since the metal was warm the wax melted and was easily spread evenly over each metal surface. The metal parts were then allowed to cool and then buffed with the same shop rag used to apply the wax.
Step 11: Ruler

The ruler of this paper cutter was in bad shape. I was going to leave it alone as an homage to how it used to look, but it just seemed out of place with the remainder of the restoration.
I decided to blend old with new and refinish the vintage ruler with laser etched markings. Once I started sanding all the original marking all came off, and etching new ones on was easy with the help of an Instructable with a ruler cut file.

The interesting thing about this ruler is that the beginning marks start at 1/4" into the ruler, this is to account for the ruler being 1/4" short to allow for the blade action. After sanding and laser etching, the ruler was lightly sanded with 400 grit sandpaper and dusted off, then 2 coats of clear spray polyurethane were applied to protect the ruler.
Step 12: Reassemble

Here's the cutter after all the parts have been repaired except for the ruler, I decided to do the laser etching of the ruler after this picture was taken. I had reassembled the cutter and realized that the original ruler lacked the same style as the newly refinished cutter, so decided to add those laser etches after.
The cutter was reassembled the same way it was taken apart, using a hand screwdriver to secure each screw and ensure that they wouldn't be stripped.
Step 13: Add Feet

The restoration is nearly complete, but I wanted to add one more feature that I thought was missing from the original, rubber feet. A set of 4 rubber feet were inexpensive and really brought some stability to this old paper cutter.

Turning the paper cutter upside down so the bottom was accessible, I measured the center line of both struts and marked them with a pencil, then measured in from each end about 1" to and made another pencil mark of where the rubber foot would be placed.

Since these feet are screw on, I drilled a pilot hole at each pencil marked intersection to a depth of about 1/2". There's a few tricks to drilling holes straight and square, and you can learn all about it in the Drilling Lesson as part of my Woodworking Class (it's free!).

Lastly, each rubbed foot was secured with a screw tightened by hand as not to over-tighten and stripping the screws.
Step 14: All Done!

This vintage paper cutter has a new lease on life and ready to cut thousands more sheets for decades to come.
 |  |
The challenges here were making the restoration without sacrificing the original look and feel of the paper cutter, to that end I think this restoration was very successful. The paint color is very closely matched, and the metal parts have all accepted the patina removal without falling apart or drastically changing the look and feel of the cutting action.

Even though this paper cutter isn't going on my wall of restored tools, it is going to a great home in a classroom - serving the only life it's ever known.
Happy making! :)
Have you restored your own tools and been inspired by this Instructable? I want to see it!
Happy making :)

Participated in the
Knives and Blades Challenge

Participated in the
Epilog Contest 8


