

Introduction: Restoring a Steel Sculpture


This Instructable will guide you through a relatively easy process to restore a rusty steel sculpture (or other iron alloy thingy). You will need the following items:
- water
- scotch brite hand pads (and maybe a random orbital sander)
- Birchwood Casey Presto Black iron darkening solution
- boiled linseed oil
- mineral spirits
- elbow grease.
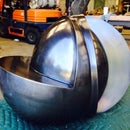
Step 1: Evaluating the Condition of the Piece


The sculpture pictured here once had a beautiful oiled patina but after a few years of neglect, reverted to a splotchy, uneven rusted surface. You'll notice in the second image that the rust has "bloomed" to create a pox that I really hate. A pox o' your throat, you bawling, blasphemous, incharitable dog! Time to start scrubbing.
Step 2: Rinsing With Sculpture


Start by rinsing the piece. You can use a pressure washer if you have one but you'll probably need to scrub the hell out of it anyway. I simply sprayed it with a hose to remove loose dirt, cobwebs and a whole bunch of spiders!
Step 3: Scotch Brite Scrub


If you want to keep a rich, rusty patina (which I did), you'll need to take care not to scrub down to the bare metal. So, start with a very fine (gray) scotch brite hand pad to see if it is aggressive enough. It turns out the fine pad didn't do the trick for me so I moved up to a coarse pad and kept scrubbing.
Step 4: Power Tools


After some intense scrubbing with a coarse pad, I still wasn't getting what I was after (plus, my arms were getting tired). So, I took a 5" random orbital sander and sanded the entire piece with a fine scotch brite pad thinking that would do the trick. And it did, but....
Step 5: Darkening Bare Metal


I went a little too far and sanded down to the bare metal even though I was careful not to. There's a reason they're called power tools. To help blend the raw metal with the rest of the piece, I brushed on some Birchwood Casey Iron Darkening solution diluted with 50% water. It's hard to see in the photos but the shiny bare metal instantly turned dark grey and no longer stood out like a sore thumb. Take care when using any oxidizers as they are hazardous and can cause chemical burns.
Step 6: Oiling the Sculpture


After removing as much of the cruddy rust as I could without doing any more damage to the piece, I used a patina torch to accelerate the drying process (I forgot to photograph that step) and then let it cool to room temperature. You can let your piece dry without applying heat but I was in a bit of a rush. I then began applying a thin coat of boiled linseed oil with a brush. Be sure to use boiled linseed oil and not raw linseed oil. The raw stuff won't really dry and will leave you with a sticky mess. It's also important that the boiled linseed oil isn't applied too thickly. If it is, it will skin over and you'll wind up with a wrinkly piece. Not good. So, after brushing the boiled linseed oil on the sculpture, I immediately wiped it off with a clean, dry rag. Since the rust has a "tooth" to it, I suggest a lint free cloth to prevent your piece from getting fuzzy. The oil will darken the steel, even out the surface and leave a protective coating when fully cured.
Step 7: Presto!

Take care to pick up any oil drips with your cloth and let the piece dry for a a day or two. You may have to give it a second or third coat if it drinks the oil. If you use this treatment once or twice a year, the piece will look great for a long time.


