

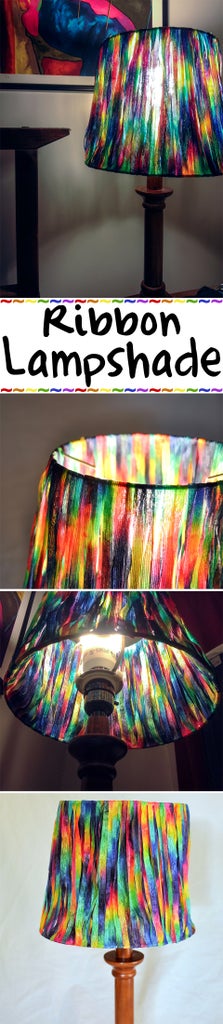
Introduction: Ribbon Lampshade


My mom gave me some ribbon yarn the other day and I've been trying to think of something to make with it. I've had this Ikea lampshade for a while that I didn't know what to do with, so I decided to see what I could come up with. After taking it apart and consulting jessyratfink, I ended up with this pretty fun rainbow ribbon lampshade! It isn't too complex and ended up a little uneven, but I'm happy with it as my first lampshade redo!
Step 1: Supplies

Here is what you need to transform your lampshade into a ribbon lampshade!
Supplies:
- Lampshade - Mine is Jära from Ikea. See next step for more information on this.
- Ribbon Yarn or Ribbon - I used ribbon yarn because my mom gave it to me and I just wanted to use it. When you decide what to use, keep in mind that you want at least a little light to pass through it. Hold it up to the light before you use it to test how well light passes through.
Tools:
- Scissors
- Exacto Knife (optional)
- Hot Glue Gun or E6000 Glue - I prefer hot glue for this project as it cools fast and kept things neat
- Ruler - important
- Masking Tape or Scotch Tape
Step 2: Lampshade


There are just a couple things to think about when going to do this project.
One main thing is that your lampshade works with your lamp. I didn't realize until I started that my lampshade (which I had gotten from someone else because they didn't need it) actually didn't fit the only lamp in my house that uses a lampshade. Luckily mine had a plastic insert that I was able to shave away at until it fit on the lamp.
The other main thing you need to think about when doing this is the structure of your shade. Mine had a top ring that attached to the lamp and then a slightly bigger bottom ring.
This is a pretty common structure, but the other option is your lamp might have wires that connect the top ring to the bottom ring. Like this. Either type of lampshade should work for this project, but a lampshade that has the top and bottom rings attached should be easier to do because you won't have to tap them together and try to manage the space between them.
Anyway, just wanted to put that all out there.
Step 3: Disassemble Your Lampshade


To get started, you will first want to measure how tall your lampshade is. When you add your ribbon, you are going to want it this tall or taller so it covers the light bulb and fixture. Mine was 7" and I think mine ended up being between 7.5" and 7.75".
Next, you need to remove the shade from the structure of the lamp shade. I used an Exacto knife because it was easier, but scissors should work too. When I got the fabric off the rings, they were really sticky. I tried to clean them off, but it didn't really work. Though, it actually ended up being fine that they were sticky because I covered them anyway, and the stickiness helped hold the ribbons in place.
Step 4: Prepare Your Lampshade


If you have a lampshade like mine, you are going to need to temporarily attach the top and bottom rings before you can add the ribbon. You also are probably going to want to use your lamp, regardless, to hold your lampshade while you work on it.
Attach the top and bottom ring with a piece of scotch or masking tape. Make sure they are the correct distance apart to make the shade as tall as you want it. Do this again directly across from this. Now, add two more, one on each side of the two you already have, so you have 4 total in place.
Adjust them as you need to so they are all equal.
Step 5: Attach Ribbon


Time to get started. I originally wanted to leave the ribbon yarn on the ball while I did this, but it was too bulky. If need be, cut off a long, long length of your ribbon yarn to work with. It was actually pretty easy to stop and start up a new strand when you need to. I had to do this about three or four times.
Start by gluing the ribbon to the top ring. You want it so the end is facing the lamp and the long strand of ribbon yarn is coming out towards you.
Bring the ribbon down to the bottom ring, smear a little glue along the bottom of that ring, and wrap it behind (towards the lamp).
Now, bring it back over the top of the lamp going from inside to out towards you. Make sure you put a little smear of glue on the top. You always want to glue your ribbon in place, especially if you have a lampshade structured like mine. If you don't glue it, the pieces will move out of place fairly easily.
I will mention this below too, but you need to wrap the ribbon right next to each other along the bottom ring and do some overlapping along the top.
Important Notes:
- It is very easy to accidentally wrap the ribbon too tight. If you do this, the length of your lampshade will decrease and you'll have a lopsided lampshade. I had this issue and it is very difficult to try to make it taller again. I suggest using a ruler and checking almost every wrap to make sure you aren't shrinking or extending the height of the lampshade. I always had my glue gun in front of me and my ruler very easily at hand.
- If your lampshade has a slightly smaller ring on top, like mine, you will need to do some overlap of your ribbon along the top ring. You don't have to overlap all of the ribbons along the top, but keep an eye on how your lamp is progressing and overlap as you need to. I didn't realize this as first, and I think this further contributed to the lopsidedness of my lamp. Try to evenly overlap the best you can so that as you finish it off, your ribbon will match up nicely.
- If/When you need to glue on a new piece of ribbon, I suggest trying to have your last piece end at the bottom of the ring. This way, you can glue the end and wrap it around towards the inside of the lamp where you won't see it. Then you can glue on a new piece right to where the last piece ended [picture 4 of the next step shows this].
- Cover all of the ring, both top and bottom. It just looks nice that way. So along the bottom, as I mentioned, I has the ribbons snug against each other and slightly overlapped or against each other along the top. Also, pay attention when you get to the parts that connect to the lamp. Use the glue to make sure the ribbon covers those parts.
Step 6: Keep Wrapping


Keep wrapping your ribbon as you go around the lamp. Keep an eye on your start and where you are to see how you are doing lengthwise and with your overlap. Use your ruler!
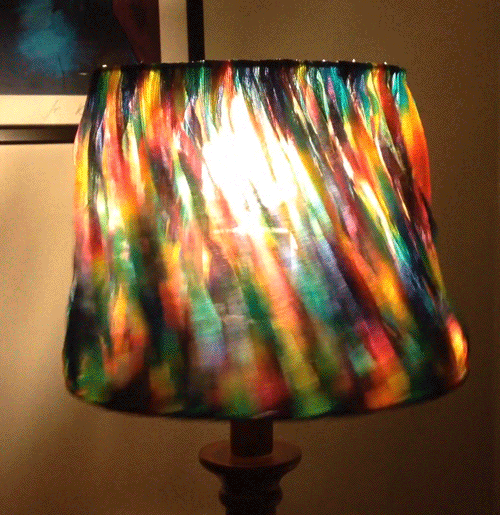
Step 7: Done!


All done!
Here is how it looks [in order]: on the lamp, off the lamp standing on its own, and upside down.
Since it doesn't have a structure, you can see why gluing everywhere the ribbon touches the rings is important. If it wasn't all glued, it would fall apart.
Step 8: My Lamp


Also, if I twist the lamp it swishes back and forth like it's doing the hula, or a person wearing a hula hoop.

Participated in the
Rainbow Contest 2016


