

Introduction: Robot Brain: Build a Single Board Computer in an Evening


Run out of memory on your Picaxe or Arduino? But a PC is overkill for the job? Take a look at this open source single board computer that can be programmed in languages like C, Basic, Forth, Pascal, or Fortran.
This board uses inexpensive ICs and deliberately uses big chips so it is easy to solder. It uses an operating system called CPM running on a Z80, which was popular in the late 1970s to mid 1980s. As a result, there is at least a gigabyte of software available including programming languages, spreadsheet programs and word processors. CPM is a text based operating system and is a simple version of DOS.
This board is perfect if you are building that highly complex robot or home automation system and keep finding that single chip computers like pics, arduinos and atmegas just don't have the memory.
Modern technology means that hard drives and floppy drives can exist on single memory chips, and computers that used to need a three phase power supply can now be emulated on a board powered by batteries.
A number of N8VEM boards are being built all over the world by a group of friendly enthusiasts http://groups.google.com.au/group/n8vem
Boards are an open source design, and you can build your own or buy one from an enthusiast in the US at cost price ($20). Eproms can be purchased pre-programmed or you can program your own.
Let's put one together and see what it can do...
Step 1: Join the Google Group

You can browse the group http://groups.google.com.au/group/n8vem but if you send a request to join the group then you can contribute to the discussion. There is a library of files and lots of pictures of working boards.
I sent a message to the group a few weeks ago and asked to join. I ordered a board and it arrived a week later, which is pretty quick from the US to Australia.
I didn't have many of the parts, so I got the parts list from here http://n8vem.googlegroups.com/web/TestPrototype_BOM_PART-LIST.lst?gda=6DMrhVQAAABRoI8ydU505jGCwGWcAnRLVYTZaCdyJias028kLbDjM7mHeIlRNZNuWyWm5kKNAJr2D8gD3ctlIYKczaAghgqdUwk_6Qi3BU8HCN0q6OYwM6JXPqrFQS5SIfKND7QsaYY
Quite a few stores have the parts, including Digikey, Jameco and Futurlec. All the logic chips are specified as LS parts. LS is a bit old school and the chips use more power and run warm. I substituted all the LS chips for the more modern HCT range. HCT are directly compatible but use far less power. Similarly, I went for a CMOS Z80, a CMOS UART (16C550) and a CMOS input/output chip (82C55).
The board arrived about the same time as the parts, and it was time to start soldering.
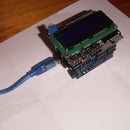
Step 2: Solder the Board

Soldering was pretty easy and was done in an hour and a half. I decided to socket the big chips and solder the smaller chips in directly. The biggest problem was bending all the chip pins slightly so they fit in the board.
There is a real time clock chip that I didn't need that so I left it out. It can be added later.
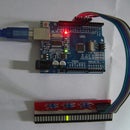
I also put a DC plug on my board and a 5V regulator. This board is so efficient it doesn't even need a heatsink on the regulator. I ran it off a 9V wall wart.
The eprom has a label over its window otherwise it might get erased if it goes out into the sun.
The schematic is here http://n8vem.googlegroups.com/web/Printing+TestPrototype-sch.pdf?gda=MaRhCFMAAABRoI8ydU505jGCwGWcAnRLnTJP08ZxIX8TVeSmRPYsxGLTiGlLa5mMzgNTsMYdvKCD3Kr1rUv-XML38vqpBkuybcVT3VtYGKLco-_l-8AzjQJ-kx2wCzwFjd1qSmbYDns
You don't really need to understand the schematic to build this board. But I found it helpful to compare with my first computer which had 8 RAM chips to get 64K. This board has half a meg on a single chip.
The CPU is a Z80. The Z80 came from the 8080 chip, and the 8080 also spawned the 8086, 80286 up to 80586, which was called the pentium because the patent office said you couldn't patent numbers. The 8080 machine code instructions in a Z80 still exist in modern PCs.
Step 3: Program the Eprom

If you don't want to program an eprom, you can always buy one pre-programmed when you get the board. But I figured I might use programmed eproms in some other projects so I got a programmer and an eraser. These used to cost thousands. But I picked up the programmer for $34 including shipping (search for eprom programmer on ebay), and the eraser was $25 including shipping.
The programmer comes with its own software and if you tell it the chip number, it gives you a picture of how to insert the chip and set all the switches. The eproms come blank, but I programmed one, then erased it for 5 minutes and reprogrammed it, just to check it all worked.
The entire rom image is here http://n8vem.googlegroups.com/web/ROMIMAGE.zip?gda=5RkX1kEAAABRoI8ydU505jGCwGWcAnRLTpwShSoH8O7HvxGhdHl1lXeXmbZQXujx0V3ulhJIKNrhtrFcBixfottYTQUy-Muj7WbB0sVAO2Hmgtm1PE2xNg
And this includes the operating system and some useful files. It is kind of like your XP installation disk except this goes into a chip. Unzip the file, fire up the programmer, load the .bin file and program the chip. You can read back the data to check it went through.
The only catch with this programmer is that it needs a parallel port. Some newer PCs don't have a parallel port. I built myself a parallel port extension cable so I didn't have to keep reaching behind the PC. It consists of an IDC D25 plug, and IDC D25 socket and 2 metres of ribbon cable. Use a vice to squeeze the plug onto the connector.
The willem programmer I bought does not show all the settings needed to program a 1 megabyte eprom. On the left of the chip near the bottom, a jumper needs to be moved. The settings are in the manual though, which is a file called Willem PCB5.0 Manual.html in the manual section. This has a lot more detail on the settings.
Step 4: Wire Up a Serial Cable

If you go back to step 2 you can see the serial cable in the picture. There are three parts to this:
1) My extension lead that comes from the back of the PC. This is the rainbow cable. I built it the same way as the programmer lead extension cable except that this one uses a D9 IDC plug and socket. It is really useful not to have to keep reaching behind the computer all the time. The extension lead has a female at one end and a male at the other.
2) A null modem. This is a female to female connection. I got the circuit from here http://www.beyondlogic.org/serial/serial.htm (scroll down a bit). Essentially, a null modem joins pin 7 and 8, joins pins 1,4,6 and swaps pins 2 and 3 over. The 9 pin connection then becomes a 3 wire connection -ground, transmit data and receive data. It kind of simplifies RS232.
3) A 10 pin header on the board to a D9 male connector. More about this on the next page.
On the schematic, the male D9 on the left connects to the PC. The null modem is a female to female connection with the connections in the plugs. I could have wired all this with a lot less plugs, but I'll be using the null modem in other projects.
Step 5: Wire Up the Serial Header

The header on the board is designed to go to an IDC 9 way ribbon cable, and then to a D9 male plug. The only trick is that the 10 way header is designed to take 10 way ribbon cable. If you use 9 way cable there is a gap for the missing wire. I've taken a closeup to help clarify this. If you wire it up right then pin 1 on the board goes to pin1 on the D9. Pin 5 on the D9 should connect to earth on the board. If those two are connected the rest of the wires will be ok too.
Wire 1 is on the left of both views of the ribbon cable. You could use ribbon cable with colours if you like.
The messy stuff on the IDC plug is hot melt glue. Probably not necessary but it makes things a bit stronger.
Step 6: Download Some Software

We need some software on the board, and before we can download programs we need a modem program. We will be using xmodem, which is a standard that has been around for years. Xmodem exists as a CPM program, and it exists in many forms on PC programs, such as hyperterminal. So we can use this to communicate between the old and new technology.
Let's grab the hex file of xmodem from here: http://n8vem.googlegroups.com/web/xm50_LB1.zip?gda=O2tYn0EAAABRoI8ydU505jGCwGWcAnRL1RQ8Aj5bHZQJ6hxcf7VyVbwBih-m421sIN3Oibiyd_vhtrFcBixfottYTQUy-Muj7WbB0sVAO2Hmgtm1PE2xNg
Unzip it and you will get two files. You need the one that ends in .hex.
Now we need to send this to the board. You need a terminal program, which emulates a monitor and a keyboard for this single board computer. Windows has one called hyperterminal which usually hides in the start/programs/accessories folder. Or you can use hyperterminal private. Or Teraterm. Or absolutetelnet. Or a dos based program called conex. There are lots of terminal programs around because this was how you dialed into the internet before broadband.
Lets fire up hyperterminal. It will give you three screens and you need all the settings correct! Once you have entered this once, you can save this session and it will create a little file ending in .ht If you then click on that file (drag it to the desktop so you can find it later), it will start hyperterminal with all the correct settings.
First screen=name the connection. Call it SBC and choose an icon.
Second screen. Set the com port. My computer defaults to COM2 on the setup screen, and it needs to be changed to COM1. Go ahead and change to COM1.
Third screen. Baud rates etc. Set the bits per second to 9600. 8 Data bits. Parity to None. Stop bits to 1. And Flow control to None. You will probably only need to change bits per second and Flow Control.
Now you will be presented with the terminal screen. Connect up the board to the serial port and power it up and you should get a welcome message.
If not then get on the Google group and ask for some help.
Now it is time to talk to the board!
Step 7: Download Xmodem

If you bought the battery backed ram chip you will only need to do this once. Indeed, others are working on putting this on the eprom chip so you may not need to do this at all in the very near future. At the > prompt, type h
Don't type anything else. Don' t type Enter. Just a single h, either lower or upper case. The cursor will go down one line but nothing else will happen. Now click at the top of the hyperterminal program on the menu Transfer. Click on Send Text File. In Filename, use browse to find the hex copy of xmodem that you downloaded. It is called XM50LB1.HEX You might need to change the default search for *.txt to *.hex to find it. Click on ok, and lots of numbers will go across the screen for about 30 seconds. Wait till they stop.
Then hit the letter c once, again with no enter. Wait 2 secs and you will be in CPM with a A> prompt.
Now type the following and hit enter:
Save 40 b:xm.com
Now type B: and enter, to change to drive B and you will get a B> prompt.
Now type DIR and enter, to list the files.
There are three drives on this computer, A, B and F. You can see what is on each by typing the drive letter, then a colon, then enter, and then DIR.
The picture shows a screen shot.
Step 8: Grab Some Software

There is lots of CPM software out there. Eg
http://www.loomcom.com/cpm/cpm_cdrom/
http://www.gaby.de/ecpmlink.htm
But let's try something simple. Lets get Basic to add a couple of numbers and print the answer.
To do that, we need a copy of Basic.
Lots of copies are out there, but lets go off on a bit of a tangent and talk about the Altair simulator.
This little program is a complete emulation of a CPM machine running on a PC. It has a large software library, conveniently packaged into disk sized portions, and it runs much faster than a real CPM computer which is very handy when compiling. The simulator is here:
http://www.schorn.ch/cpm/intro.php
Download the software, and download at a minimum the CPM2.2 disk image, and about half of the way down the page, the Basic image. Put them all in the same directory. While you are there, check out all the other languages like C Cobal, Fortran, Pascal.
If you run the program AltairZ80.exe you will get a dos window. If you have downloaded the file basic.dsk, then you can run this with the command
Do basic
In the simulator.
Then DIR to list the files (which are on drive A: and B: )
We want MBASIC and it is sitting in the A drive.
To copy this to a PC directory, type W MBASIC.COM and this will save the file to the directory that the altair program sits in. You can do the reverse with the R command which transfers files from the PC into the altair simulator disks. Indeed, if you want to play with CPM, this is a great way to do it without having to build or buy anything.
If you want to save files on the virtual disk, exit out of the altair simulator with a ctrlE (control key and E). This exits and saves. If you don't want to save any changes, just close down the window with the X at the top right corner.
Step 9: Move the File MBASIC.COM Into the Board

Let's transfer Basic onto the board.
In the hyperterminal session, go to drive B: and type XM R MBASIC.COM and then enter. This will start up the xmodem program and it will sit there waiting for a file to arrive.
Now go to the hyperterminal menu, and click on Transfer and then Send File. Browse for the file MBASIC.COM. In the protocol section, select Xmodem. In hyperterminal it is the third one down. Click on send and after a few seconds the file will go though. It takes about a minute.
If it works you should get the B> prompt. Type DIR to check it is there.
(Ignore all the B> down the screen - I hit the enter key a few times accidentally)
Step 10: Run Basic and Write a Program

Now we can run Basic on the board and write a little program.
Eg
mbasic
10 A=20
20 B=30
30 C=A+B
40 print "The answer is: ";C
RUN
Save "MYPROG",A
Now we have a working computer.
Step 11: Compile a Program
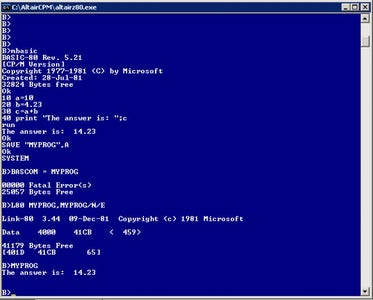
If you feel really keen, you can compile a program. This produces a .com (the equivalent of an .exe on a PC). Com files can be run as independent programs, and can even be set up to auto run when the board starts. Now the board can function as a standalone controller, without ever needing to be connected to a PC.
The N8VEM board can compile programs on the board, or you can use the altair simulator. The latter is faster but it doesn't really matter. If you do want to compile programs, then you need the following:
MBASIC.COM , BRUN.COM L80.COM BCLOAD, BASLIB.REL AND BASCOM.COM
C is a bit different, but I think it still uses the L80 linker.
See the screenshot for how to write and compile and run a program.
And stay tuned, because soon there will be hard drives, a mini LCD display, a display that uses an old vga monitor http://www.tvterminal.de/index.html#english with keyboard interface, a flash drive and input and output boards!


