

Introduction: Robotic Car With Bluetooth
Celia Redondo Verdú
22/06/2018
Computer Engineering class - Bayside Secondary School
This is a very easy way (even for beginners) to make a Robotic Car controlled with your smartphone by using Bluetooth.
It has the basic commands (forward, backward, right and left) but also I am going to show you more expansions: add LEDs and a horn to the project.
Step 1: Materials


- Arduino UNO Arduino UNO
- Adafruit Motor Shield v2.3 Motor Shield
- Bluetooth Module HC-05 Bluetooth
- Chassis (comes with the wheels, DC motors, and battery pack) Cassis
- LEDs
- 2 white
- 2 yellow
- 2 red
- Resistors (10Ω,100Ω, 330Ω)
- Passive Buzzer
- Jumping wires
- Male to female wires
- Mini Breadboard Mini Breadboards
- 4 AA batteries
- Tape
I got a kit which included the LEDs, buzzer, wires, resistors and more kit
Step 2: Assembly
- Assembly the chassis: the kit from Amazon comes with the instructions.
- Set the Motor Shield on top of the Arduino UNO
- Set the breadboards in the chassis
I used tape and elastics to fix everything to the chassis but you can also use glue
The disposition vary on the individual's needs
Step 3: Wiring
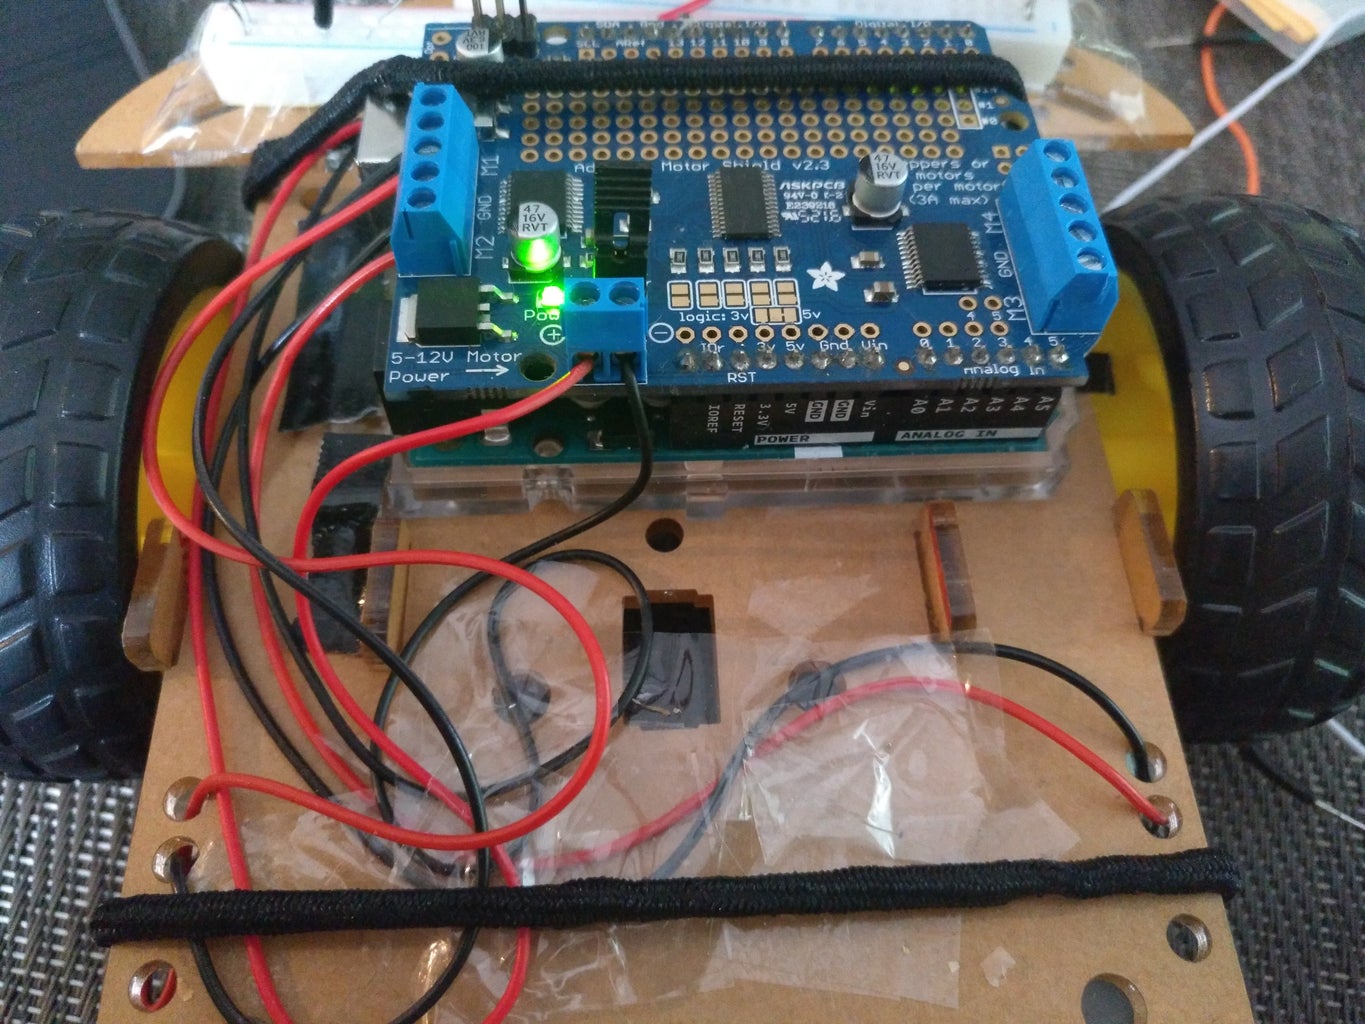


- Connect the DC motors to the Motor Shield
- The wires from one DC go to M1 (motor 1) and the others go to M2 (motor 2)
- The order does not matter, but both wires from the same motor must be in the same section (either M1 or M2)
- The power goes connected to the Motor Shield as well:
- Black wire -> Negative
- Red wire -> Positive
- Bluetooth Module
- GND module -> GND board
- VCC module -> 5V board
- TXD module -> RXD board (pin 0)
- RXD module -> TXD board (pin 1)
Expansion :
- LEDs
- 2 front white LEDs -> pin 5
- 2 back red LEDs -> pin 7
- 2 turning yellow LEDs
- Right -> pin 6
- Left -> pin 5
- All LEDs go connected to the GND in the board
- Buzzer
- passive buzzer -> pin 12
- GND in the board as well
Step 4: Phone App

I used this app that it is for Android called Bluetooth RC Controller and you can find it in Google Play (free)
Here are the commands available for the app to connect in the code:
Forward -> F
Backward -> B Left -> L Right -> R Forward Left -> G Forward Right -> I Back Left -> H Back Right -> J Stop -> S Front Lights On -> W (upper case) Front Lights Off -> w (lower case) Back Lights On -> U (upper case) Back Lights Off -> u (lower case) Horn On -> V (upper case) Horn Off -> v (lower case) Extra On -> X (upper case) Extra Off -> x (lower case) Speed 0 -> 0 (zero) Speed 10 -> 1 Speed 20 -> 2 Speed 30 -> 3 Speed 40 -> 4 Speed 50 -> 5 Speed 60 -> 6 Speed 70 -> 7 Speed 80 -> 8 Speed 90 -> 9 Speed 100 -> q Stop All -> D
Step 5: Code (simple)
This project uses IDE Arduino Code
- Code for the basic controls (only movement)
// Celia Redondo Verdu
// ROBOTIC CAR // // Simple comands: forwards, backwards, right and left// Control of speed
#include //libraries for the motor shield to work
Adafruit_MotorShield AFMS = Adafruit_MotorShield(); Adafruit_DCMotor *myMotor = AFMS.getMotor(2); //right Adafruit_DCMotor *myotherMotor = AFMS.getMotor(1); //left
char command;
void setup() { Serial.begin (9600); // serial pin (bluetooth) AFMS.begin(9600); // start the motor shield
myMotor->setSpeed(150); myotherMotor->setSpeed(150);
}
void loop() {
if (Serial.available()>0) { command = Serial.read(); //this sends the information to the serial port called command // the commands are the ones that my app includes (the ones shown in the Instructable) switch(command){ if (command == 'F') { case 'F': { myMotor -> run (FORWARD); myotherMotor -> run (FORWARD); delay (25); myMotor -> run (RELEASE); myotherMotor -> run (RELEASE); } } if (command == 'B') { case 'B': { myMotor -> run (BACKWARD); myotherMotor -> run (BACKWARD); delay (25); myMotor -> run (RELEASE); myotherMotor -> run (RELEASE); } }
if (command == 'L') { case 'L': { myMotor -> run (BACKWARD); //LEFT myotherMotor -> run (FORWARD); //LEFT delay (10); myMotor -> run (RELEASE); myotherMotor -> run (RELEASE); } }
if (command == 'R') { case 'R': { myMotor -> run (FORWARD); //RIGHT myotherMotor -> run (BACKWARD); //RIGHT delay (10); myMotor -> run (RELEASE); myotherMotor -> run (RELEASE); } }
// SPEED CONTROL // if (command == 'q') { case 'q': { myMotor -> setSpeed (250); myotherMotor -> setSpeed (250); } }
if (command == '5'){ case '5':{ myMotor -> setSpeed (200); myotherMotor -> setSpeed (200); } } if (command == '10'){ case '10':{ myMotor -> setSpeed (300); myotherMotor -> setSpeed (300); } }
} //end swithc command Serial.print(command); } //end if serial available } // END of the code
Step 6: Code for the Expansions
This code is to control the LEDs with the Bluetooth module (without being connected to the car)
// Code to control an LED witth Bluetooh a HC-05 Bluetooth module
// I recomend doing this before going into controlling the dc motors in the car // so you are familiar with how the Bluetooth works// this code is adapted to the app that I have used for the car in order to learn how to control it
char command;
void setup() { Serial.begin(9600); pinMode (13,OUTPUT); // pin of the LED
}
void loop() { if (Serial.available()>0) //this means that the code below will take place when the Bluetooth receives the signal { command = Serial.read();
switch(command) { case 'F': digitalWrite (13, HIGH); break; // I used F to turn the LED ON but in the car it is used as FORWARD case 'B': digitalWrite (13, LOW); break; // B is BACKARD for when you are controlling a car default : break; } Serial.print(command); } }
This code is to control the Buzzer with the Bluetooth module (without being connected to the car)
// Code to control a buzzer with the bluettoth module
// the commands are directed by the app that I used for the robotic carconst int buzzer = 12; char command;
void setup() {
Serial.begin (9600);
pinMode (12, OUTPUT); }
void loop() {
if (Serial.available()>0) { command = Serial.read();
switch (command){
if (command == 'V'){ case 'V':{ tone (buzzer, 1000); } } if (command == 'v'){ case 'v':{ noTone(buzzer); } }
} }
}
Step 7: Final Code
This is the code that includes all the features for the car
// Celia Redondo Verdu
// ROBOTIC CAR // // Simple comands: forwards, backwards, right and left // Front LEDs, turning LEDs, back LEDs and emergency LEDs (with buzzer) // Buzzer as a horn // Control of speed#include //libraries for the motor shield to work
Adafruit_MotorShield AFMS = Adafruit_MotorShield(); Adafruit_DCMotor *myMotor = AFMS.getMotor(2); //right Adafruit_DCMotor *myotherMotor = AFMS.getMotor(1); //left
const int buzzer = 12; //buzzer pin 12
char command;
void setup() { Serial.begin (9600); // serial pin (bluetooth) AFMS.begin(9600); // start the motor shield
myMotor->setSpeed(150); myotherMotor->setSpeed(150);
pinMode (7, OUTPUT); //back red LEDs pinMode (4, OUTPUT); //front left yellow LED pinMode (6, OUTPUT); //front right yellow LED pinMode (5, OUTPUT); //front white LEDs
pinMode (12, OUTPUT); //buzzer }
void loop() {
if (Serial.available()>0) { command = Serial.read(); //this sends the information to the serial port called command // the commands are the ones that my app includes (the ones shown in the Instructable) switch(command){ if (command == 'F') { case 'F': { myMotor -> run (FORWARD); myotherMotor -> run (FORWARD); delay (25); myMotor -> run (RELEASE); myotherMotor -> run (RELEASE); } } if (command == 'B') { case 'B': { myMotor -> run (BACKWARD); myotherMotor -> run (BACKWARD); digitalWrite (7, HIGH); // this pin is the back red LEDs delay (25); myMotor -> run (RELEASE); myotherMotor -> run (RELEASE); digitalWrite (7, LOW); // to turn off the back LEDs once the cra stops going backwards } }
if (command == 'L') { case 'L': { myMotor -> run (BACKWARD); //LEFT myotherMotor -> run (FORWARD); //LEFT digitalWrite (4, HIGH); //yellow LED when turning left. delay (10); myMotor -> run (RELEASE); myotherMotor -> run (RELEASE); digitalWrite (4, LOW); } }
if (command == 'R') { case 'R': { myMotor -> run (FORWARD); //RIGHT myotherMotor -> run (BACKWARD); //RIGHT digitalWrite (6, HIGH); //yellow LED when turning right. delay (10); myMotor -> run (RELEASE); myotherMotor -> run (RELEASE); digitalWrite (6, LOW); } }
// LEDs // case 'W': digitalWrite (5, HIGH); break; //turn ON white front LEDs case 'w': digitalWrite (5, LOW); break; //turn OFF white front LEDs
// the code down below is the one for the emergency lights and the buzzer if (command == 'X'){ case 'X': { for (int x = 1; x < 8; x++){ digitalWrite (4, HIGH); digitalWrite (6, HIGH); digitalWrite (7, HIGH); digitalWrite (12, HIGH); delay (500); digitalWrite (4, LOW); digitalWrite (6, LOW); digitalWrite (7, LOW); digitalWrite (12, LOW); delay (500); } } } if (command == 'x'){ case 'x':{ digitalWrite (4, LOW); digitalWrite (6, LOW); digitalWrite (7, LOW); digitalWrite (12, LOW); } }
// HORN (BUZZER) // if (command == 'V'){ case 'V':{ tone (buzzer, 1000); } } if (command == 'v'){ case 'v':{ noTone(buzzer); } }
// SPEED CONTROL // if (command == 'q') { case 'q': { myMotor -> setSpeed (250); myotherMotor -> setSpeed (250); } }
if (command == '5'){ case '5':{ myMotor -> setSpeed (200); myotherMotor -> setSpeed (200); } } if (command == '10'){ case '10':{ myMotor -> setSpeed (300); myotherMotor -> setSpeed (300); } }
} //end swithc command Serial.print(command); } //end if serial available } // END of the code
Step 8: Final Connexion
Upload the code to the Arduino Board and connect all the wiring and the power.
Tip: in order for me to upload the code to the board I had to disconnect the RX and TX to the board
To connect the app with the car:
- go to Bluetooth and pair the module. It is going to be labeled as HC-05
- the password is 0000 or 1234
- go to the app and press settings and connect to the car
- find the Bluetooth module in the list and press to connect
- the red light in the screen will turn green when it is paired
Step 9: Done

And there you have a Robotic Car controlled with your smartphone.
Enjoy :)
If you have any questions contact me email


