

Introduction: Rocket Science: Make a Matchstick Rocket!


One of the most popular science project out there! A perfect science project to demonstrate the application of Jet Propulsion, Newton's 3rd Law of Motion and Combustion. This Instructable is a part of my Unusual Uses of Matchsticks (It is better to check it out!). We will explore the wild world of science by demonstrating the applications of Jet Propulsion, Newton's 3rd Law of Motion and Combustion. Not only to demonstrate some science stuff but also to show you the step by step tutorial on how to make a matchstick rocket. Besides being a tool to start a fire, matchsticks can be used to science stuff like making a simple solid propellant rocket. You will learn some basic science behind rockets and jet propulsion. If you want to be an Astronaut/Cosmonaut, well this is your starting point to learn rocketry and explore it. Come on, let's learn together with this Instructable!
NOTE: Temporarily, I showed up the background music video that is extremely related to my Instructable. I will update this when I am done working with the options for visitors to turn off and on the background music. Thank you for understanding!
Hey, I put a background music on this Instructable to add some effects while you reading this Instructable. The song is extremely related to rockets I hope you like it! The song is recorded by Owl City and the title of this song is Alligator Sky. Wondering how I add background music here? Don't worry pal, I've posted an Instructable showing the step by step instructions how I add background music to this Instructable, you can add yours if you want, just visit this Add Background Music To Your Instructable! Don't forget to vote it! I am a web developer and I know how to write codes. I know also the framework use on this website. I am willing to be hired here in Instructables if possible as a web developer.
Inspiration
![]()
I am dreaming about being an Astronaut of NASA someday when I was in junior high school. In that time, I want to explore the space and see the earth from above. I become a fan of rockets when I start learning them on how a rocket works. The one and only inspires me to make this instructable is to show and tell the science behind rockets and how to demonstrate it using simple things such as matchsticks or matches. Matchsticks are a common tool to start a fire so that everyone can make a simple and small solid propellant rocket.
Rockets Class

I recently earned a badge from Rockets Class by mikeasaurus a self-taught DIY troublemaker of Instructables. If you want to learn more about rockets and make some real rockets outside, well, this is a perfect class for you! The author of said class is also the author of Backyard Rockets a book of awesome Instructable rockets. You can learn how to make rockets by enrolling yourself in the Rockets Class. Start learning today and earn a rockets class badge after reading this Instructable. Goodluck!
What to expect to this experiment? Yeah, I know that this experiment is very common and basic but you will learn the science behind it and help me to find out which rocket design will work! We will make 3 identical rocket design in terms of the length of the aluminum foil around it from its head. Prepare yourself and let's all explore the science behind rockets! Proceed to the first step!
Step 1: You'll Need!

Here's the list of what you'll need for the science project!
- Safety Pin
- Safety Matches (Matchsticks)
- 20-22 AWG Insulated Solid Copper Wire
- Aluminum Foil
Prepare these things before you proceed. These materials are household items and can be easily acquired. I use a safety pin from my mom's sewing kit. I got some old aluminum foils from my past science projects. The insulated solid copper wires are excess material from my past electronics project. When you have these materials, you should jump to the next step! See you there.
Step 2: What Is Rocket?

When we are talking about the rockets, what comes to your mind first? A cylindrical object that sends astronauts to space? A military weapon to destroy enemy's tanks, airplanes, or bases? Maybe an object that is used for striking a ball in tennis or shuttlecock in badminton. (What? Hey, dude that's "Racket" not "Rocket"! LOL!!!). Anyway, let's get serious now. I will discuss some important information about rockets. Studying rockets will take a month or even years to build a serious one. You'll need to take a course like Aerospace Engineering if you're really serious to make a working serious rocket. Don't worry, we are not going to make big rockets instead we will make a demonstration how rockets work and also test my hypothesis about these matchsticks rocket. Before we start our exploration with rockets, let's have a look some information about rockets and what are the things what I've learned from Instructables Class:Rockets Class. Please continue your reading below!
According to NASA, Rocket is a cylindrical projectile that can be propelled to a great height or distance by the combustion of its contents. The name Rocket comes from the Italian name Rocchetta. Which means bobbin or little spindle. The shape of the rocket is very similar to the bobbin or spool used to hold the thread to be fed to a spinning wheel, that's why it is called a rocket.
The modern rocket is invented by Robert H. Goddard. He made the first liquid-propellant rocket. Which is now used for space exploration. Instead of using gunpowder-powered rockets they start to use the liquid propellant rockets for high-altitude research and also for military purposes as it used in WWII.
Rocket's Anatomy

Let's explore the rocket's anatomy! I will show you the basic anatomy of a typical or common rocket. As an example, I have the anatomy of a model rocket. This is only for hobby purposes and it is for outdoor fun only. Look at the picture on the right and study the parts of a model rocket. In this instructable, I will not discuss all the information about the rockets. Why? because there is a rocket class for you to take! Enroll to the rocket class offered by Instructables and get your own badge for finishing rocket class! This is a quick exploration about rockets. I will show you next to the science behind rockets. Don't forget we have an experiment to do later we will just be preparing ourselves for the rocket science experiment!
Rocket Science

The forces acting on rockets are indicated on the left picture. If we consider the forces acting on a rocket it will result in a successful launch. In this instructable, we will follow the science behind rockets and let's see if we are able to launch a matchstick rocket. Rockets are the application of jet propulsion, combustion and Newton's 3rd Law of motion. The third law states that all forces between two objects exist in equal magnitude and opposite direction: if one object A exerts a force FA on a second object B, then B simultaneously exerts a force FB on A, and the two forces are equal in magnitude and opposite in direction: FA = −FB. This is important to have a little knowledge about rockets to have an idea on what we are doing. Making rockets will be dangerous if we don't have enough knowledge to operate it and to make it. I will not discuss all the information about the rockets here, I just show you the things you will learn in the Rocket Class.
What I've learned from the class is that the center of gravity is should be always on the top of the center of pressure. If you're building a rocket you should consider the forces around it. In my matchstick rocket, it has a center of gravity and also a center of pressure. Look again at the picture that I've provided and have a study or research if you're really interested in rocketry and also don't forget to enroll yourself in the rocket class!
My instructable is not all about launching a simple matchstick rockets and demonstrating the 3rd law of motion. (Hey dude, I'm not grade-school for this science experiment!). As I've said earlier we will explore the rocketry and I will find out the answer to my curiosity. I will look for the answer to my hypothesis. What is my hypothesis? You will find out it on the next step while we are designing some matchsticks rockets!
Step 3: Design a Rocket!
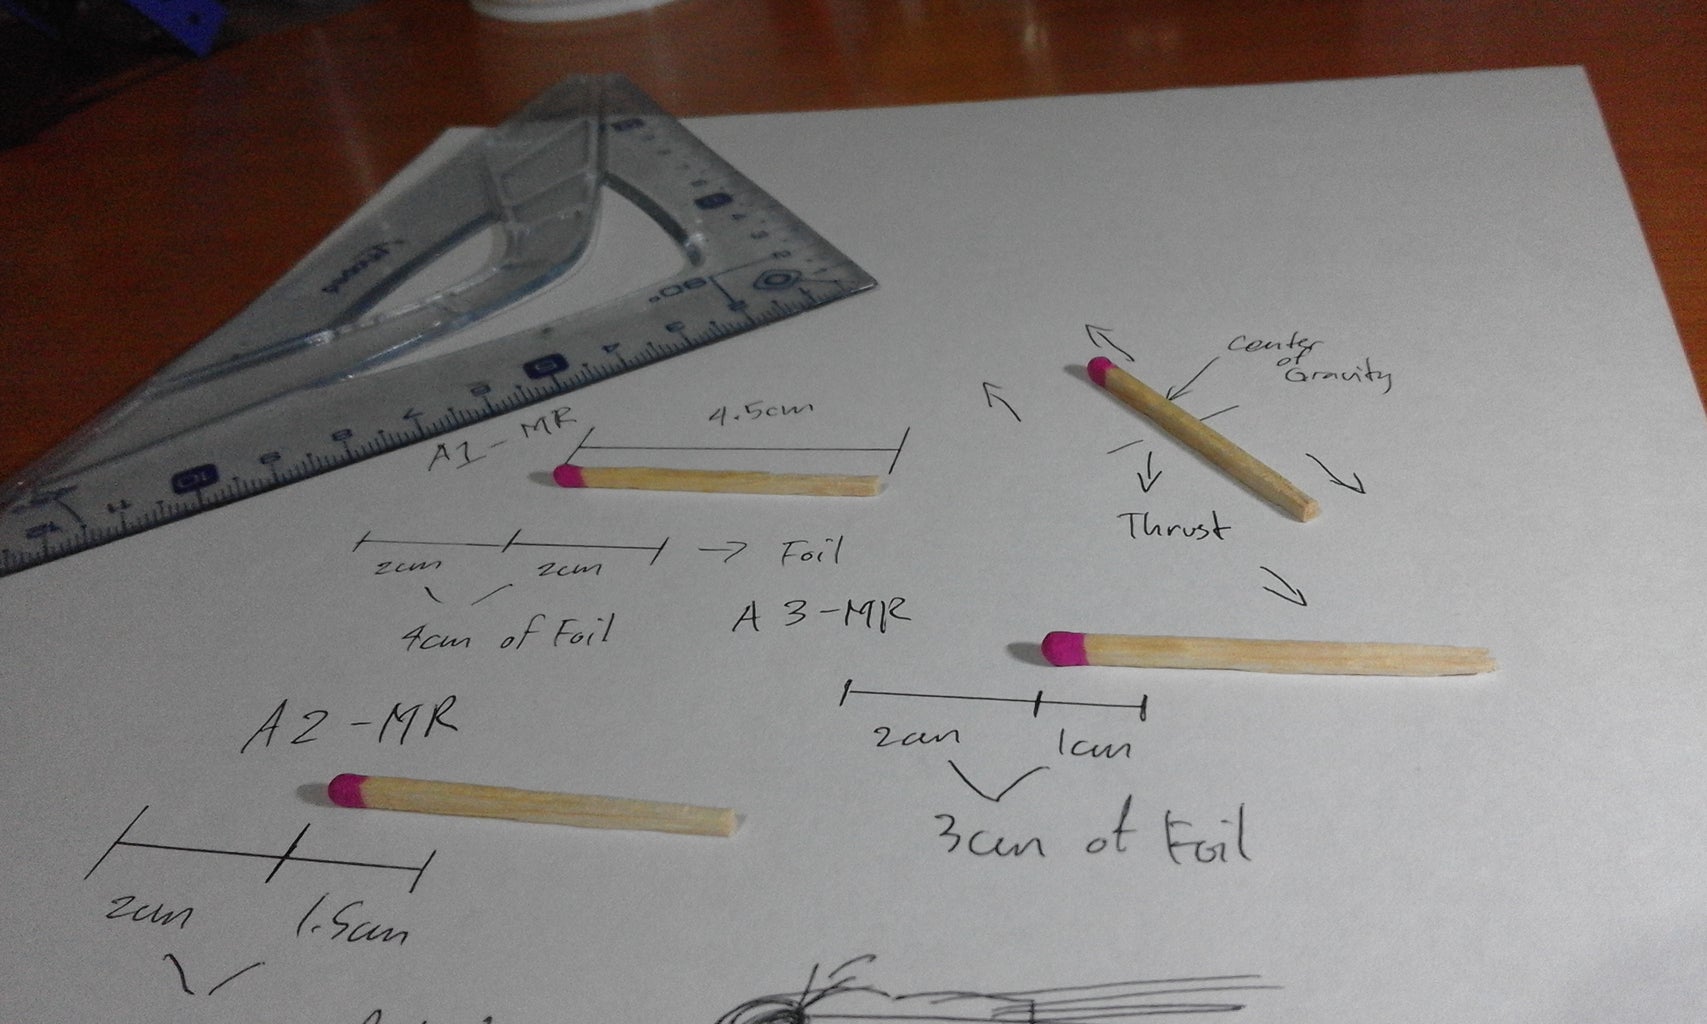


In this step, we are going to design a rocket! You heard it right! (not the sophisticated one... I am not an engineer). A matchstick rocket! (kids: yay!) So, what are you waiting for? Get the parts and materials needed for our science experiment! For designing a rocket we should consider what we've learned from the previous step. Have a look at my pictures above. As you can see there's a measurement each sticks right? Don't ask me why because these measurements are related to my hypothesis. Are you excited to know what answer we are looking for instead of launching a matchstick rocket? Okay, let's go to the wild world of science!
My Hypothesis
The reason why I put some measurements is to figure it out what size of a rocket will be successful. I made 3 sizes for my matchstick rockets. My original plan is to make a 6 version of rockets with different length in aluminum foil and different size of an exhaust hole. The reason why I made only 3 because of lack of time to make it and I want to publish this instructable as soon as possible. So yeah, let's proceed to the experiment.
The matchstick rockets I made has a serial number each (I just want to put a name in there to specify their sizes and features). The first matchstick rocket I named it A1-MR which means A1 is the order of the rocket and MR which means Matchstick Rocket. The A1-MR has the size of aluminum of 2cm from the head of matchsticks and the overall size of is about 4cm. I intended to put a 2cm extension from above of the head of a matchstick so that I have a space for combustion. The A2-MR has a 1.5cm length of aluminum from the head of matchsticks and the A3-MR has an only 1cm length of aluminum foil from the head of a matchstick.
The matchstick rockets have the same forces like a typical rocket. It has a center of gravity, a center of pressure and also the aerodynamics (not perfectly design with aerodynamics because it is a matchstick!). I will focus on the construction of the matchstick rocket, so that if you want to have some information about rockets you may take a rockets class.
We will test which of these rockets will be successful in the end. The A1-MR or the A2-MR or even A3-MR? Choose your bet before we proceed! The successful launch will vary on the size of the aluminum foil? or not? We will answer some of the questions after this experiment about rocketry!
You can customize your research you can even try a different size of the exhaust hole for combustion (the hole made by the pin after wrapping aluminum foil into it). You can add factors as many as you want, just make sure that you're able to answer them all.
Follow my setup, look at the picture for more guidance in the sizing of the aluminum foil and you may now proceed to the next step.
Step 4: Make a Rockets!


Get ready because we are now making matchstick rockets! Please prepare the following materials below...
- 3 x Matchstick
- Aluminum Foil with 4cm x 4cm size
- Aluminum Foil with 4cm x 3.5cm size
- Aluminum Foil with 4cm x 3cm size
Cut the aluminum foil according to the sizes above, use a pair of scissors to do this. The aluminum foil with 2cm x 2cm dimension is for A1-MR. The aluminum foil with 2cm x 1.5cm is for A2-MR and the last one is the aluminum with 2cm x 1cm is for A3-MR rocket. So follow the pictures above for more info about the right steps on how to make a matchstick rocket. In the pictures, the first rocket I build is the A3-MR rocket up to A1-MR rocket. It is equivalent to from small to long. You must consider the sizes and length of the aluminum foil because this is the main concern of my Instructable. Please proceed to the next step when you're done making rockets!
Step 5: Prepare the Launch Pad


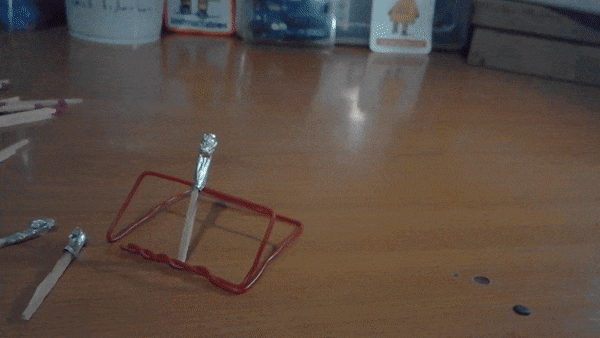
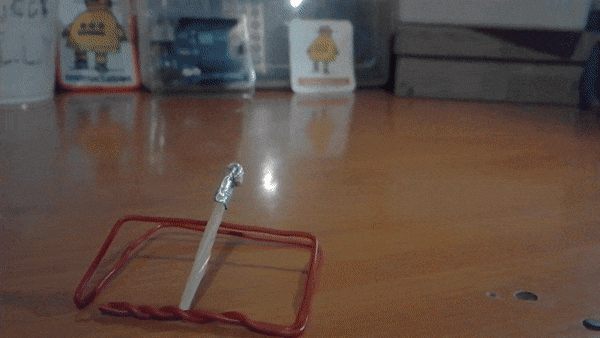
You will not able to launch a rocket without launch pad. A launch pad is extremely useful for launching rockets because it can guide the rocket which direction and angle you want it to point. What is exactly a launch pad? Well, A launch pad is an above-ground platform from which a rocket-powered missile or space vehicle is vertically launched. So that, having rocket requires also a launch pad. If you ever tried this experiment, you will notice that I use copper insulated wire instead of a paperclip.
The real reason why I use copper insulated wire it is because I don't have the supply of paper clip may be soon I will order a pack of it when I have a free time. Another reason is that I want to reuse the extra copper wire in my supplies. My design of launch pad is very easy and anyone can make one of it in just a few minutes. You can also launch 3 rockets at the same time in one ignition.
Look for the 2nd picture for the dimension of launch pad out of copper insulated wire. If you asking me what the size of the wire it is 20-22 AWG solid core insulated copper wire. Just follow the picture above for more information about the launch pad. If you have any question regarding this part please let me know by leaving your question as a comment thanks!
Are you done making launch pad for our rockets? Why don't you show it to us? Share the picture of your own version of rocket launcher! If you're contented to your launch pad you may now proceed to the next step which is the testing and experiment part!!! Good Luck...
Step 6: Test the Rockets!

This is the most exciting part of this Instructable! The science is about to happen! Before I conduct the experiment I prepare the data below so that I am able to record the result of the test. You may have a look at my basic and simple data record for the matchstick rocket science experiment.

Get your paper and pencil/pen and copy this, because we are going to explore the science with the help of this basic and simple science experiment. I will demonstrate and conduct the experiment to fill up this data. Also by doing this experiment, we are now able to answer my questions about matchstick rockets.
Safety Precaution!
Experiments need to be safe, remember we are dealing with fire so that please be sure that you're outside your home and make sure you have a pail of water nearby. If you have a fire extinguisher that would be great! Use safety glasses in case that the rocket will explode or unexpected fly in a random direction. Don't do this without supervision from your parents! I conduct this experiment in my room in a controlled environment with safety. I have a pail of water nearby. Another thing, don't ever touch the aluminum foil in the matchstick rocket because that will be super hot and might cause burn. Always remember that safety is very important in any science experiment. Don't breathe also the smoke coming out from matchsticks because they are the harmful product of chemical reaction. Thank you!
Experiment Time!
I start with the short aluminum length which is the A3-MR rocket. Place it on the launch pad and prepare yourself for the launch. Get your match and start a fire and ignite the A3-MR rocket. Please don't do this without your parents or don't do this indoor. Make sure do this outdoor! Don't mind my setup because I am in a controlled environment. Parental guidance is advice before conducting this experiment!
Don't laugh at me... I know I'm failed to launch the first rocket design. The A1-MR rocket is failed to lift off! It produces smoke instead of lifting off and that's funny for a simple rocket. I think the number one factor for it's failed flight is that the length of the aluminum foil on it. The burned material is completely transformed into smoke before leaving the head as a thrust for the rocket. Another actor is that the weight of the whole rocket. I think the center of gravity on it is not stable and also for the center of the pressure. Anyway, in the end, it fails, because of several factors. After the first test, we should write the data we gather. I listed the data from the first test with A1-MR rocket, I will show the data after the experiment! The matchstick rocket demonstrates the application of Jet Propulsion. It also demonstrates Newton's 3rd Law of Motion, how? What I've learned from books and from my school. Newton's 3rd Law of Motion states that If there's an action there's also equal and opposite reaction. Which means if there is a force downward you will get force upward. Just like a rocket, if there is a thrust in the bottom of the rocket, the rocket will lift off and fly. Got it? So, let's move on to the next test for the rocket A3-MR. Why A3-MR rocket? Based on my theory this rocket would be successful because of its design. It has a short length of aluminum from its head. It has an about 1cm length from the head of the matchstick. It can burn faster and possibly lift off fast. So let's have the test!
Oh, wait? Oh no... fail again? Yes! I fail again to successfully lift this matchstick rocket off. I think I overheated the head of the rocket that's why it explodes and produce fire and smoke. I lowered the angle of the launch pad to make it fly but yeah, nothing happens. The A3-MR rocket is failed to lift off instead it produces a smoke and burned it self. The data for this rocket is recorded in my data table. One rocket left, the design for A2-MR rocket that has 1.5cm aluminum foil on it from its head. It is natural to have failed during experiments because a good scientist has never ending patience on what his/her doing. The most important thing is that you have the passion and love for it. If you love what you are doing you will not stop to achieve your goals. Come on! Let's continue the experiment even if I always fail LOL. Get the last rocket which is the A2-MR. Let's see it in action, I hope it will work successfully!
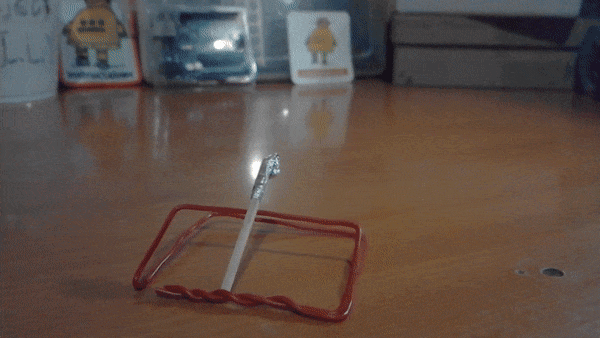
Finally, It success! The A2-MR rocket has successfully produced a thrust to lift itself and eventually fall to the ground. It is because that the weight of the matchstick rocket is higher than it's thrust force. If you continue and test the same design for the A2-MR rocket, you will end up with great rocket experiment. May be you can achieve long distance travel even high distance above the ground. You can continue this experiment at your own time and outside your home. I am not able to continue this experiment because I have a lack of time to do this and also my resources are limited only. If I have a sponsor to fund my experiments that would be nice and great news for me. So yeah, this rocket has completely demonstrated the Newton's Law of Motion, the Jet Propulsion, and even the Combustion. Read physics books for more info about these key terms because they are the important application in making rockets. Also not only these terms instead there are many terms you should consider if you want to enter the world of rocketry and science! All of these are waiting for you in the rocket class! Have time to visit that class!
Experiment Result

Here's my data from my experiment, as you can see I have 2 failed launches for A1-MR and A3-MR rockets. Only one out of 3 rockets have successful and complete data. Failed to launch means no data to be recorded. In the last part of my experiment, I got only one rocket has complete data on it and it is the rocket A2-MR. It is the rocket with 1.5cm aluminum from its head. I can't imagine this rocket would be the successful one from the rest. Now I learned something today with the help of this experiment if you did the experiment you should show it in the comment below. Let me know also what are the things you've recorded aside from my data. I am so happy to document this little experiment to show and tell the application of Jet Propulsion and to have an idea on which design is effective when making a matchstick rocket. Proceed to the next and last step for my conclusion about this experiment! Thank you for joining me in the wild world of SCIENCE!
Step 7: Conclusion


Hello there, do you enjoy the simple but awesome experiment with matchsticks? Well, I also enjoy doing this experiment in my free time. As I advise don't do this without the supervision from your parents if you're not under the legal age. Again safety first, before crazy stuff!
I, therefore, conclude that the rocket design is important in making successful and reliable rockets. Making rockets are very serious one (not too serious in making matchstick rockets) because if you don't make any research and study before building a rocket then you're wasting your time and money. The A1-MR and A2-MR rockets are failed due to its own design. It can't support its own weight or has an imbalance in the center of gravity. The A3-MR rocket burned itself due to an explosion caused by overheating of the head (I think it's my fault...). The only successful design is the A2-MR rocket. Why? Has its average length of aluminum foil? I think yes, I've tried it again in the same design and you what!? It works again! So the right design is the A2-MR rocket so next time if I have enough time to conduct this experiment I will follow the design I did for A2-MR rocket!
In the data, as you can see the A1-MR rocket has 7s on ignition time. It is normal because it has a 2cm length from its head and another 2cm from above of its head to equal to 4cm x 4cm. The higher the dimension is the higher the ignition time also. Compare it to the two rockets A2-MR and A3-MR they have the same ignition time because they have lower in dimension. Only 0.5cm the difference between them but the A2-MR only did a good job. I've learned here is now I know how to make a perfect size of aluminum to be wrap in the matchstick with a higher success rate. This is only my conclusion about my hypothesis and I finally answered my own questions about rockets.
Want to learn rocketry? Well, I am highly recommended to take the Rocket Class from Instructables! You will learn more interesting things about how rockets work in detail. I didn't show here how actually rockets work in details because there is a class for that. It will take too much time for me to show and tell it to you guys. If you have a question you can leave in the comment below and be constructive when commenting.
This Instructable is a part of my Unusual Uses of Matchsticks (It is better to check it out!). You can support me by voting my Instructables in the contest. That would be great for me! I have so many ideas that I want to share here in Instructables, I don't have enough funds to support my hobby in sharing high-quality projects. If you consider to support me you can go to my Patreon page and be my patron or support me by Donating so I can continue sharing awesome projects here in Instructables and on YouTube.
Source and References
- https://www.nasa.gov/audience/forstudents/k-4/stor...
- https://en.wikipedia.org/wiki/Rocket
- https://www.grc.nasa.gov/WWW/K-12/TRC/Rockets/matc...
- https://www.education.com/science-fair/article/bui...
Outro
Thank you for taking your time to read my instructable about exploring the science with making a simple matchstick rocket! I hope you enjoy it as I enjoy making it and documenting it to show and tell to other fellow makers here. If you find my instructable useful please consider to click the heart button, leave your comment about my instructable or even follow me on Instructables. By voting this project to the contest it means a lot to me. You can support me by visiting my Patreon page or visiting my Facebook page for more interesting projects about web development, programming, and electronics. I'll bid you farewell, see you in my next Instructables!
Do you have your own data in the experiment we did? Did you follow me? Please share it in the comment below together with a snapshot of your own data and experiment and also your conclusion about the experiment. To have a chance to win PRO Membership! Come on, share it!

Participated in the
Unusual Uses Challenge 2017

Participated in the
Makerspace Contest 2017

Participated in the
Explore Science Contest 2017


