

Introduction: Rocket Stove V3


My interest in rocket stoves started with steaks. I learned about reverse searing - where you cook it low and slow until it's within 10 or so degrees of desired done-ness, then you sear it to have a nice layer of char on the outside. If you want to cook a 1 1/2" thick rib eye that's medium rare - all the way through (instead of just a medium rare thin patch through the middle) the easiest way to do that it is to bring it up to temp slowly. Somewhere in my reading someone referred to cooking a thick steak like trying to catch a moving bus. Throw it on a 400 degree grill, you're cooking it from the outside in. By the time the middle is 130-135, most of the non-middle is overcooked. If you cook it at 225, yes it takes much longer, but the internal temperature climb is much slower. Before you hit 130, you remove it, and expose it to MUCH higher temps, for a short time. This triggers the Maillard Reaction, which produces the char-grilled texture or grill marks. If you like grill marks, it helps to constantly rotate your steak, so you don't have a single set of parallel lines, your marks cover the steak. Or if you use a super hot iron skillet, the entire side will be one char-grilled delicious grill mark. Flip once, then let rest a few minutes, then you'll have the perfect medium rare steak.
My problem has been - that second heat source. You want to trigger that reaction quickly. Ideally when I am searing the steak, I'd like it on heat no more than 1 minute per side. Too much time, and that extreme heat makes its way into the steak, over cooking it. So you need it VERY hot. I've heard that high class steakhouses use broilers that go up to 1800 degrees. When I try to sear my steak on an iron skillet on my grill's side burner - my infrared thermometer only reports about 600 degrees. It takes about 2 mins per side, and usually over cooks the middle.
I started using a Weber charcoal chimney upside down - so that the coals sit near the top. I try to time it so the steak is ready to go one when the coals are red hot. I've seen temps near 1000 degrees with this method. The bad thing about this method is the window of that heat is small. I start the chimney with paper bags, and a little coal in the larger (now on the bottom chamber), and fill the smaller chamber with charcoal on top. It takes anywhere from 30-45 mins for those top coals to get red hot. Then it only stays that hot for 10 or so minutes. I could add more charcoal, but that would take time to heat up. Timing that 10-15 minute super heat window, with having your steak hit about 110 degrees in the oven is tricky. Many attempts result in over cooked steaks because the sear wasn't hot enough.
Then I found out about rocket stoves. I can't find it now, but I read an article where someone built a rocket stove and recorded temps in excess of 1500 degrees coming out of the top. However YouTube, Google and even Instructables are loaded with wood burning stoves, (with chambers shaped like either an L or a J) that call themselves rocket stoves. In my opinion (but I'm no expert) a true rocket stove should have a distinct rocket like sound, and produce enormous heat. They are supposed to be incredibly efficient, and can be fueled by twigs, small sticks or scrap wood. They are usually very well insulated, which keeps the heat in the burn chamber. The air is pulled in below the fuel wood, where it is preheated, then as it feeds the fire - it rapidly exits creating a whooshing noise like a rocket engine. Many companies sell an L shaped steel wood burning stove with called a Rocket Stove. In my (layman's) opinion, they are not. Steel is not an insulator. For these stoves to be most efficient, they'd need to keep all the heat in the fire chamber, where there is a secondary combustion. I don't fully understand the science behind it, but when the heat is not radiated out of the fire chamber - a second combustion burns the spent gases, and incinerates the wood? Basically, its so hot that there's no smoke. Properly designed rocket stoves are said to have a riser height that is 3x the diameter of the fire chamber. So a 4" diameter chamber should have a riser 12" tall.
What motivated me to try to build my own, was the $12 rocket stove video on YouTube. The builder used 4" PVC pipe as molds to create his chamber in some homemade insulated concrete that he molded into a 5 gallon bucket. He recommends a 4:1 ratio of Perlite (or Vermiculite) to reinforced concrete. I tried this but wasn't happy with my results. Although it turned out to be a highly insulated wood burning stove, I don't think it had proper separation of the fuel and air chambers. Also the 4:1 ration resulted in a mix that never cured hard enough to support itself. Even after 5 weeks of slowly drying in a trash bag, the mix came out fragile and easily crumbled. My second attempt to build this, I used a cardboard 4" tube, so it could be burned out - instead of removed (don't burn PVC pipe! Dangerous fumes, heavy pollutant). This time I shaped it more like a J, so it fuel could be gravity fed. I also cut a slit in the fuel chamber so I could insert a piece of steel to as a fuel shelf. This would always allow adequate separation of fuel and air. This time my mix was about 60% perlite to 40% reinforced concrete. It was SUPER heavy, and the concrete leaked into places in the chamber it shouldn't have been and never burned that hot. I trashed it. While building this one, I also had the great idea to take a working Weber charcoal chimney and "improve" it by adding a layer of this 60/40 insulative concrete. I used a piece of 12" air conditioning duct as an outer shell and filled it with that same mix. After it cured nice and hard, I tested it. I didn't account for the holes in the Chimney, so my concrete mix blocked them all. This suffocated any hopes of a hot fire. I tried propping it up on some scrap blocks of 2x4, but they ignited and burned with the fire. Fail numbers 2 and 3.
This year, I found another YouTube video that showed a Perlite and concrete mix, that also included sand. I also like how this guy wrapped his inner forms with pizza boxes to make removal of the bucket and tube easier. This one was also laid in the bucket upside down, which allowed for a (water filled) 1/2 gallon milk jug to form the fuel/air chamber. He addressed the separation of fuel and air by placing the completed form over a dugout pit on the ground. Some bricks created elevation for the stove, and a spare piece of a charcoal grill was set between the bricks and the stove, so that the sticks would remain elevated. I didn't like how the bottom portion (the regular bricks) were not made from the insulative compound, and the how air could mix with the fuel (sticks). And I didn't think the chamber was tall enough. But this amended insulative compound encouraged me to try again. Also, now I can weld, so the problems I had on version 2, should be alleviated by steel fuel and air chambers.
Step 1: Material List


Materials:
(1) 60lb bag of sand
(1) 80lb bag of fiber reinforced cement mix (crack resistant)
(4) 8 Qt bags of Perlite
Water (not measured)
(1) 4" x 48" cardboard mailing tube (from FedEx)
(1) 12" x 48" cardboard concrete form
Scrap steel - I used 1/8" x 1 3/4 angle, and 1.5 x 2.5 x .125" rectangular tubing, .125" plate, and expanded steel
Duct tape
Tools:
Bandsaw, hacksaw and Exacto knife to cut cardboard tubes - both to 24"
Angle grinder with Cutoff and flap discs
MIG welder
Cement tub and trowel
Step 2: Building the Air and Fuel Chambers


I knew I wanted to be able to separate the air and fuel chambers. I also want to be able to fabricate a door for the fuel chamber so that all air is fed in by the lower air chamber. I believe the hotter burning stoves typically have a larger chamber for air than fuel. I had some scrap 1 3/4" angle iron from my first attempt at building a band saw stand that I reused. I welded a piece of 1/8" plate under it to make a 1 3/4" x 3 1/2" rectangular tube. I had some scrap 1.5" x 2.5" tubing leftover from my welding table build. Now I just wanted to stack them, and insert them into the fire chamber at a 45 degree angle. I also wanted a tray, so that fuel would not go all the way to the bottom of the chamber - I want a gap so plenty of air can get pulled in. I also wanted the bottom of the chamber to be a smooth steel so that ashes could be easily scraped (or shaken) out. The insulative concrete mix is pretty porous, and would be tough to remove ashes from.
I didn't really measure much while welding this form together, I just eye-balled it. This project doesn't seem to require the precise measurements that some of my others do. Before tacking the fuel chamber to the air chamber, I traced the 4" cardboard tube onto it, so I could cut out a groove for it. Then traced a shape 4" tube on to a 1/8" sheet and cut out a circle to make the bottom. I realized I shouldn't have the full circle...I needed a flat edge to mate to the air chamber. So I cut a square whole in it and used if for my fuel tray. I cut a second round piece similar in size, this time with a flat edge to better connect to the air chamber. The fuel tray has 2 scraps of expanded steel welded above and below the opening. I could've cut it to fit inside the hole and maintained 1/8" of thickness, but I thought the gaps were too big. By using 2 pieces, I could rotate one 90 degrees and shrink the hole size (to decrease the amount of larger coals/ash from falling to the bottom).
Next I welded the fuel tray to the top of the air chamber, then I welded the fuel chamber tubing to the rest of the form. I didn't have a single piece of 2.5 x 1.5 long enough, but figured it would be fine to weld two pieces together. They'll be hidden inside the concrete so that won't be visible in the finished form. Although both chambers appeared to be plenty long enough (by eye-balling) you'll see if the final pics, they could've benefited from being longer.
Step 3: Connecting the Inner Fire Chamber to the Steel Fuel/air Chambers


I thought I'd be able to cut a slit into the cardboard tube and jam the fuel tray inside it. That probably would've worked if I hadn't made it thicker my welding expanded steel on both sides of it. Instead of bending or deforming the cardboard, I cut it. Then I duct taped the top section to the bottom and steel. All this duct tape should burn off with the cardboard in the first firing.
Picture 2 was reminiscent of most of my teenage building projects ;-)
Step 4: Marrying the Burn Chamber to the Form Mold


Here comes the super simple task of cutting holes in cardboard. NO PROBLEM! Uh, except, the cardboard is close to a quarter inch thick and super dense. And curved. And you need to align a flat piece of steel to the inner curved surface, trace it and then cut it so that the steel fits through the hole. Piece of cake!!!
Psyche.
Took a few attempts, and had to tape back a big piece that I shouldn't have cut. I forgot to snap a pic of the completed and taped up exterior form before I put it in the bag.
Anyone that has some suggestions on how to better align stuff to trace and cut out holes in curved surfaces, I'd appreciate it!
Step 5: Fill With Insulated Cement


The YouTuber I mentioned that added sand - he used equal part cement/sand/perlite. A good thing about measuring this stuff out - you don't need a measuring cup scales or anything like that. Just use 1 container and fill it with the same amount of each material. For a 4:1 (aka 80% perlite) mix, you fill up any random container 4 times, dump it in your mixing tub/bucket, then add 1 scoop of the cement. For 60/40 last time, I used 3 scoops Perlite to 2 scoops cement. This time I wanted to go with a suggestion down in this builder's comments..3:2:1 of Perlite/sand/cement.
Before you start, you're going to want to use a good water tight lid for the bottom, so that the mix doesn't go all over the place. I had a lid from a car wash bucket that was a perfect fit. Also set the whole form inside a bag now, because once this thing is full of wet compound, there will be no lifting it to put it in a bag later.
What I didn't notice at the store - my Sand mix, also included cement. So my first batch of 3 scoops Perlite, 2 scoops Sand (mix) and 1 scoop cement resulted in what looked more like a 50/50 mix. Way to heavy on cement according to my eyeballs. (Disclaimer - my total life experience working with concrete is in these rocket stove build attempts, so if you think you know better - you probably do). I added 2 more scoops of Perlite to lighten it up. Mix up your dry ingredients well before adding water.
I have no idea how much water I added. Maybe a couple of cups. I didn't want it soupy. What I remember about my last mix of this compound (for the Weber chimney - that dried hard and heavy) was that it never really sticks together. It stinks like cat litter, and kinda looks like wet cat litter - if it didn't clump.
After that first batch, all later batches were 1 scoop cement, 1 scoop sand (mix) and 3 scoops Perlite. I don't remember how many batches it took. Probably like 6-8. I had plenty of cement and sand mix, but just enough Perlite. I got the last 3 scoops needed when I opened the 4th bag. After each batch, I tapped the mixed down with a scrap piece of 1 x 4 wood to compact it. I filled it all the way to the top, covering the steel bottom of my ash tray and leveled it off with a piece of wood. I tied it up tight in a big construction grade trash bag and sealed it with a zip tie. A commenter on that YouTuber's page said let it cure for 29 days, so I'm going with that. After 29 days, I'll remove it from the plastic and sit another couple days before removing the outer form.
I was too pressed for time to add the grab handles I wanted. My plan was to run a pair of large C shaped steel rods into the concrete compound - sticking out of the sides so I could carry the thing. I'll have to deal with that later...
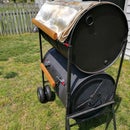
Step 6: Testing...Recommendations?


The form was ready to come out of the bag back in April. I took it out on time, and let it sit and harden a little more before my first firing. This burned out the cardboard tubes, and the tape that held them onto my metal form. I shoved about 5-10 little pieces of my fuel (old pallet wood cut into 6-8" pieces, then split into 1"-2" wide) down the tube. I grabbed a couple cotton balls, dipped them in Vaseline and dropped them down the top. Another Vaseline rubbed cotton ball was put down the air chamber - under everything and lit. Cotton balls rubbed with petroleum jelly make a good starter for these types of fire. They start very easily and burn for a few minutes. Lots of smoke for that burn, and it never felt super hot.
A few days later, I went at it again, this time with a way to test temps. After 10-15mins of heating up, I sat my cast iron skillet on top of some more of that scrap rectangular tubing. I think my highest recorded temp was about 550F. I was hoping for more. I left the stove outside for a few months, covered in one of those black construction grade garbage bags, with a concrete plug in the top to keep it from blowing away. I thought perhaps it could burn hotter with charcoal.
For my last test, I stuffed a balled up paper bag down the tube as far as I could, and put 12 Kingsford charcoal briquettes on top and lit it with the cotton ball/vaseline. 10mins in and it was still smoking heavily from the paper bag. When you use a paper bag to start charcoal in a Weber Charcoal Chimney, air reaches the fire much more easily than it does inside a tube. It took probably 45+ minutes for the charcoal to actually get hot. Then, even when most of the coals were glowing hot, putting my hand over the top of the tube, I could feel the air was no where near as hot as it was with the sticks. I didn't even bother to set up the skillet and read the temp.
I mentioned above that I read that the burn tube height should be 3x its diameter. So a 4" diameter tube should only have 12" of length. This is twice that tall. I did that on purpose because I assumed it would be easier to remove excess form, then to try to stick it on later. If I can figure out a way to cut 8 or so inches from the top, and end up with a clean flat surface, I'll do another burn test. I don't have high hopes of that, as the form is pretty crumbly.
I'm posting this about 5 months after finishing it, opening it up for suggestions. If the builds I found before (but can't find now >.< ) are accurate, I should be able to see at least 1000F on that skillet. If I can't hit that temp, then maintain it easily for 20+ mins, I'll probably junk this thing and give up on Rocket stoves. Maybe I should try a modified forge?
I still have 24" of each of those cardboard tubes, I may try one more time with these changes:
- No J shape. Gravity feed doesn't work right, so the next fuel tube will be perpendicular to the burn tube.
- Eliminate that ash screen/tray. It didn't seem to help anything, just made larger un-burned chunks harder to remove
- Adding carry handles. This mass tips the scales at 96lbs!!
- Longer fuel tube with a close-able door to prevent air coming in that route.
- More air. I'm thinking adding bigger air intake(s?) under the fuel tube. Maybe several so this thing gets plenty of air.
- Shorter burn chamber height. Sticking with the 4D=H, maybe only 12" from the top plane of the burn tube to the top of the form will improve heat.


