

Introduction: Rubbish Recliner - Step Ladder -> Seat Transformation


The streets around where I live give up some surprising things if you're willing to do a bit of bin hoking.. this project started with an old, broken, paint covered step ladder that I thought deserved better in life.
I thought that since all the parts were found on the street I wouldn't bother to give it a finished look, the random colours and obviously different parts kinda add to it
Step 1: Tools and Parts


The "Parts" list here doesn't have a whole lot of structure.. basically whatever you can find to create something similar to the pictures should do.
I gathered my high quality materials from these piles of rubbish I found on the street. Actually pretty much everything in this build came from the street; including most of the screws, the seat cover, the planks and even the makeshift bracket to hold the wires in the final design.
Parts:
- Step ladder
- Planks for back
- Seat
- Wire
- Some wood to make the arms / blocks for the sides.
- Paint
- Approx 20 screws (if you're lucky you can reuse ones from what you find)
Tools:
- Saw
- Screwdriver
- File / sandpaper
- Drill
- Pliers
- Wire cutters
- Some masking tape will help keep things clean when painting too
- Tape measure / ruler
- Spirit level
Step 2: Back and Base


- Place a plank between the bottom and second bottom step of the ladder
- Take measurements and mark holes for drilling
- Set second plank on top of the first (this was for added strength)
- Drill holes and screw back into the ladder
- Make sure the base sits level on the top of the ladder
- Drill 4 holes in the top of the ladder
- Screw upwards through these holes into the base (make sure the screws are long enough to get into the base, but not poke through all the way)
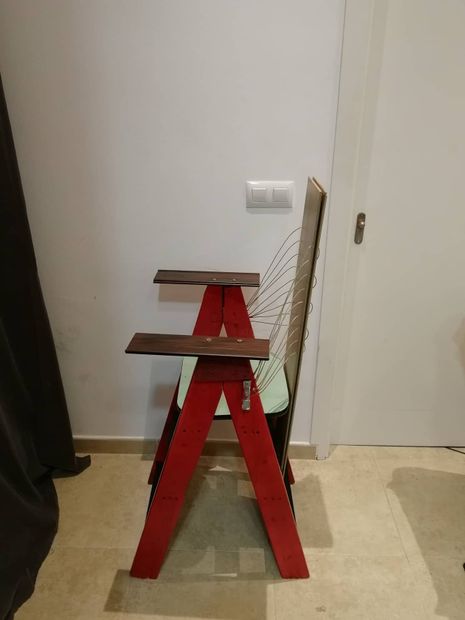
The ladder I found was not level so had to be taken apart and leveled.. sorry I don't have any pics of this, but you basically have to unscrew the 2 parts of the ladder, level the top, then secure the sides with blocks (circled in red), before putting the base on.
Step 3: Cables


You don't want the seat to be too straight, it's good if it can recline a bit.. To do this without risking the back snapping I supported it with some cable.
- Drill 9 holes in the back (for me 2cm in from the edge, 4cm spaced vertically worked) Before drilling I tested the design out with some string.
- Put the cable through one of the clamps in the sides of the chair then weave it in and out of the back in the order shown below

Step 4: Arms and Painting

After the back is in place you can position the arms so they don't get in the way of the cables
- Screw them into the tops of the ladder.
- All that's left to do is to paint the steps and sides..

I hope you enjoyed reading through, if you'd like to see some more then check out instagram: jamesmco1

Participated in the
Epilog X Contest


