

Introduction: SMS Message LittleBits Gumball Machine


This awesome Gumball Machine is dedicated to Geof Lipman, Engineering Team Lead of the littleBits Electronics Company. Have you ever thought of having your own Gumball Machine? With this awesome flower pot, you could send a text message (#GeofGumball) from your phone to the Cloud Module and receive a gumball! Well, I would receive a gumball but I could definitely mail it to you if you'd like! Send #GeofGumball to (415)-799-4278 to let me know you're connected! ;) Be a Maker! Be Awesome and Be a Maker!!!
Materials:
Door Hatch (1)
Door Hinge (1)
Glass Bowl (1)
GUMBALLS!!!!!!!!! (infinity)
Omega Clamp (1)
Putty (1)
PVC Connectors 90 Degrees (3)
PVC Pipe 3/4" (1)
Terracotta Plate (1)
Terracotta Pot (1)
Wooden Knob (1)
Acrylic Paint
littleBits
Cloud Module (1)
Button (1)
Wire (3)
Power P3 (1)
Servo (2)
Fork (1)
Pulse (1)
Buzzer (1)
Tools
Drill Press
Gloss
Handsaw or Bandsaw
Paint Brush
Tape
Step 1: Drilling


The first step is to drill a hole through the side of the flower pot, used to distribute the gumballs. To avoid cracking or chipping the flower pot, use a small drill bit to drill a hole through the side. Once that hole is placed, increase the size of the drill bit. Keep increasing the size until the PVC connector fits through the flower pot. In case you would like to use other candy, make sure the PVC connector and pipes you use is able to feed the candy through.
After the hole is drilled, decorate the flower pot, plate and the wooden knob. I used a solid color for all of the items and painted gumballs on the pot, but I definitely encourage you to get creative! After you have decorated the flower pot, finish it off with a fresh layer of gloss! This will definitely shine up the room!
Step 2: Mounting

Now lets make finishing touches to the pot and plate. After they both are finished, glue the wooden knob to the bottom side of the plate. I used putty instead. Now, use the putty to mount the door hinge over the hole for the PVC pipe. This will keep the gumballs from falling out. Now mount the clamp over the door hinge to resemble a twisting knob.
Step 3: Mechanism


Now lets design the mechanism of this project. You will need the three PVC connectors, PVC Pipe,Handsaw and tape. First tape two connectors to resemble a "S" shape. Cut the amount of PVC pipe you need to reach the bottom PVC Connector from the end of the "S" shaped connectors.. Now use the handsaw to cut two slits into the PVC pipe. Both slits should be wide enough for the servo arm to move back and forth through the PVC pipe. The slits should be one inch away from each other along the PVC pipe, so that the gumball could sit in between the two servos and stop more gumballs from falling through. Ensure that the servo arms can swing inside of the PVC pipe through the slits. Now connect the bottom side of the PVC pipe to the last connector.
We have reached the somewhat tricky part; connecting the servos the PVC pipe. Refer to the diagram. Through this design, the gumballs will feed through to the first Servo that is connected to the Cloud module. Once the cloud module is activated, the gumball will fall to the second Servo which is connected to the button. Once the first servo closes and blocks the other gumballs from falling, you can press the button to release the gumball from the bottom servo. The trick is to mount the servos where both arms are inside of the PVC pipe through the slits. The arms should be in far enough to hold the gumballs in place. Now tape the servos to the PVC pipe and test the arm motion. Unscrew the arms to place them in the right position.
Now mount the PVC pipes and connectors to the inside of the flower pot. Use tape to mount them to the sides.
Step 4: Gumballs and Glass


Gumball Time! Fill the glass bowl halfway with gumballs. Mount the bottom of the flower pot to the opening of the glass bowl. Use the putty to secure the glass bowl on to the flower pot. ENSURE THAT THE GLASS BOWL IS CONNECTED TO THE FLOWER POT TO AVOID THE GLASS FALLING OVER!
Step 5: IFTTT Recipe

Now lets create the Recipe. Go to the IFTTT website and connect the cloud module. Create any recipe that you would like to create to receive gumballs.
Step 6: LittleBits Circuit

Time to build the circuit: P3 + fork + (1st Channel) Cloud + Servo + Pulse + Buzzer + (2nd Channel) Wire + Button + Wire + Servo. Mount the circuit on a mounting board to secure the circuit. Place the board on the inside of the pot.
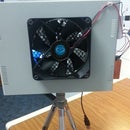
Step 7: Finished

AWESOME!!!!! You have created the awesome Gumball machine!! To refill the machine, connect a button on each servo to open the hole of the PVC. Feed the candy in the hole under the hinge. Replace the gumballs with skittles, M&M's, or what ever you find! What about Ice Cream? Charge your friends a quarter for a gumball lol Happy making! :)

Participated in the
Home Technology Contest

Participated in the
Paint It! Sponsored by Olympic Paint

Participated in the
Remote Control Contest

Participated in the
Summer #mikehacks Contest


