

Introduction: STANDALONE SMALL ARDUINO


Hey! I am back with another instructable.
The main objective of this project is to get manufacture a small PCB for ATMEGA328P micro-controller aka small Arduino board.
Step 1: COMPONENTS REQUIRED
- ATMEGA328P micro controller
- 16 MHz crystal
- 22 pf ceramic capacitors
- Tactile switch
- Male jumper pins
Step 2: The Arduino Standalone
Kindly go through below link before starting:
https://www.arduino.cc/en/Main/Standalone
I decided to develop own PCB, in order to simplify the assembly of some projects and understand the step by step on how the basic Arduino Standalone circuit works.
Kindly pay attention while purchasing ATMEGA328P. It should have 'P' at the end so that you don't get signature errors while programming.
It is essential to develop your standalone Arduino board so that you have the ability to develop more complex projects based on the basic Arduino Standalone circuitry.
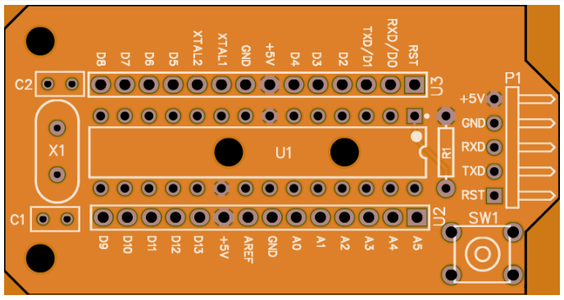
All the pins have been added as they exist on the Arduino boards, to make it easier to identify the pins by the user. The PCB is very simple, and as you can see, there is a connector of 5 pins used to flash the code to the ATMEGA328P on the board. The board has used a button to reset the application embedded on the microcontroller device and exists a circuit clock on the board.
Step 3: PCB MANUFACTURING


For all my prototypes I prefer LIONCIRCUITS as they provide great quality at an affordable price. I get my PCB rendered as shown above also I get an instant quote for my board. Their DFM is too quick which I get as soon as I make my payment. I recommend to try them once.


