

Introduction: Sculptural Experiments With Hard Candy


It's castable, malleable, and transparent.
It changes over time, and can be eroded with heat, water, or pressure. It slumps into forms, slowly changing its shape in response to gravity.
It can take any color and achieve a wide variety of textures with the addition of aggregates.
It also happens to be edible...
When I first decided to work with hard candy, I envisioned encasing strange archaic objects (typewriters? cash registers?) in clear candy and then cutting cross-sections on the Pier 9 waterjet cutter. I thought about suspending large castings over hot wires and letting the candy slowly sag through the system--perhaps this would leave a wake of burnt extruded line drawings? At any rate, I knew I needed to get some samples going to learn more about this highly complex, challenging, and versatile medium before committing to a larger-scale project. It's worth noting that I never planned for these experiments to actually be edible... counterintuitive, I know, but I was more interested in other chemical properties of this medium.
In this Instructable, I'll discuss:
1) My two forms of making hard candy: stove top and microwave
2) My first casting experiments with ready-made silicone molds and a wide variety of aggregates, from peppercorns to post-it notes
3) Hand forming the candy to create abstract sculptural forms
4) My experience waterjet cutting hard candy
5) My hot wire experiments
6) Waterjet cutting a hard candy/car part casting
The results from these tests varied: some were surprisingly successful, some were utter failures. But even the failures turned out of have unexpected learning-worthy side effects (like dissolving a gallon of hard candy in the waterjet cutting bath...more on that later!).
Step 1: Making the Hard Candy


The first recipe I used to make hard candy was a stove-top method. In a metal pan, I combined 2 cups of granulated sugar, 3/4 cup light corn syrup, and 1 cup water. I stirred this over medium heat to dissolve the sugar, and then turned up my heat, waited for the liquid to boil, added my candy thermometer, and waited for the liquid's temperature to reach the hard crack stage, or 300 degrees Fahrenheit. At this point, I quickly removed the candy from the heat and poured it into silicone baking molds that had been greased with butter or PAM cooking spray.
That's the general principle, at least. But I made plenty of mistakes along the way. The first time I tried this recipe, I couldn't get the temperature to rise above 220 degrees so I assumed my thermometer was inaccurate. I poured this candy into a larger baking mold, and it never set properly. The top "skin" of the candy was malleable, while the rest remained gooey. I soon learned that if the candy does not get hard pretty quickly as it cools, it probably never reached the hard crack stage in the cooking process. Cooling this candy will never make it hard--it needs to be re-cooked. It's essential that the sugar reach a temperature of 300 degrees. My heat settings were too low and I wasn't patient enough, so keep in mind that you might have to wait 15-20 minutes or more to reach the correct temperature.
That said, it's incredibly easy to burn the candy. The only disadvantage of this, when making inedible candy, is that the sugar begins to caramelize and the fluid turns amber. I found it very difficult to avoid a slight tint of amber, but this can be neutralized with a drop of blue food coloring (after the candy reaches 270 degrees). The best way to keep the candy clear, but still reach the hard crack stage, is to cook the candy as quickly as possible. Low heat will not help you here--use high heat and do not stir the fluid after it begins boiling. This can cause unwanted crystallization.
My second cooking method was the microwave. This was great because I could use disposable cups and go through many trials while honing my timing and volumes. The disadvantage is that the clarity is quite compromised--you get a much milkier, cloudier candy with the microwave. I used dixie cups for this method, combining 2 parts sugar with 1 part light corn syrup in a large paper cup. I stirred it thoroughly and finally came upon the correct settings for my microwave--high for 1 minute, 45 seconds. Note that the boiling action will greatly raise the fluid level, so be careful to leave a lot of room in your cup. I found that slight changes in volume, or using two cups at once, greatly changed my cooking times. Many dark brown (but great smelling) batches of burnt sugar came out of this process. I also used the microwave for stove-top batches that hadn't been cooked enough. Put the soft candy into a cup, turn on your microwave, and do your best to monitor the temperature. The larger casting in the photo above started as a failed stove-top batch and then became re-cooked using the microwave.
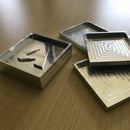
In my molds above, I decided to try out some interesting aggregates. Clockwise from top left: crayons, cake icing powder, aluminum foil plus cake icing powder, calcium chloride salt plus cake icing powder, peppercorns plus chili powder, aluminum remains from a waterjet project.
Step 2: Casting the Hard Candy


You can pour the hot liquid into any mold that can withstand temperatures of 300 degrees. I figured vacuum-formed plastic wouldn't withstand this heat, but any silicone baking molds work really well. So would wood, ceramic, or plaster, or even hand-formed aluminum foil. Just remember to use a release agent like butter or PAM.
You can see the results from my samples above. The cake icing powder nicely colored the candy in a localized fashion and the wax from the crayons melted and rose to the top of the sugar mixture. The candy sat on top of the salt, embedding only a single layer of salt on the bottom, but it sank to the bottom of the peppercorn mixture. You can see that the larger casting, stove-top and then microwave, turned amber from caramelization and lost some of its clarity in the microwave.
I was amazed at how much the candy resembled resin or glass castings. Anyone would be fooled until handling the pieces--they are slightly sticky.
Step 3: Hand Manipulations!


Another way to work with the candy is to manipulate it by hand while it's still warm and malleable, stretching and bending it. Sugar artists even blow the candy, like glass, but I haven't tried that yet.
At first I tried pouring the candy on a greased surface and then gently lifting it as it cooled, but it was still very hard to remove from the surface. Instead, I poured the candy into my silicone molds, waited for it to cool, and then pulled it out of the cast when it was still warm. I then stretched it, pulled it into large ropes and folded it back into itself. This was an immediately gratifying process, especially because of the time constraints. I kept a bowl of cold water nearby, so that when I achieved a shape I wanted I could immerse my piece and it would quickly harden into position.
Make sure to place the hardening candy on wax paper. I lost countless pieces because they stuck to whatever surface I had placed them on to cool. These pieces shatter like glass--they're quite brittle.
I put some of these forms in later castings with interesting results. The very burned pieces (that look almost tar black in the pictures) withstood the heat and retained their shape, but the clear forms just sagged and melted into the larger castings. Still, this can be an interesting way to work with color (deep red swirls in a clear casting, for instance).
Step 4: Waterjet Cutting


The obvious next step was to try waterjet cutting the candy! Who needs molds?
I set up my larger candy casting on MDF and used drywall screws to hold it in place. I clamped this board down using the rails on the cutter. As you can see in the photo above, I set my material type to cast acrylic (though I'm sure glass would work), and used low pressure settings for the initial piercing. The plan was to cut a small square out of the larger block.
The initial piercing did end up fracturing the candy in two places, but the cut itself worked quite well. Next time I would pre-drill the initial piercing location, or pick a spot that's further from the edge of the piece.
The candy block was incredibly sticky after being immersed, and I realized that I had created a built-in welding system. I placed my cut piece on top of the original block, and overnight the two pieces fused wonderfully.
I continue to be amazed by how much working with sugar reminds me of working with glass. Even the two fractures look just like glass fractures.
Step 5: Hot Wire Part 1: Setting Up Transformer/rheostat Sytem and Embedding Wire in Casting


I was intrigued about how hard candy would behave when eroded by very localized heat, such as heat from a hot wire. After some searching online, I ordered this rheostat and transformer from Aircraft Spruce:
http://www.aircraftspruce.com/catalog/cmpages/hotw...
It comes with a schematic, but you need to supply your own plug (a 2-prong lamp plug works fine, as this system is not grounded). You also need your own hot wire. I ordered two gauges of stainless steel, also from Aircraft Spruce (0.025" and 0.041" diameter).
I soldered connectors to both my rheostat and transformer for the sake of versatility: you never know when you might want to re-use old electronic parts. I tested out my system on a 12" piece of 0.025" stainless steel, with good results. I learned not to use hot wire that's shorter than about 8" because it could short out the circuit, and that with this particular rheostat you need to turn the knob about a quarter turn to activate the voltage, then dial it back down to the desired setting. I went by the "feel" method--when the wire was too hot to keep my finger on it for more than a few seconds, it was at a good temperature. I then laser cut and glued a box to keep my electronic parts secured and insulated.
For my first experiment, I embedded the thicker gauge steel wire in a block of hard candy. I wove the wire in and out of the casting so that I could suspend the whole piece from the wire later. Then I plugged everything in and turned up the heat. Instantly, my piece thermal shocked. I could hear cracking sounds, and see fractures appear from the inside of the casting, right by the hot wire, to the nearest exterior surface. Still, the hot wire actually held the piece together. I watched the candy begin to sag and melt, slowly separating from the hot wire that was holding it up. When I could tell that it would fall at any moment, I stopped the experiment. This was a rather underwhelming trial, despite the initial drama. It seems that the rheostat really prevents the slow initial buildup of heat. For future iterations, I would not be able to embed wire inside the casting itself.
Step 6: Hot Wire Part 2: Balancing Sugar on Hot Wire


But there must be other ways to work with hot wire and hard candy. In this experiment, I laser cut an elliptical frame out of wood and added drywall screws along its circumference. I then stretched my thinner stainless steel wire between these screws, being careful not to let the wire cross over itself. If that happened, the voltage would follow the shortest path and likely short out. After elevating the frame and heating up the wire, I turned back the heat, gently placed a new candy block on top, and then (very slowly) brought the temperature back up. Over the course of about twenty-five minutes, the candy sagged through the hot wire. It looked like it was cutting through the candy, but appearances can be deceiving. In the last few moments, I held my hands under the candy to prevent it from shattering when the pieces fell through. But--to my complete surprise--when the candy block fell through, it remained in one piece. The "cut" pieces had fused themselves back together. It was a kind of Terminator moment: I had made self-healing candy. Plus, the cut lines refracted the light in beautiful, interesting ways. I can see many sculptural uses for this discovery, from time-intensive kinetic pieces that fall from ceiling to floor over the course of an opening to more static pieces that use the cut lines as a kind of drawing device.
Step 7: Adding Resin


For this trial, I made some light blue and caramelized sugar pieces, hand manipulated them, and placed them inside vacuum formed molds. I then filled the molds to the top with clear epoxy resin. When the resin cured, I cut each mold in half on our waterjet cutter with an organic curving line. This turned out to work quite well: the water slightly eroded the sugar, leaving interesting slots and negative spaces along the length of the cut on either side. I polished the exterior surfaces after de-molding my parts. I would definitely use this method on larger and more involved pieces in the future, keeping in mind that the larger the volume of the resin, the hotter it will get and the more likely it will melt the sugar into indistinguishable shapes. Also, if the waterjet cut were to erode most of the sugar away, so be it! The negative space would be interesting on its own, or it would be filled back again post-cut--maybe even with another material, like wax.
This piece is a good example of the sculptural balance between control and non-control: setting up a system and allowing the parts to behave according to their own physical parameters, intervening only when necessary;
Step 8: Car Parts!


After a day of gathering salvaged parts and other mechanical components, I decided to put car parts in a mold and fill the negative space with pure hard candy. Then, I would cut the piece into parts and investigate the material variation in the cross-sections. The idea turned out to be sound, but I didn't expect what actually ended up happening. This is the beauty, and frustration, of an experimental mindset.
I used wood clamps to keep my mold together, and added a combination of spray release and wood putty to seal the edges of my mold. I made a large batch of hard candy, added some yellow coloring, and poured it in the mold. After letting that cool overnight, I knocked the wooden sides off. I was pleased with the results: the car parts looked like they were embedded in amber, like some archaeological accident. I left the piece fused to the bottom part of the mold, so it would be easier to jig it on the Waterjet cutter later.
Step 9: Car Parts 2!


I built a customized jig to hold the part steady during the cut, which would be a sinuous curve. In the waterjet software I set the material to 3" of steel at a quality of 3, as I wanted to be conservative and ensure that the cut would go through completely. The cut took about two hours, and after the first fifteen minutes I began to worry about the warm water churning against the hard candy. This was a recipe for extensive erosion. Sure enough, as the minutes ticked by I saw my sugar disappearing more and more, but I could mostly only guess at what was really happening. I decided to be patient and wait it out.
When the cut was finally done, there were two major problems. The first was that the cut didn't actually go through completely in one area. However, it wouldn't have really mattered anyway, because almost all of the hard candy was gone. I was left with a strange and sticky still life. The piece worked well before I made the cut, but now, without the candy, it just looked like a ramshackle pile of parts. This unsuccessful trial taught me that resin would have to be my binder for anything that would be waterjet cut for expensive periods of time.
This period of extensive research, which took place during my residency at Pier 9, set me up to work with hard candy on a larger scale for future projects. I left with a much stronger understanding of how to control this medium (and how and when to relinquish control).
More sweet and sticky projects in the imminent future!


