

Introduction: NRF24L01 As Bluetooth Low Energy | Send Data to Mobile Using NRF24L01 | Using NRF As a Bluetooth Low Energy Module BLE Tutorial Arduino | Sending Sensor Data to Android Phone Using Arduino and NRF24L01 Over Bluetooth (BLE)


Here in this tutorial we will demonstrate how to send any data over BLE using nRF24L01.
How Bluetooth Low Energy (BLE) is different?
The BLE was adopted due to its power consumption features as it was able to run for an extended period of time using just a coin cell. Compared to other wireless standards, the rapid growth of BLE has gone further faster because of its phenomenal applications in smartphones, tablets, and mobile computing.
BLE Capability of NRF24L01 Module :
BLE uses the same 2.4 GHz ISM band with baud rate from 250Kbps to 2Mbps which is allowed in many countries and can be applied to industrial and medical applications. The Band starts at 2400 MHz to 2483.5 MHz and it is the divided into 40 channels. Three of these channels are known as ‘Advertising’ and are used by devices to send advertising packets with information about them so other BLE devices can connect. These channels were initially selected at the lower upper of the band and middle of the band to avoid interference which can possibly interfere with a number of channels. To learn more about BLE, follow this tutorial.
This tutorial will explain how to use NRF24L01 module as BLE transceiver. Today the BLE functionality of this module will be explained by sending sensor data to a smart phone. Here this nRF24L01 module will be interfaced with Arduino Microcontroller and the data will be sent to official Nordic BLE android application.
Supplies
buy nrf24l01 :
https://www.banggood.in/3Pcs-NRF24L01-SI24R1-2_4G-...
https://www.banggood.in/NRF24L01-SI24R1-2_4G-Wirel...
https://www.banggood.in/5Pcs-NRF24L01-SI24R1-2_4G-...
buy arduino uno : https://www.banggood.in/Wholesale-Geekcreit-UNO-R...
https://www.banggood.in/3Pcs-UNO-R3-ATmega16U2-AV...
https://www.banggood.in/Wholesale-Geekcreit-UNO-R...
buy jumper wires : https://www.banggood.in/120pcs-20cm-Male-To-Femal...
https://www.banggood.in/40pcs-20cm-Male-To-Female...
https://www.banggood.in/120pcs-20cm-Male-To-Femal...
https://www.banggood.in/40pcs-10cm-Male-To-Male-J...
https://www.banggood.in/120pcs-20cm-Male-To-Femal...
https://www.banggood.in/40pcs-10cm-Female-To-Fema...
https://www.banggood.in/120pcs-20cm-Male-To-Femal...
Buy Arduino starter kit:
https://www.banggood.in/Geekcreit-UNOR3-Basic-Star...
https://www.banggood.in/Geekcreit-Mega-2560-The-Mo...
https://www.banggood.in/Geekcreit-UNO-R3-Basic-Lea...
Sensor Kits :
https://www.banggood.in/Geekcreit-37-In-1-Sensor-M...
https://www.banggood.in/45-IN-137-IN-1-Sensor-Modu...
_____________________________________________
Step 1: About NRF24L01 Module

The nRF24L01 modules are transceiver modules, meaning each module can both send and receive data but since they are half-duplex they can either send or receive data at a time. The module has the generic nRF24L01 IC from Nordic semi-conductors which is responsible for transmission and reception of data. The IC communicates using the SPI protocol and hence can be easily interfaced with any microcontrollers. It gets a lot easier with Arduino since the libraries are readily available.
The module has on operating voltage from 1.9V to 3.6V (typically 3.3V) and consumes very less current of only 12mA during normal operation which makes it battery efficient and hence can even run on coin cells. Even though the operating voltage is 3.3V most of the pins are 5V tolerant and hence can be directly interfaced with 5V microcontrollers like Arduino. Another advantage of using these modules is that, each module has 6 Pipelines. Meaning, each module can communicate with 6 other modules to transmit or receive data. This makes the module suitable for creating star or mesh networks in IoT applications. Also they have a wide address range of 125 unique ID’s, hence in a closed area we can use 125 of these modules without interfering with each other.
Step 2: Connections
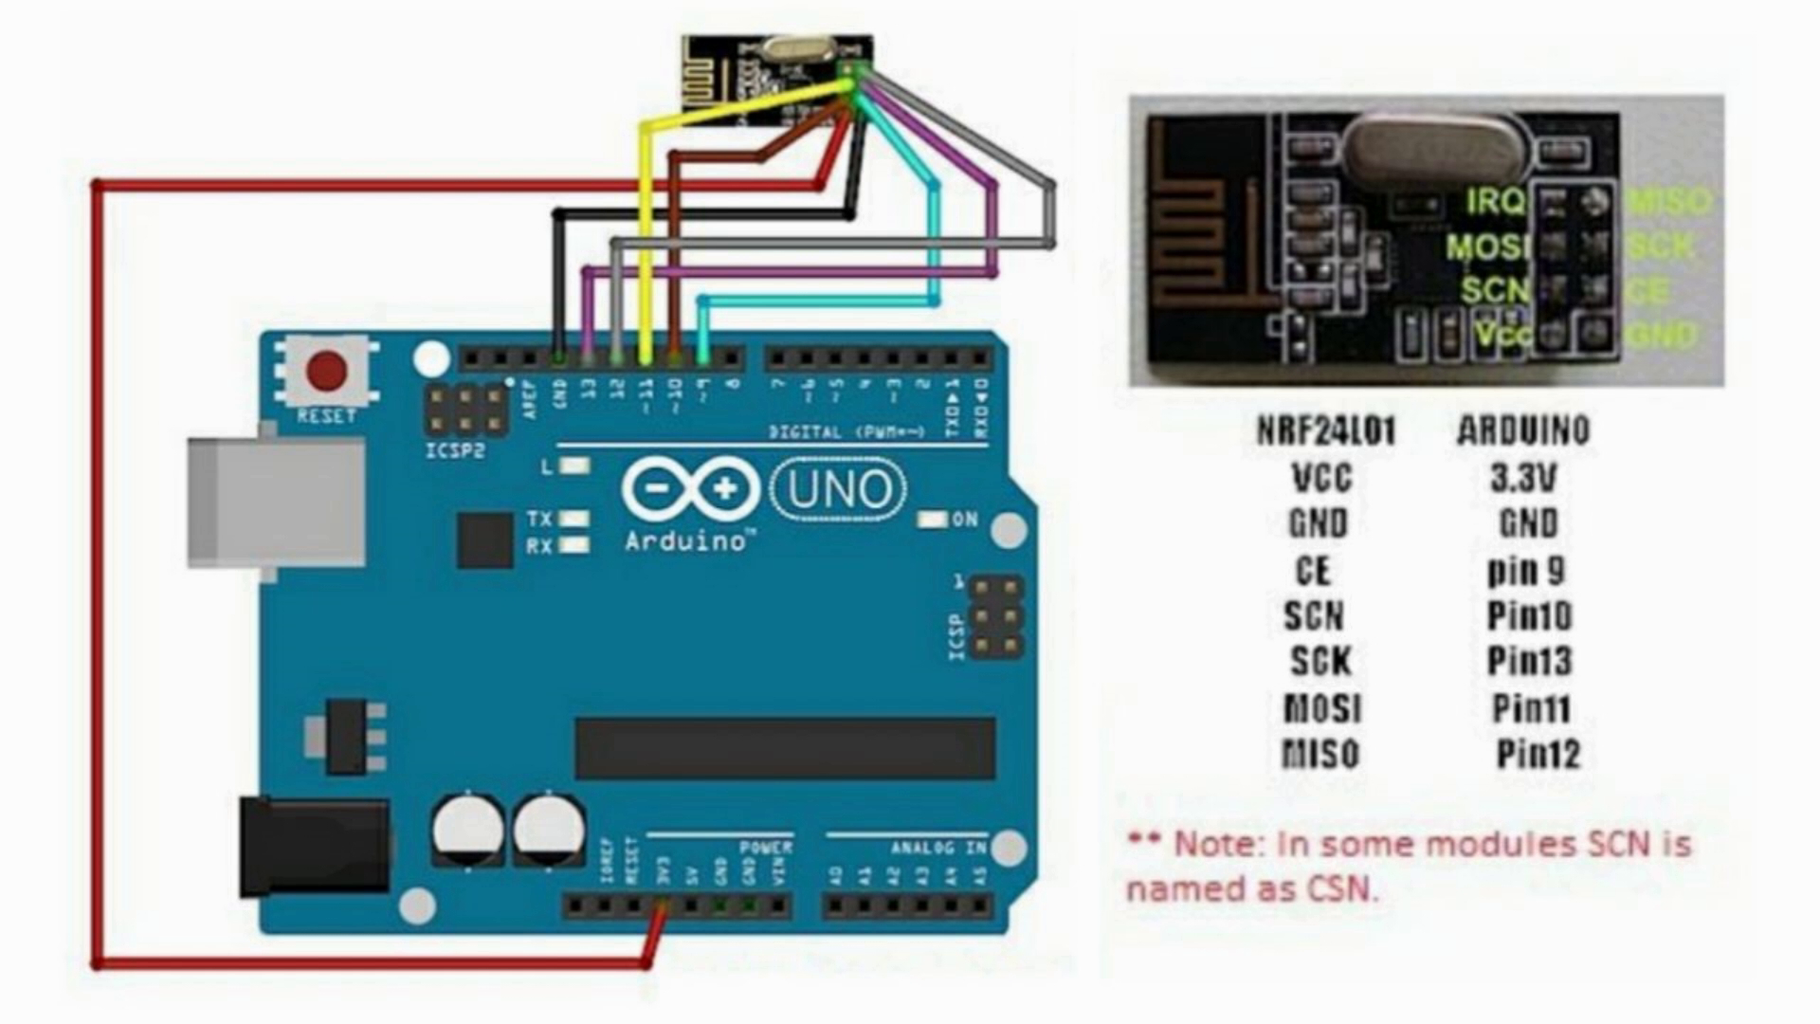
Arduino NRF24L01 Module Circuit Diagram :
the Arduino NRF24L01 Module Circuit Diagram is attached please connect everything accordingly.
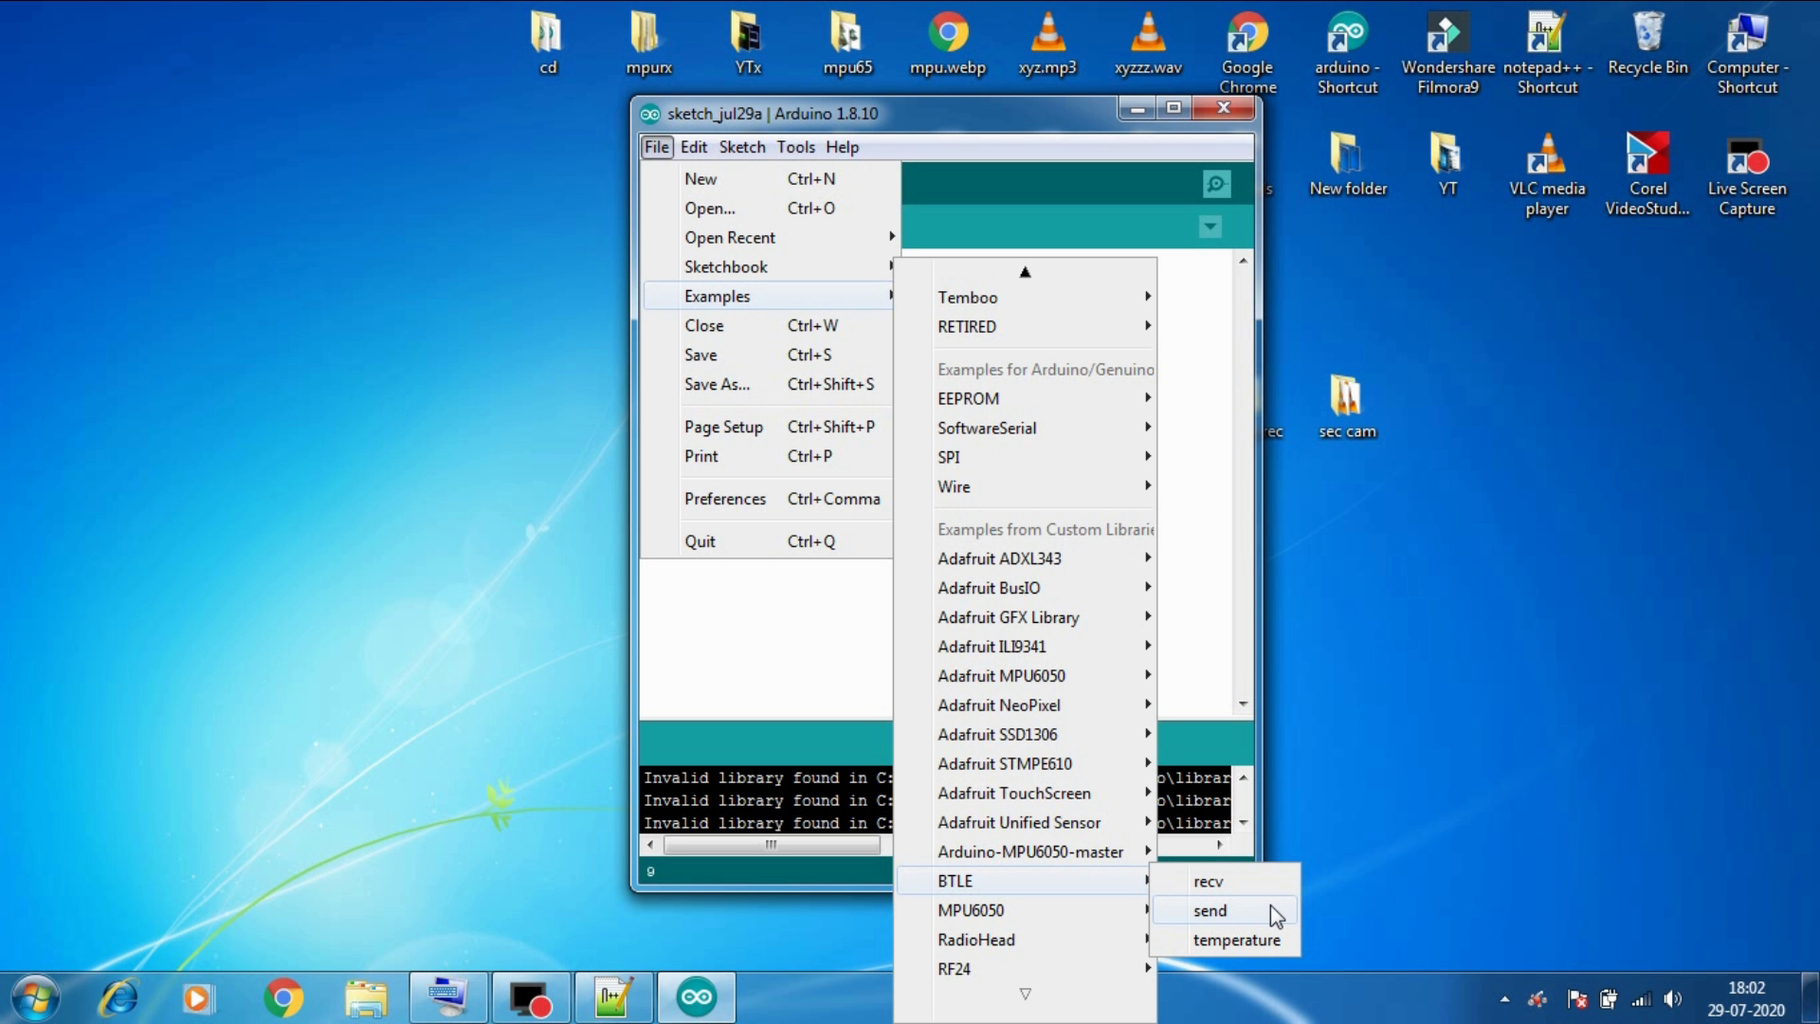
Step 3: Install Libraries in Arduino IDE


please install RF24 and BLTE library from Arduino Library manager as shown in above images.
Step 4: Download NRF App

please download the NRF connect for mobile app.
Step 5: Send Data Over BLE Using Send Example
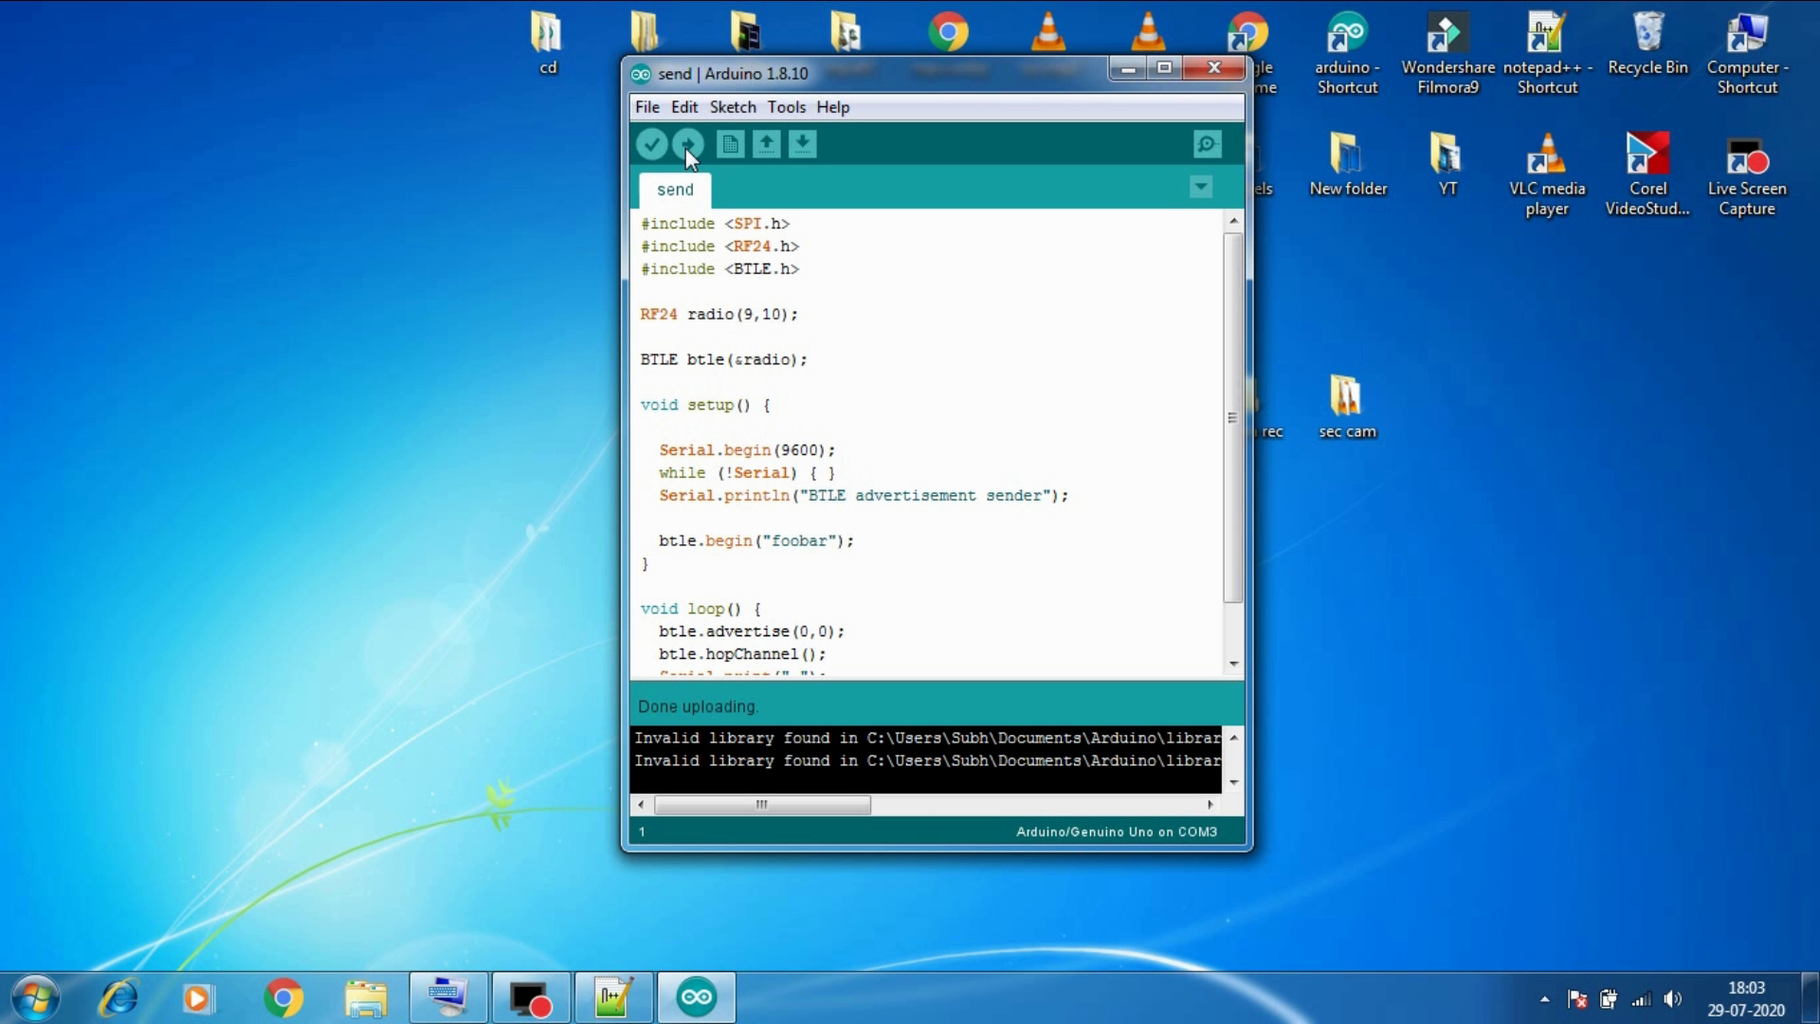

now go to send example under BTLE library as shown in image and upload it to arduino then open your NRF App and you will see your device named as Foobar.
but its not sending a data in this moment so we will add the data to it in the next step.
Step 6: Modify Send Example to Send Data Over BLE


please copy the below modified code and upload it :
#include "SPI.h"
#include "RF24.h"
#include "BTLE.h"
RF24 radio(9,10);
BTLE btle(&radio);
void setup() {
Serial.begin(9600);
while (!Serial) { }
Serial.println("BTLE advertisement sender");
btle.begin("foobar");
}
void loop() {
float temp=30;
nrf_service_data buf;
//buf.service_uuid = NRF_DEVICE_INFORMATION_SERVICE_UUID; //0x180A
buf.service_uuid = NRF_TEMPERATURE_SERVICE_UUID; //0x1809
//buf.service_uuid =NRF_BATTERY_SERVICE_UUID; //0x180F
buf.value = BTLE::to_nRF_Float(temp);
btle.advertise(0x16, &buf, sizeof(buf));
//btle.advertise(0,0);
btle.hopChannel();
Serial.print(".");
}
after uploading of code you can see that in NRF App now we can read our temperature data as 30C as we sent it and even we can attach our temperature sensor and send the real time temperature data over BLE (Bluetooth Low Energy).
so thats all guys if you want some detailed explanation or want to learn more on please watch this video.
and i will take this a little further so if you want to next few videos about it please go to my youtube channel and subscribe it , i will make some mroe videos on NRF as BLE and few more projects on that as well.
Thank you.


