

Introduction: Servo Controlled Time-Lapse Camera


For our HAB mission, we created a servo controlled camera running on a RasPi Zero and using xChips to control/drive a servo.
Step 1: Things Used in This Project
Hardware components
- Raspberry Pi Zero x 1
Get the newer version that has a camera interface. And make sure you got a Micro-USB cable to connect the Pi to your computer - XinaBox BR03 x 1
- XinaBox OC05 - Servo Driver x 1
- XinaBox XC10 x 1
- XinaBox MD01 x 1
Really just a spacer to mount the servo on, so very optional. - Raspberry Pi Camera Module x 1
Remember to get the narrower flat cable that fits the RasPi Zero - 3.7v LiPo battery (generic) x 1
- Servos (Tower Pro MG996R) x 1
Any small servo with standard 2.54 mm 3 pin header cable, and mounting gear (nuts/bolts, rubber bands, cable ties, glue, or what ever is your preference)
Software apps and online services
- Raspberry Pi Raspbian Lite
- Balena Etcher
- XinaBox OC05 Servo Driver
Step 2: Story
Using the RasPi Zero with the PIcamera, a Servo and the OC05 Servo Driver/Controller, you can shoot a panning time-lapse video.
Step 3: Preparing the SD Card for the Rasperry Pi Zero
- Download Raspbian Lite and unzip
- Download Etcher and install
- Flash Raspbian Lite to a Micro-SD card using Etcher
- Open your terminal and go to the root of the SD Card
cd /Volumes/boot
echo 'dtoverlay=dwc2' >> config.txt
touch ssh
echo -n ' modules-load=dwc2,g_ether' >> cmdline.txt
The last 3 lines set up the RasPi Zero (and only the Zero) to be able to network via the USB port. Just verify that the last line has no newline before ' modules...' in cmdline.txt!
- Eject the SD Card
- Assemble everything as per this video:
- Connect USB Cable between your RasPi Zero and your computer.
- Either use a Mac or install Bonjour to SSH to your RasPi Zero: ssh pi@raspberrypi.local
- Password is raspberry
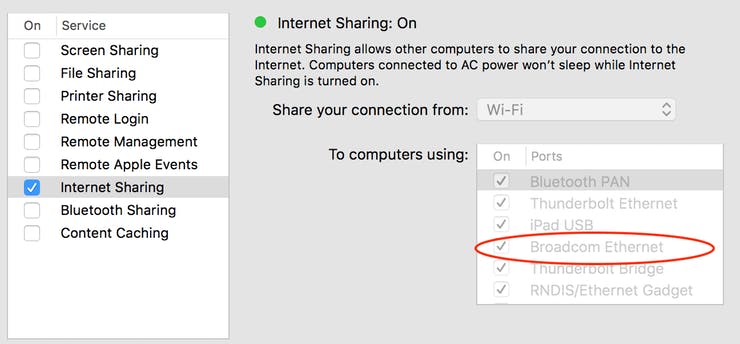
- Finally setup internet sharing on your computer allowing Broadcom Ethernet to connect to your WiFi via your computer.
Step 4: Configuring the Raspberry Pi Zero
sudo raspi-config nonint do_expand_rootfs
sudo raspi-config nonint do_i2c 0
sudo raspi-config nonint do_camera 0
sudo apt-get install vim python-smbus i2c-tools
sudo apt-get install python-picamera python3-picamera
sudo reboot
- The first 3 lines makes full use of your SD card, activates I2C for the servo controller and activates the PIcamera.
- Then I2C tools are getting installed and then PIcamera drivers.
- Then reboot to make the changes take effect.
- Login again.
- Test the connection to your servo controller, and if everything is fine you should see this:
pi@raspberrypi:~ $
    0  1  2  3  4  5  6  7  8  9  a  b  c  d  e  f
00:          -- -- -- -- -- -- -- -- -- -- -- -- --
10: -- -- -- -- -- -- -- -- -- -- -- -- -- -- -- --
20: -- -- -- -- -- -- -- -- -- -- -- -- -- -- -- --
30: -- -- -- -- -- -- -- -- -- -- -- -- -- -- -- --
40: -- -- -- -- -- -- -- -- -- -- -- -- -- -- -- --
50: -- -- -- -- -- -- -- -- -- -- -- -- -- -- -- --
60: -- -- -- -- -- -- -- -- -- -- -- -- -- -- -- --
70: 70 -- -- -- -- -- -- --
Step 5: Install OC05 Servo Driver
cd ~

git clone https://github.com/xinabox/rpOC05.git</a>
cd rpOC05

sudo python setup.py install
This will install the Servo Driver library, once installed, test by:
cd examples
python simpletest
Step 6: Program
- Copy and Paste the code below into xservo.py.
- Create a frames directory
cd ~
mkdir frames
python xservo.py
It should now start taking pictures and store them in frames.
Step 7: Extra Steps
- You can have the program run automatically by crontab -e
- And then write at the bottom of the file: @reboot python /home/pi/xservo.py
- Once your shoot is finished, you can copy the pictures to your computer. I use scp
- And then I use convert from ImageMagick, like this: convert -quality 100 frames*.jpg outputfile.mpeg
Step 8: Code
servo.py Python
from __future__ import division
import time
from datetime import datetime<br>import rpOC05
import picamera

pwm = rpOC05.PCA9685()

servo_min = 150  # Min pulse length out of 4096
servo_max = 500  # Max pulse length out of 4096
i = servo_max + 10
chan = 8
filename = 'frames/frame-%s.jpg'
pwm.set_pwm_freq(50)
# signal ready with a wave
pwm.set_pwm(chan, 0, servo_min)
time.sleep(1)
pwm.set_pwm(chan, 0, servo_max)
time.sleep(1)

print('Time-Lapse Running...')
while True:
  if i > servo_max:
    i = servo_min

  pwm.set_pwm(chan, 0, i)
  with picamera.PiCamera(resolution=(1920,1080)) as cam:
    ts = str(datetime.utcnow())
    cam.capture(filename % ts,quality=90,thumbnail=None)
  # time-lapse interval in seconds.
  time.sleep(0.1)
  i += 1


